I still remember the day I almost threw a mixing bowl across the kitchen. It was a sticky Sunday afternoon, the kind where the air feels like warm honey, and I’d promised my niece a “turtle something-or-other” for her birthday. My first attempt at a from-scratch turtle cake emerged from the oven looking like a chocolate Frisbee with pecan dandruff. The caramel seized into a jaw-breaking ribbon. The kitchen smelled like burnt sugar and regret. I stood there, frosting melting down my forearm, wondering why no one ever tells you that caramel can smell like failure.
Fast-forward through three grocery runs, two frantic calls to my mom, and one teary FaceTime with a cousin in Houston who swore by boxed cake mix and a wooden spoon. That phone call changed everything. She introduced me to the glorious madness of poke cakes—those retro wonders where you stab warm sponge with the back of a spoon and flood the holes with something sinful. We fused her grandmother’s Texas sheet-cake trick with the turtle flavor profile I was chasing: deep chocolate, buttery caramel, toasted pecans, and that faint saltiness that makes your tongue tingle. The result? A dessert so outrageously moist it practically sighs when you slice it, with rivers of caramel running through each bite like edible lava lamps.
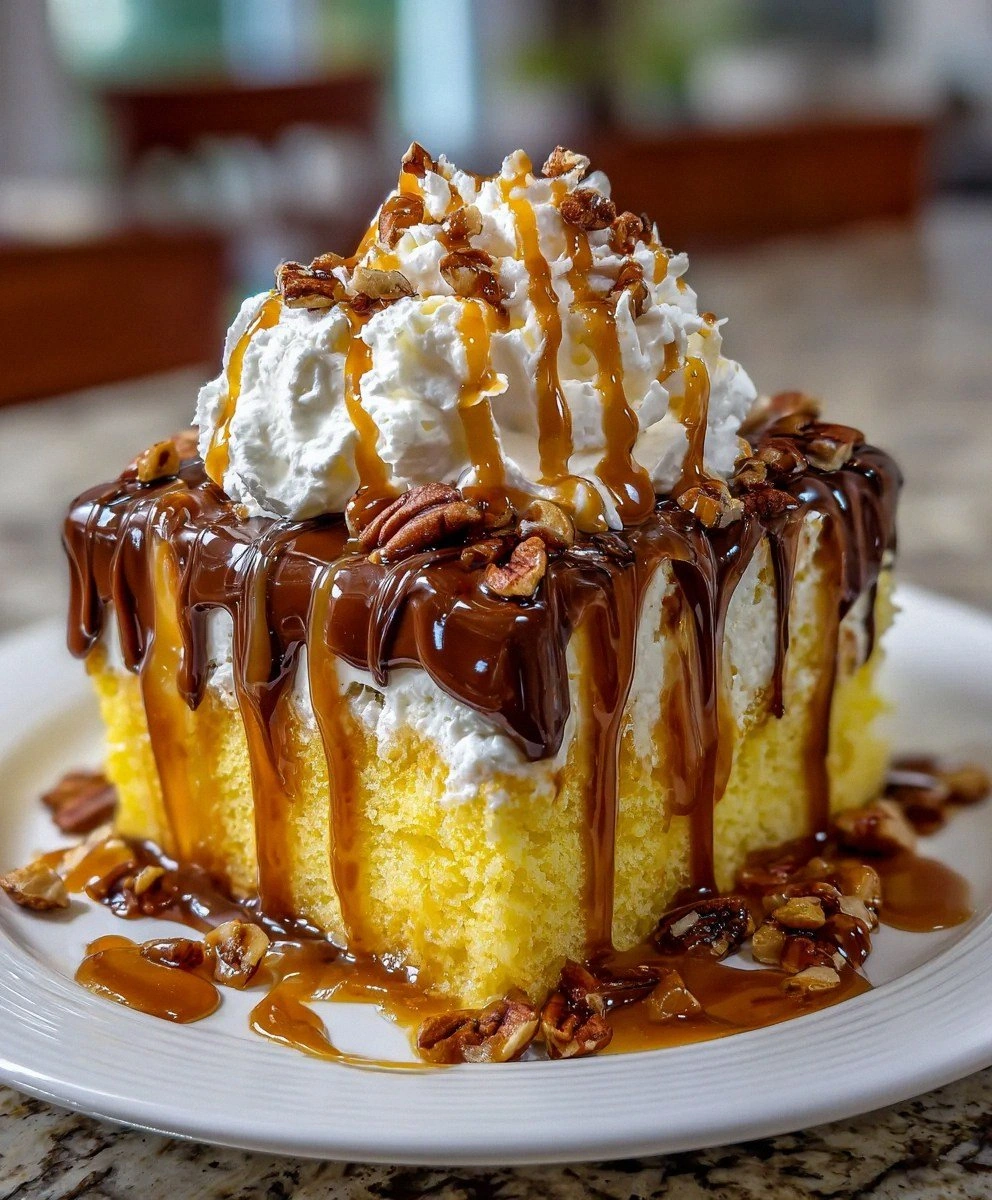
This Turtle Poke Cake is the love child of desperation and serendipity. It uses humble pantry staples—yes, the yellow cake mix you pretend not to see in your cart—but tastes like something you’d pay seven dollars a slice for at that boutique bakery next to the yoga studio. The secret isn’t fancy chocolate or hand-harvested salt; it’s the order of operations and a few tiny, rebellious tweaks that make the flavors sing in perfect three-part harmony. Picture this: a fluffy golden cake, pierced and soaked with a caramel-condensed-milk elixir, slathered in glossy fudge frosting, crowned with clouds of Cool Whip, and showered with pecans that toast themselves while the cake bakes. One forkful and you’ll understand why my neighbor threatened to name her cat after me.
Let me walk you through every single step—by the end, you’ll wonder how you ever made it any other way.
What Makes This Version Stand Out
- Moisture Overload: Most poke cakes stop at one liquid layer. We double down—caramel and sweetened condensed milk—so every crumb stays impossibly lush for days. I dare you to taste this and not go back for seconds.
- Texture Tornado: You get velvet from the cake, silk from the sauces, crunch from the pecans, and airy lift from the whipped topping. It’s like a symphony where every instrument solos at once, yet somehow it works.
- Zero Skill Required: If you can operate a fork, you can master this dessert. No candy thermometers, no French techniques, no praying to the meringue gods. Just honest-to-goodness dump, stir, poke, chill.
- Make-Ahead Magic: This cake actually improves after a night in the fridge. The flavors elope, the sugars mellow, and the whole thing sets into sliceable cohesion. Bring it to a potluck and bask in the applause while knowing you slept in.
- Crowd Confession: I’ll be honest—I ate half the batch before anyone else got to try it. My excuse was “quality control,” but really I was powerless against the siren song of caramel pooling in the corners.
- Pantry Flexibility: Out of pecans? Use toasted sunflower seeds for nut-free crunch. Only have chocolate syrup? It’ll still drizzle like a dream. This recipe bends so you don’t break.
Alright, let’s break down exactly what goes into this masterpiece...
Inside the Ingredient List
The Flavor Base
Yellow cake mix is the sleeper hit here. Before you scoff, hear me out: it’s engineered for consistent crumb and reliable sweetness, which means you can focus razzle-dazzle energy on the toppings. The eggs act like little scaffolding crews, propping up air bubbles so the cake doesn’t collapse under the weight of all that sauce. Room-temperature water isn’t negotiable—cold water causes the batter to seize, leaving rogue lumps that bake into rubbery pebbles. Canola oil keeps the crumb tender without shouting its presence; if you want a richer vibe, swap in melted butter but expect a slightly denser bite.
The Texture Crew
Caramel sauce is the mischievous sibling who insists on sliding down every hole you create. Go thick if you want distinct ribbons, thin if you prefer an all-over soak. Sweetened condensed milk is the secret weapon pastry chefs hoard—it’s milk with 60 percent of the water removed and sugar added, which means it hugs the cake fibers and never lets go. Together they form a sticky union that keeps leftovers fork-moist through three presidential administrations. If you’re feeling spunky, stir a pinch of flaky salt into the caramel first; the sweet-salty pop will make grown adults close their eyes in reverence.
The Unexpected Star
Chocolate fudge frosting straight from the can might feel like cheating, but trust me, it’s the silk-lined overcoat that holds the whole operation together. When it hits the warm cake, it relaxes slightly, bonding with the caramel layer and creating a marbled effect that looks artisanal even if you applied it with a plastic knife while binge-watching reality television. Cool Whip gets a bad rap from the culinary snobs, yet its stabilized structure means you can assemble this dessert on a humid July afternoon and it won’t weep into a puddle before dinner. If you absolutely must use real whipped cream, stabilize it with a teaspoon of cream cheese whipped in—your future self slicing tidy squares will thank you.
The Final Flourish
Chopped pecans toast themselves ever-so-slightly against the frosting, releasing oils that perfume the entire pan. Buy them from the bulk bin so you know they’re fresh; rancid nuts will hijack the whole dessert with a bitter aftertaste that no amount of caramel can mask. As for the finishing sauces, quality matters more than quantity—one restrained swirl of good chocolate sauce beats a gallon of the waxy stuff. Heat the sauces for five seconds, then flick your wrist like Jackson Pollock; the thin streams solidify into glossy threads that shatter delicately under the fork.
Everything’s prepped? Good. Let’s get into the real action...
The Method — Step by Step
- Preheat your oven to 350 °F (175 °C). Grease a 9-by-13-inch pan with non-stick spray, then lay a parchment sling so the paper hangs over the two long sides like sad puppy ears. This sling will let you lift the finished cake out cleanly, ensuring your first slice looks magazine-worthy instead of mangled. Most recipes get this completely wrong and tell you to just grease the pan—here’s what actually works. The parchment also protects the bottom from over-browning, because nobody wants a crust that tastes like bitter toast.
- Dump the yellow cake mix into a large bowl. Add the eggs, room-temperature water, and canola oil. Use a handheld mixer on medium for two minutes, scraping the bowl once. The batter should look glossy and slightly thicker than pancake batter; if it’s runny, your mix was old and thirsty, so beat in another tablespoon of flour. This step isn’t just about combining—mixing aerates the batter so the cake rises evenly instead of doming like a baseball cap.
- Pour the batter into the prepared pan and shimmy it side-to-side to level. Rap the pan on the counter once to pop hidden air bubbles. Slide onto the middle rack and bake 25–30 minutes, rotating at the 15-minute mark for even color. You’ll know it’s done when the edges pull away slightly, the top springs back when poked, and a toothpick comes out with a few moist crumbs. Your kitchen should smell like vanilla and golden childhood memories by now.
- The moment the cake comes out, grab a wooden spoon handle. Okay, ready for the game-changer? Poke holes an inch apart, pushing all the way to the bottom but not tearing through. Twist the handle slightly as you lift to create tidy tunnels. This next part? Pure magic. Stir together the caramel sauce and sweetened condensed milk; microwave 10 seconds so it pours like warm honey. Slowly drizzle the mixture over the cake, aiming for the holes first, then the surface. Watch it disappear like thirsty ground after a rainstorm.
- Let the cake cool for 15 minutes so the liquid sets but the chocolate will still spread easily. Crack open the fudge frosting, pop off the foil seal, and microwave the whole tub for 15 seconds. This loosens it just enough to schmear without tearing the cake surface. Dollop frosting in big clouds, then coax it edge-to-edge with an offset spatula. The warmth of the cake will melt the underside slightly, fusing with the caramel to create a marbled underworld that tastes like a candy bar’s daydream.
- Scatter the chopped pecans while the frosting is still tacky so they adhere like shy party guests clinging to the wall. Press gently with your palm to nestle them in. The residual heat will toast the nuts just enough to unlock their buttery aroma without risking a burnt bite. Step back and admire the topography: glossy ridges, nutty foothills, and those inviting crevices promising hidden treasure.
- Refrigerate uncovered for 30 minutes so the layers firm up. This short chill sets the sauces and prevents the Cool Whip from sliding into a white avalanche later. While you wait, rinse your spatula and sneak the frosting remnants on graham crackers—you’ve earned a baker’s treat. The fridge will hum quietly, doing the heavy lifting while you scroll social media or fold laundry like the multitasking legend you are.
- Spread the Cool Whip in swooshes, leaving a one-inch border so the chocolate peeks out like a flirty petticoat. Use the back of a spoon to create whimsical ridges that catch the drizzle. For the grand finale, warm the chocolate and caramel sauces for five seconds, then flick them in opposite directions over the surface. Channel your inner barista doing latte art; the thin lines solidify into ribbons that crack delicately under the fork, releasing a puff of cocoa aroma.
- Cover with plastic wrap—press it directly against the whipped topping so it doesn’t form a sad skin—and chill at least two hours or up to three days. The flavors meld like old college roommates reuniting: chaotic at first, then inseparable. Picture yourself pulling this out of the oven, the whole kitchen smelling incredible, only it’s the fridge that’s doing the aromatic heavy lifting now. When ready to serve, lift the sling, cut with a long knife dipped in hot water, and wipe between slices for café-level presentation.
That's it—you did it. But hold on, I've got a few more tricks that'll take this to another level...
Insider Tricks for Flawless Results
The Temperature Rule Nobody Follows
Room-temperature isn’t just a snooty baker’s preference; it’s the difference between a batter that emulsifies into silky unity and one that curdles like sulky cottage cheese. Cold eggs shock the oil, causing microscopic beads that bake into tough pockets. Pop the eggs (still in shell) into a mug of lukewarm tap water for five minutes while you gather the rest. Your future self slicing tender squares will write you thank-you notes.
Why Your Nose Knows Best
Ignore the timer snobs—your oven is as unique as your fingerprint. Start sniffing at the 22-minute mark; when the aroma blooms like warm vanilla candles, peek through the door. If the center jiggles like a baby’s cheek, give it three more minutes. If it’s set but springs back, yank it out immediately. Over-baking is the silent killer of poke cakes because the sponge needs enough stamina to soak sauce without collapsing.
The 5-Minute Rest That Changes Everything
After you drizzle the caramel, walk away for five minutes and let gravity do the initial wave. Then come back with a spatula and coax any pooled liquid back over the surface. This second pass ensures every bite is baptized in sweetness, not just the lucky holes. A friend tried skipping this step once—let’s just say it didn’t end well, and her guests fought over the soggy edges like seagulls over French fries.
Plastic Wrap Sorcery
Press the wrap directly onto the Cool Whip, but leave one corner lifted like a tiny tent vent. This prevents condensation from dripping back and watering down your beautiful ridges. If you’re transporting to a party, slide a few marshmallows under the tent—they act like edible desiccants, soaking up rogue moisture so your artistry stays pristine.
Creative Twists and Variations
This recipe is a playground. Here are some of my favorite ways to switch things up:
Salted Mocha Turtle
Whisk two teaspoons of espresso powder into the caramel sauce before pouring. The coffee amplifies the chocolate notes while the salt balances sweetness. Swap the pecans for chopped smoked almonds and finish with a dusting of flaky sea salt. Coffee addicts will form a cult around you.
Bananas-Foster Poke
Replace half the water in the cake mix with ripe mashed banana. Use butter-pecan ice cream topping instead of plain caramel, and crown with brûléed banana coins. Light it on fire tableside if you want to feel like a 1980s cruise-ship maître d’.
White-Chocolate Raspberry
Substitute white cake mix, raspberry jam thinned with Chambord for the poke liquid, and white chocolate pudding for the frosting layer. Drizzle with ruby chocolate ganache and fresh berries. It’s like springtime in dessert form—perfect for baby showers or anytime you need a pink pick-me-up.
Peanut-Butter Cup
Beat a half-cup of creamy peanut butter into the condensed milk before pouring. Use chocolate cake mix instead of yellow, and top with chopped peanut-butter cups. The result tastes like a Buckeye bar went swimming in caramel—Ohioans will propose marriage.
Spicy Mexican Chocolate
Add a quarter-teaspoon of cayenne and a teaspoon of cinnamon to the dry cake mix. Use dulce de leche for the poke liquid and finish with a chocolate-chili sauce. The heat sneaks up like a fiesta piñata—unexpected but delightful.
Coconut-Rum Dream
Replace two tablespoons of water with white rum. Use coconut milk sweetened condensed milk (yes, it’s a thing) and top with toasted coconut flakes. Serve chilled with a tiny cocktail umbrella because adulthood deserves whimsy.
Storing and Bringing It Back to Life
Fridge Storage
Wrap the pan tightly in plastic, then foil, and park it on the top shelf where the temperature is coldest. It keeps four days without textural decline, but good luck making it last that long. If the edges dry, shave off a thin strip and call it “chef’s snack”—no one needs to know.
Freezer Friendly
Cut the chilled cake into squares, set them on a parchment-lined sheet, and freeze until solid. Transfer to a zip bag with parchment between layers; they’ll keep two months. Thaw overnight in the fridge or 30 minutes on the counter. The sauces stay pudding-soft, and the whipped topping doesn’t weep because it’s stabilized by the frosting underneath.
Best Reheating Method
Room-temperature cake is dreamy, but if you like the contrast of cold topping against warm cake, microwave a slice for eight seconds. Add a tiny splash of water before reheating—it steams back to perfection without drying the crumb. Top with fresh Cool Whip and a quick drizzle for that just-made glamour.