Picture this: a Saturday night, the kitchen is a battlefield of half‑baked attempts, and the fridge is echoing with the faint hum of a forgotten ice cream maker. I was halfway through a disastrous attempt at a chocolate‑chip cookie crust, when my roommate dared me to “make something that actually tastes like a peanut butter dream.” I laughed, I rolled my eyes, and I whispered, “Challenge accepted.” The result? The best easy peanut butter pi that has since become the unofficial dessert anthem of every gathering I host. This pie isn’t just a sweet treat; it’s a memory‑maker, a conversation starter, and a literal crowd‑pleaser that will have everyone reaching for seconds.
The moment you open the oven door, the aroma of toasted Oreo crumbs mingles with the buttery richness of melted butter, creating a scent that is at once nostalgic and intoxicating. Imagine the buttery crust cracking just enough to reveal a silky, creamy filling that clings to your fork like velvet, while the peanut butter flavor hits you with the comforting hug of a childhood favorite. The texture is a perfect duet: a buttery, slightly crunchy base supporting a smooth, airy topping that whispers of whipped cream and peanut butter bliss. And the taste? It’s a balanced symphony of sweet, salty, and nutty notes that dance across your palate, leaving you in a state of blissful disbelief.
Most recipes get this completely wrong. They either skimp on the crust, over‑sweeten the filling, or forget the crucial step of letting the pie set properly. Here’s what actually works: a crust made from crushed Oreos and butter that holds together without crumbling, a filling that blends cream cheese, peanut butter, and sugar into a luscious, stable base, and a generous fold of whipped topping that lifts the whole thing into cloud‑nine territory. I’ll be honest — I ate half the batch before anyone else got to try it, and that’s a testament to how addictive this pie truly is.
And now the fun part. I’m about to reveal a technique that most home bakers overlook: a quick chill of the crust before adding the filling, which locks in the buttery flavor and prevents sogginess. This tiny step transforms the whole pie from “good” to “hands down the best version you’ll ever make at home.” I dare you to taste this and not go back for seconds. Okay, ready for the game‑changer? Let me walk you through every single step — by the end, you’ll wonder how you ever made it any other way.
What Makes This Version Stand Out
- Flavor: The combination of creamy peanut butter and tangy cream cheese creates a depth that rivals any store‑bought dessert.
- Texture: A buttery Oreo crust that stays crisp, paired with a light, airy filling that melts in your mouth.
- Simplicity: No oven required for the filling, just a few minutes of mixing and a quick chill.
- Uniqueness: The use of whipped topping adds a fluffy lift, making the pie feel like a cloud of peanut butter.
- Crowd Reaction: Guests often claim they’ve never tasted anything like it, leading to endless requests for seconds.
- Ingredient Quality: Premium peanut butter and real Oreo cookies give the pie an authentic, indulgent flavor.
- Method: The crust is baked just enough to set, while the filling stays cool, preserving that fresh‑made feel.
- Make‑Ahead Potential: This pie can be prepared a day ahead, allowing flavors to meld perfectly.
Inside the Ingredient List
The Flavor Base
Peanut Butter: This is the star of the show, providing that rich, nutty depth that defines the pie. Use a natural, unsweetened variety for the purest flavor; if you prefer a sweeter profile, a creamy salted peanut butter works wonders. Skipping it would leave the filling flat and unrecognizable, turning the pie into a generic cream cheese dessert.
The Texture Crew
Cream Cheese: The cream cheese adds tang and structure, balancing the sweetness of the sugar and the richness of the peanut butter. A full‑fat block yields the smoothest texture, while low‑fat versions can become grainy. If you omit it, the filling loses its firm yet creamy consistency, becoming overly soft.
Whipped Topping: This ingredient lightens the filling, giving it that airy, cloud‑like finish. It folds in gently, preserving air bubbles that keep each bite fluffy. Substituting heavy cream will give you a denser texture, so stick with the whipped topping for that signature lift.
The Unexpected Star
Sugar: A modest amount of granulated sugar sweetens the pie without overwhelming the natural peanut butter flavor. It also helps stabilize the cream cheese, ensuring the filling sets properly. Leaving it out would make the pie taste too bland, missing that essential sweet‑salty balance.
The Final Flourish
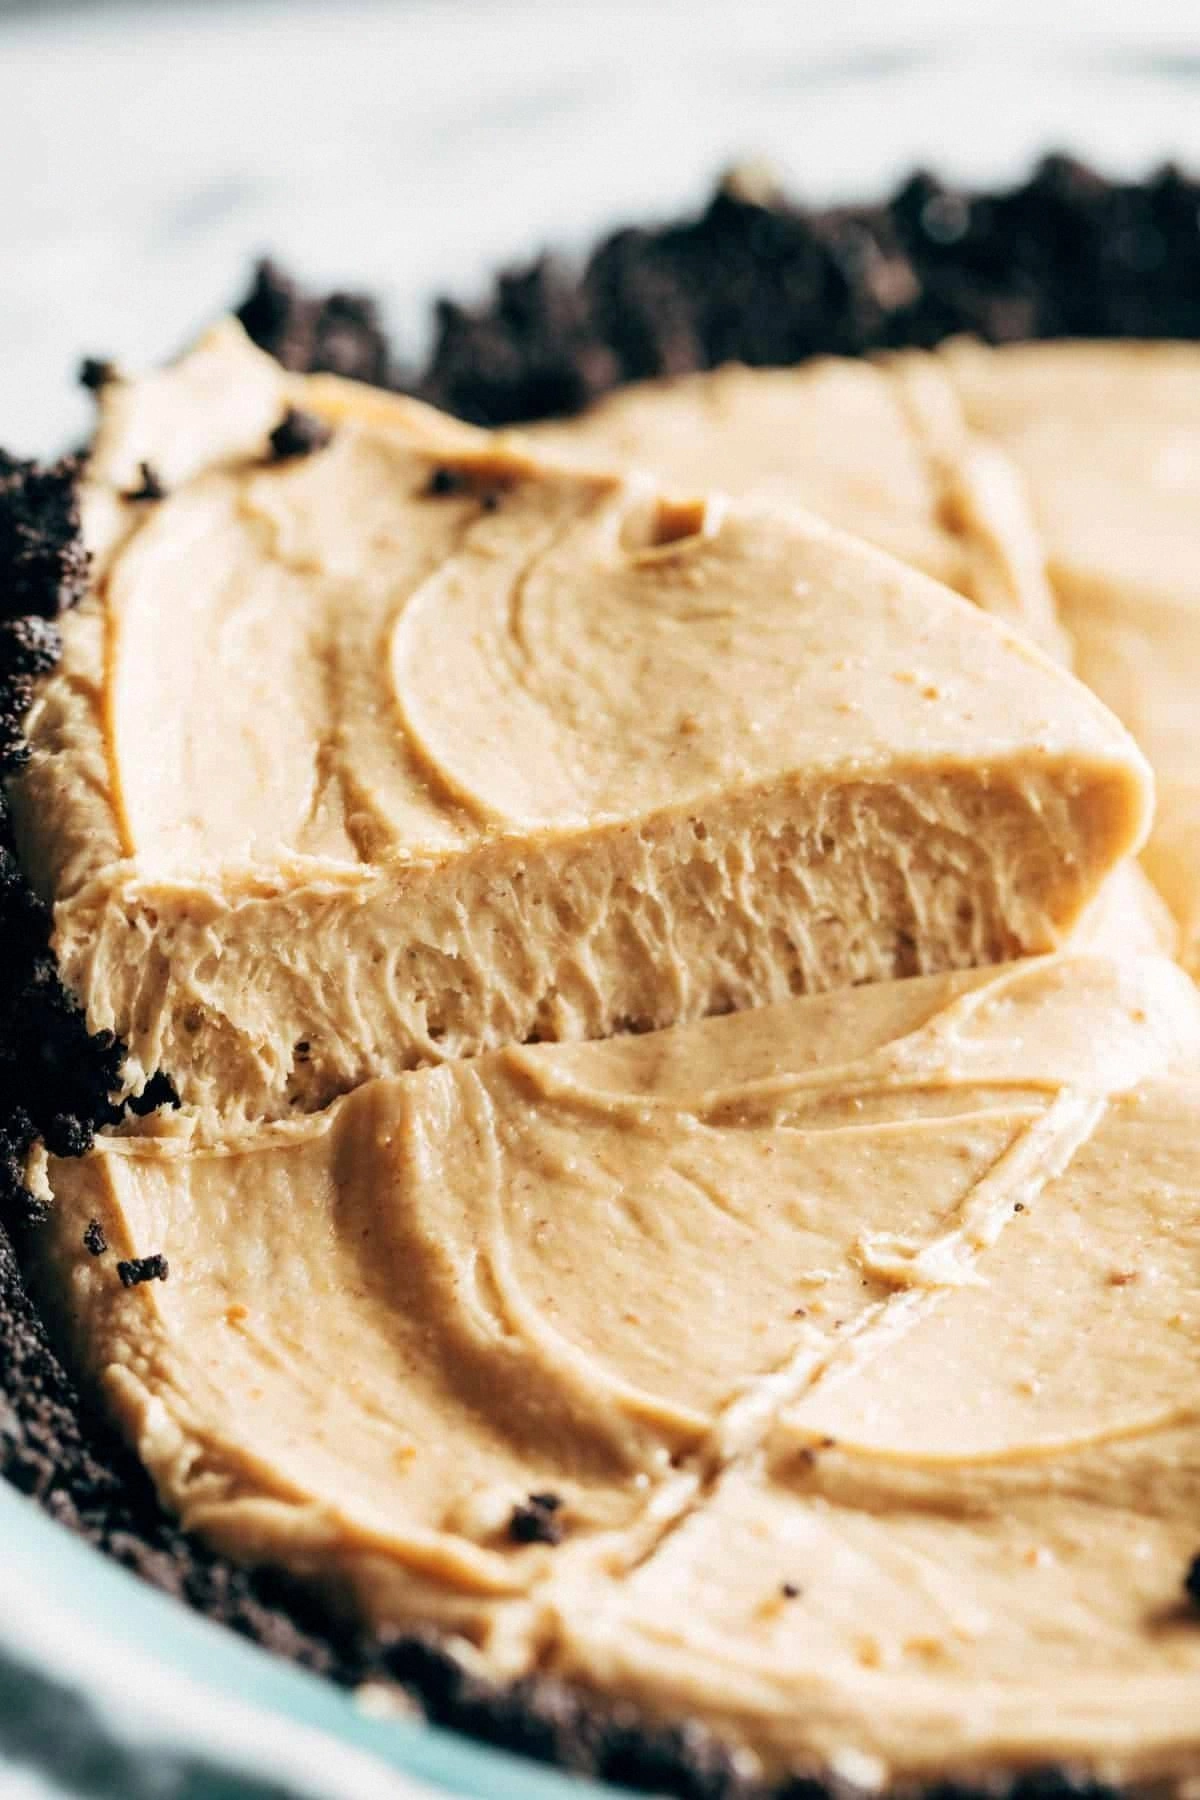
Oreos: The crushed cookies form the buttery, chocolatey crust that holds everything together. Their slight sweetness and cocoa flavor complement the peanut butter perfectly. If you substitute another cookie, you’ll lose the classic Oreo crunch that makes this pie instantly recognizable.
Butter (salted or unsalted): Butter binds the Oreo crumbs, creating a cohesive crust that doesn’t fall apart. Salted butter adds a subtle depth, while unsalted lets you control the salt level yourself. Skipping butter results in a dry, crumbly base that can’t support the filling.
Everything's prepped? Good. Let’s get into the real action…
The Method — Step by Step
Start by crushing the Oreos. Place 24 Oreo cookies (about 2 cups) into a zip‑top bag, seal it, and roll a heavy skillet over them until they become fine crumbs. The sound of the rolling is like a gentle percussion that sets the rhythm for the rest of the recipe. Once crushed, pour the crumbs into a medium bowl and set aside.
Next, melt 1/2 cup of butter in a saucepan over low heat. When the butter bubbles, it should emit a nutty aroma that signals it’s ready. Stir the melted butter into the Oreo crumbs until the mixture looks like damp sand. Press this mixture firmly into the bottom and up the sides of a 9‑inch springform pan, creating an even crust.
While the crust chills, combine 8 ounces of softened cream cheese with 1 cup of creamy peanut butter in a large mixing bowl. Using an electric mixer on medium speed, blend until the mixture is smooth and glossy. You’ll notice the mixture turning a deep caramel hue — that’s the peanut butter integrating perfectly.
Now, add 1/2 cup of granulated sugar to the bowl. The sugar should dissolve quickly, leaving a glossy, slightly glossy mixture. This step is crucial for the filling to set properly; if the sugar doesn’t dissolve fully, you might end up with a gritty texture.
Fold in 1 cup of whipped topping gently, using a spatula. The mixture should become light and airy, almost like a mousse. This is the moment of truth – if the filling looks too dense, you’ve either over‑mixed or used insufficient whipped topping.
Spread the filling evenly over the chilled crust, smoothing the top with the back of a spoon. The surface should be glossy and slightly firm to the touch. If you notice any cracks forming, gently tap the pan on the countertop to settle the filling.
Cover the pie with plastic wrap and refrigerate for at least 2 hours, preferably overnight. This chilling period allows the flavors to meld, and the crust to firm up, making slicing clean and effortless. The scent that fills your kitchen during this time is a promise of the deliciousness to come.
Just before serving, garnish the pie with a drizzle of melted chocolate, a sprinkle of crushed Oreos, or a few whole peanuts for extra crunch. This final touch adds visual appeal and a burst of texture that elevates the entire experience.
Slice the pie with a warm knife (dip it in hot water, wipe dry) for flawless cuts. Serve each slice with a dollop of extra whipped topping if desired, and watch as your guests’ eyes widen in anticipation. Picture yourself pulling this out of the fridge, the whole kitchen smelling incredible… and then hearing the collective “Mmm!” from the crowd.
Insider Tricks for Flawless Results
The Temperature Rule Nobody Follows
Never use cold butter straight from the fridge when making the crust. Soften it just enough that it’s pliable, but not melted. This ensures the crust holds together without becoming greasy. I once tried using frozen butter and ended up with a crumbly mess that refused to set. Tip: Soften butter for about 15 minutes at room temperature, then give it a quick whisk before mixing with the Oreo crumbs.
Why Your Nose Knows Best
When the crust is baking, trust the scent. The edges should start to smell nutty and slightly caramelized; that’s the sweet spot. If you rely solely on the timer, you might over‑bake and lose that delicate crunch. I’ve seen pies turn a dull brown because I ignored the aromatic cue. So, keep your nose close to the oven door – it’s the most reliable kitchen gauge.
The 5‑Minute Rest That Changes Everything
After you spread the filling, let the pie sit at room temperature for five minutes before refrigerating. This short rest allows the filling to firm up just enough to hold its shape, preventing it from sliding off the crust when you cut the first slice. Skipping this step can lead to a messy presentation that looks like a dessert disaster. Trust me, those five minutes are worth the extra patience.
Chocolate Drizzle Discipline
If you decide to drizzle chocolate, use a spoon‑filled reservoir or a squeeze bottle for precise lines. A heavy hand can drown the subtle peanut flavor, while a light drizzle adds a sophisticated finish. I once poured an entire bar of chocolate over the top, and the pie became more “chocolate cake” than “peanut butter pie.” Balance is key.
Serving Temperature Secrets
Serve the pie chilled, but not ice‑cold. Let it sit for about ten minutes out of the fridge before plating. This slight warming brings out the full flavor profile without compromising the texture. If you serve it straight from the freezer, the whipped topping can become stiff, and the crust may crack under the pressure. A short wait makes every bite melt in your mouth.
Creative Twists and Variations
This recipe is a playground. Here are some of my favorite ways to switch things up:
Chocolate‑Swirl Delight
Fold in 2 tablespoons of melted dark chocolate into the filling before adding the whipped topping. The swirl creates a marble effect and adds a deep cocoa note that pairs beautifully with the peanut butter. Perfect for chocolate lovers who still crave that nutty base.
Banana‑Boosted Bliss
Mix in 1/2 cup of mashed ripe banana into the filling for a fruity twist. The banana adds natural sweetness, reducing the need for extra sugar, and introduces a subtle tropical flavor. This version is a hit with kids who love banana‑nut combos.
Spicy Peanut Surprise
Add a pinch of cayenne pepper or a dash of sriracha to the filling for a gentle heat that awakens the palate. The heat balances the sweetness and makes the pie an unexpected conversation starter at parties. Just a little goes a long way.
Nut‑Free Alternative
Swap the peanut butter for almond butter or sunflower seed butter to accommodate nut allergies. The flavor shifts slightly, but the creamy texture remains, and the pie stays just as indulgent. Ensure you use a smooth, unsweetened version for best results.
Mini Pie Bites
Press the crust mixture into mini tart pans or silicone muffin molds, then fill with the same peanut butter mixture. These bite‑size versions are perfect for potlucks and cocktail parties, offering a portable, elegant treat that guests can enjoy without utensils.
Storing and Bringing It Back to Life
Fridge Storage
Cover the pie loosely with plastic wrap and store it in the refrigerator for up to 4 days. The crust will stay firm, and the filling will retain its airy texture. If you notice the whipped topping settling, give the pie a quick stir before serving.
Freezer Friendly
Slice the pie, then wrap each piece individually in parchment paper and place them in a freezer‑safe bag. The pie freezes well for up to 2 months. When you’re ready to enjoy it, let the slice thaw in the fridge overnight, then bring it to room temperature for 10 minutes before serving.
Best Reheating Method
Although this pie is best served cold, if you prefer a warm slice, place a single piece on a microwave‑safe plate, add a tiny splash of water, and heat for 10‑15 seconds. The steam will revive the crust’s crispness and the filling’s fluffiness without turning it into a soggy mess.