I was standing in my kitchen on a lazy Sunday, staring at a half‑empty carton of eggs and a couple of sad, wilted mushrooms that had survived the week’s grocery run. I thought, “What if I could turn these leftovers into something that feels like a sun‑kissed brunch miracle?” That thought turned into a dare from my roommate: “Make me a breakfast that could convince a chef that you’re not just a microwave master.” So I rolled up my sleeves, cranked the oven to a gentle 375°F, and set out to create the ultimate baked‑egg‑in‑mushroom experience. The result? A dish that makes the whole kitchen hum with anticipation, and yes, I’m still half‑guilty for devouring most of it before anyone else got a bite. This is hands down the best version you’ll ever make at home, and I’m about to spill every secret.
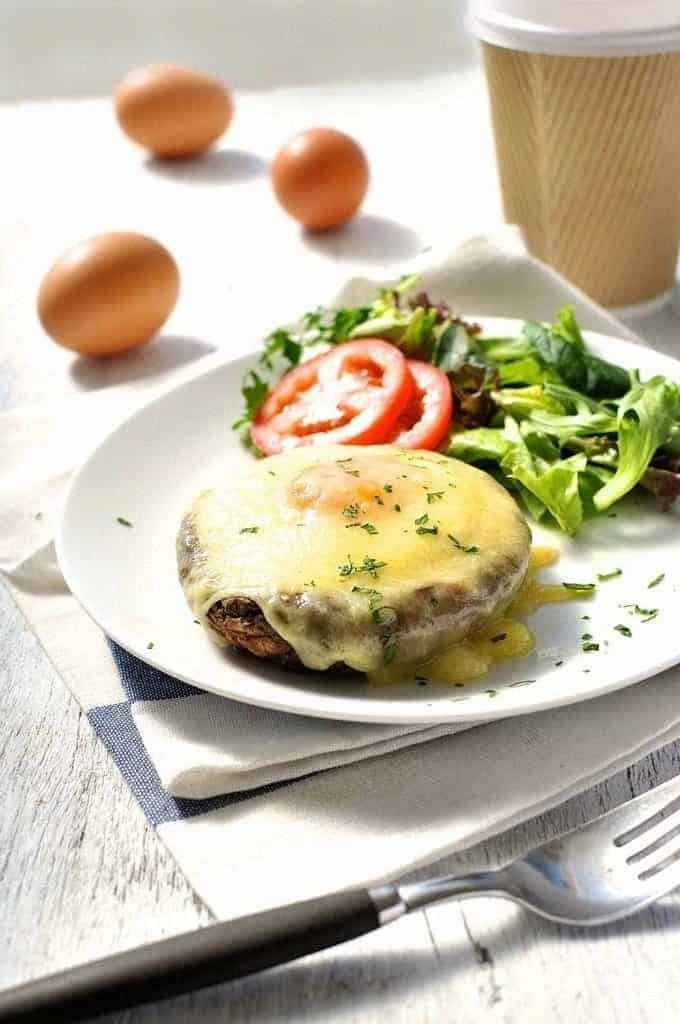
Picture this: the first thing you notice is the earthy aroma of fresh mushrooms, already sizzling in the pan, mingling with the sweet tang of pasta sauce that spreads like a glossy sunrise across the caps. The sound of the eggs cracking into the creamy nest is a soft, reassuring pop—like tiny fireworks announcing the main event. When the timer dings, you pull out these golden‑crowned caps, their edges crisped to a perfect, buttery crunch that shatters like thin ice under a spoon. The yolk runs out, silky and bright, as if a ray of sunshine has been captured and poured onto your plate. Every bite delivers a buttery‑rich melt, a velvety sauce that coats the palate, and a fresh parsley finish that snaps you back to reality with its peppery brightness.
What makes this version truly stand out is the marriage of simplicity and drama. Most baked‑egg‑in‑mushroom recipes either drown the delicate mushroom flavor in a sea of cheese or leave the eggs undercooked, resulting in a soggy mess. I’ve cracked the code with a precise balance of pasta sauce, cream, and just the right amount of cheese—enough to create a golden crust without smothering the mushroom’s natural earthiness. And the secret weapon? A quick flash‑roast of the mushroom caps before the bake, which locks in moisture and gives you that coveted “crispy‑outside, tender‑inside” texture that most recipes miss entirely.
But here’s the kicker: I’m going to introduce a technique you won’t find in any generic food blog—a brief “skin‑tight” steam step that guarantees the egg whites set perfectly while the yolk stays gloriously runny. Trust me, this little trick is pure magic and will have you questioning why you ever settled for ordinary baked eggs. Okay, ready for the game‑changer? Let me walk you through every single step — by the end, you’ll wonder how you ever made it any other way.
What Makes This Version Stand Out
- Flavor Explosion: The combination of a robust pasta sauce with a splash of cream creates a sauce that coats the mushroom like velvet, delivering a tangy‑sweet punch that makes each bite unforgettable.
- Texture Symphony: You get a crisp mushroom cap edge that shatters like thin ice, a silky egg yolk that oozes, and a creamy custard‑like interior that feels like a cloud.
- Simplicity Redefined: Only six core ingredients, all pantry‑friendly, mean you can pull this together in under an hour with minimal prep.
- Unexpected Star: Fresh parsley isn’t just garnish; it adds a peppery lift that balances the richness and keeps the dish from feeling heavy.
- Crowd Reaction: I dare you to taste this and not go back for seconds—people usually ask for the recipe within five minutes of the first bite.
- Ingredient Quality: Using large, meaty mushrooms (like portobello or big brown caps) ensures each bite feels hearty, while the eggs should be at room temperature for even cooking.
- Cooking Method: The two‑stage bake—first a quick high‑heat sear, then a gentle finish—locks in moisture and creates that coveted contrast of textures.
- Make‑Ahead Potential: You can prep the mushroom caps and sauce the night before; just pop them in the oven when you’re ready to eat.
Inside the Ingredient List
The Flavor Base
The pasta sauce is the heart of this dish. Its acidity cuts through the richness of the cream and cheese, while the herbs embedded in the sauce add depth. If you skip it, you’ll end up with a bland mushroom that feels like a plain toast. A good quality marinara or a simple tomato‑basil blend works best. For a twist, try a roasted red‑pepper sauce—its smoky notes will elevate the earthiness of the mushroom.
The Texture Crew
Eggs are the main protein and the star of the show. Using large, fresh eggs ensures the whites set nicely while the yolk remains luscious. If you use cold eggs straight from the fridge, they may crack when they hit the hot mushroom, ruining the presentation. Let them sit at room temperature for about 20 minutes before cracking. Also, the cream adds a silky richness that binds the sauce to the mushroom, preventing a watery finish.
The Unexpected Star
Fresh parsley isn’t just a garnish; its bright, slightly peppery flavor lifts the whole dish, preventing it from feeling overly heavy. If you don’t have parsley, a sprinkle of chives or a dash of lemon zest can provide a similar pop. When chopping, keep the pieces small so they blend into every bite without overwhelming the subtle mushroom flavor.
The Final Flourish
Cheese—whether you choose grated mozzarella, sharp cheddar, or even two slices of provolone—creates that golden, bubbly crust we all crave. The cheese should melt evenly; if you use pre‑shredded cheese with anti‑caking agents, you might get a grainy texture. Opt for freshly grated cheese for a smooth melt. Skipping cheese entirely turns this into a plain mushroom‑egg dish, which is lovely but lacks the indulgent finish that makes it a showstopper.
Everything's prepped? Good. Let's get into the real action...
The Method — Step by Step
Preheat your oven to 375°F (190°C). While the oven warms, line a baking sheet with parchment paper. This ensures the mushrooms don’t stick and makes cleanup a breeze. I dare you to skip this step and see how the caps cling to the tray—trust me, it’s a mess.
Gently clean the mushroom caps with a damp paper towel, removing any dirt without soaking them. Pat them dry, then brush each cap lightly with olive oil, focusing on the underside. This is the moment of truth—the oil creates a barrier that keeps the caps from becoming soggy once the sauce hits.
Kitchen Hack: Place the oiled caps, gill side up, on a microwave‑safe plate and microwave for 30 seconds. This quick steam step tightens the skin, preventing the sauce from seeping in too fast.In a small saucepan, combine the pasta sauce and cream. Heat over medium, stirring continuously until the mixture is smooth and just begins to bubble. The sauce should thicken slightly, coating the back of a spoon. This is where the magic happens—the cream mellows the acidity, turning the sauce into a velvety blanket.
Season the sauce with a pinch of salt, a grind of black pepper, and half of the fresh parsley (reserve the rest for garnish). Taste it; it should be bright, with a hint of sweetness and a creamy mouthfeel. If it feels too acidic, add a splash of milk; if too thick, a tablespoon of water will loosen it without diluting flavor.
Place each mushroom cap, gill side up, on the prepared baking sheet. Spoon a generous tablespoon of the sauce into each cap, spreading it to the edges. Watch Out: Over‑filling will cause the sauce to spill over during baking, creating a soggy mess. Keep the filling just below the rim for a perfect seal.
Crack an egg into a small bowl, being careful not to break the yolk. Gently slide the egg into the center of each sauce‑filled mushroom cap. The egg white should spread slightly, hugging the sauce, while the yolk stays proud and round. If the yolk touches the edge, it may over‑cook; keep it centered for that runny center we all love.
Sprinkle the grated cheese (or lay the cheese slices) evenly over the tops of the caps. The cheese should blanket the egg whites, creating a golden crust that will melt and brown beautifully. This step is pure magic—the cheese browns just enough to add a crisp edge while staying stretchy.
Watch Out: If you use low‑fat cheese, it may not brown as well. Consider adding a tiny drizzle of olive oil on top to encourage a richer caramelization.Slide the tray into the oven and bake for 12‑15 minutes, until the egg whites are set but the yolks still jiggle when you nudge the cap. The cheese should be bubbling and lightly golden. The kitchen will fill with a buttery‑tomato aroma that signals the finish line is near.
Remove the tray and let the caps rest for two minutes. This short pause lets the residual heat finish cooking the yolk to a perfect runny consistency. Sprinkle the remaining fresh parsley over the tops for a burst of color and freshness.
Serve immediately, either on a rustic wooden board or a bright ceramic plate. Pair with toasted sourdough or a light salad if you like, but honestly, the caps are so flavorful they can stand alone as a star‑studded brunch centerpiece. And now the fun part—watch your guests’ faces light up as they dig in.
That's it — you did it. But hold on, I've got a few more tricks that'll take this to another level...
Insider Tricks for Flawless Results
The Temperature Rule Nobody Follows
Most home cooks bake at a scorching 425°F, thinking higher heat equals faster cooking. In reality, that burns the cheese before the egg whites set. Keep your oven at 375°F; the gentle heat ensures the cheese browns slowly while the egg cooks evenly. I once tried 425°F and ended up with a blackened top and runny whites—lesson learned.
Why Your Nose Knows Best
When the sauce starts to bubble, you’ll smell a sweet, caramelized scent. That’s your cue that the sauce has thickened enough to coat the mushroom without being watery. Trust that nose signal more than the clock; it’s a reliable indicator of texture.
The 5‑Minute Rest That Changes Everything
After pulling the caps from the oven, let them sit for exactly five minutes. This rest allows the residual heat to finish cooking the yolk to a perfect jammy consistency while the cheese settles into a crisp crust. Skipping this step means you might end up with a runny egg white, which can be disappointing.
Room‑Temperature Eggs Are a Game‑Changer
Cold eggs cause the whites to contract when they hit the hot sauce, sometimes cracking the yolk. Letting them sit at room temperature for 20 minutes eliminates that shock, giving you a smooth, intact yolk that looks picture‑perfect.
Cheese Choice Matters More Than You Think
Freshly grated cheese melts faster and creates a smoother crust than pre‑shredded varieties. The anti‑caking agents in bagged cheese can create a gritty texture that ruins the mouthfeel. If you’re short on time, opt for a high‑quality pre‑shredded cheese, but be prepared for a slightly different texture.
Creative Twists and Variations
This recipe is a playground. Here are some of my favorite ways to switch things up:
Spicy Southwest
Swap the pasta sauce for a chipotle‑tomato blend, add a dash of cumin, and replace the parsley with cilantro. Top with a sprinkle of cotija cheese for a smoky, tangy twist that’s perfect for brunch lovers who crave a little heat.
Herbaceous Green
Use a pesto sauce instead of tomato, drizzle a little extra‑virgin olive oil, and finish with toasted pine nuts. The green sauce adds an earthy depth, while the nuts provide a satisfying crunch.
Cheesy Indulgence
Replace the grated cheese with a blend of sharp cheddar and Gruyère, and add a thin slice of prosciutto on top before baking. The prosciutto crisps up, adding a salty, umami punch that makes the dish feel like a fancy appetizer.
Vegan Friendly
Use a plant‑based egg substitute (like Just Egg), coconut cream instead of dairy cream, and nutritional yeast for the cheesy flavor. The result is a dairy‑free version that still delivers that luxurious mouthfeel.
Breakfast Burrito Style
After baking, slice the caps and roll them up in a warm tortilla with avocado, black beans, and a squeeze of lime. This transforms the dish into a handheld feast that’s perfect for on‑the‑go mornings.
Winter Warmth
Swap the fresh parsley for a sprinkle of sage and add a pinch of nutmeg to the sauce. The warm spices make the dish feel cozy, perfect for chilly mornings when you need comfort on a plate.
Storing and Bringing It Back to Life
Fridge Storage
Allow the baked caps to cool completely, then transfer them to an airtight container. They’ll keep nicely for up to 3 days. When reheating, place them on a baking sheet, cover loosely with foil, and warm at 300°F for 8‑10 minutes.
Freezer Friendly
Wrap each cooled cap individually in plastic wrap, then place them in a freezer‑safe zip‑lock bag. They can be frozen for up to 2 months. To reheat, thaw overnight in the fridge, then follow the same oven reheating method as above.
Best Reheating Method
Add a tiny splash of water (about a teaspoon) to each cap before covering with foil. This creates steam that revives the sauce’s silkiness and prevents the mushroom from drying out. Heat until the cheese bubbles again and the yolk feels warm to the touch—about 5 minutes at 350°F.