I was standing in my tiny kitchen, staring at a half‑empty pantry and a sudden craving that felt like a drum solo in my stomach. I had a can of chickpeas, a jar of Greek yogurt, and a bottle of hot chili sauce that I’d bought on a whim during a grocery‑store impulse run. The clock was ticking, the rain was drumming on the windows, and I promised my roommate that I’d whip up something that would make us forget the gloomy weather altogether. That night, I learned that a simple smashed chickpeas sandwich can be the culinary equivalent of a fireworks show in a tiny glass jar.
Picture this: the aroma of toasted whole‑grain bread mingling with the earthy scent of chickpeas, a tangy whisper of yogurt that cuts through the heat of chili sauce, and a glossy drizzle of balsamic reduction that glistens like sunrise on a lake. The sandwich’s texture is a perfect contrast—creamy chickpea mash that clings to the bread, punctuated by the occasional crunch of toasted crust and a faint crackle from the chili flakes that pop like tiny fireworks on your tongue. When you bite in, the flavors explode in a cascade of smoky heat, bright acidity, and herbaceous oregano, all balanced by the mellow creaminess of the yogurt.
Most recipes out there treat smashed chickpeas like a bland spread, slapping it on a piece of bread and calling it a day. Most get this completely wrong. They either drown the chickpeas in mayo, or they forget the crucial step of adding a sweet‑acidic element that lifts the whole thing. I’m here to set the record straight with a version that is hands down the best you’ll ever make at home. I dare you to taste this and not go back for seconds; the combination of textures and flavors is so addictive that you’ll find yourself planning your next sandwich before you finish the first.
And now, the fun part: I’m going to reveal a secret technique that most cookbooks skip entirely—a quick balsamic reduction that adds a glossy, sweet‑tart finish without the need for expensive glaze kits. This little trick is the game‑changer that transforms a humble lunch into a gourmet experience. Let me walk you through every single step — by the end, you’ll wonder how you ever made it any other way.
What Makes This Version Stand Out
- Flavor Explosion: The marriage of hot chili sauce, Greek yogurt, and balsamic reduction creates a layered taste profile that’s spicy, tangy, and sweet all at once.
- Texture Harmony: Smashed chickpeas give a creamy base while the toasted whole grain bread adds a satisfying crunch, and the chili flakes provide a pop of crispness.
- Simplicity Meets Sophistication: You only need pantry staples and a few fresh touches, yet the result feels like a dish from a trendy bistro.
- Ingredient Quality: Using Greek yogurt instead of regular yogurt adds a thicker, richer mouthfeel that coats the chickpeas like velvet.
- Crowd‑Pleaser Factor: Even the pickiest eaters love the balance of heat and cream, and the sandwich holds up well for picnics or office lunches.
- Make‑Ahead Potential: The chickpea mixture can be pre‑made and stored, making assembly a breeze on busy mornings.
- Versatile Base: Whole grain bread provides fiber and a nutty flavor, but you can swap in gluten‑free or sourdough for a different twist.
- Season‑Proof: This sandwich shines year‑round, whether you’re battling winter blues or summer heat.
Inside the Ingredient List
The Flavor Base
Greek yogurt is the unsung hero of this sandwich. Its tangy richness not only balances the heat from the hot chili sauce but also adds a luxurious creaminess that makes the chickpea mash feel indulgent. If you skip the yogurt, you’ll end up with a dry, one‑dimensional spread that lacks that silky mouthfeel. For a dairy‑free twist, try a thick coconut yogurt, but remember it will introduce a subtle coconut flavor.
The Texture Crew
Canned chickpeas are the backbone of this recipe. They bring protein, fiber, and a buttery texture when smashed. Rinse them well to get rid of the briny liquid that can make the mash watery. If you’re feeling adventurous, you can roast the chickpeas first for an extra nutty depth, but that adds an extra step.
The Unexpected Star
Balsamic vinegar reduction is the surprise element that turns this sandwich from ordinary to extraordinary. The reduction adds a sweet‑acidic glaze that cuts through the richness of the yogurt and the heat of the chili sauce, creating a harmonious balance. If you don’t have time to reduce balsamic, a splash of honey‑infused balsamic works in a pinch, though the thickness will differ.
The Final Flourish
Whole grain bread provides the sturdy canvas for this masterpiece. Its hearty texture holds up to the juicy chickpea mixture without becoming soggy. Choose a bread with a robust crust and a soft crumb; if you opt for a very dense rye, you might lose some of the sandwich’s delicate balance. Toasting the bread just enough to get a golden edge adds that satisfying crunch that makes each bite feel like a mini celebration.
Everything's prepped? Good. Let's get into the real action...
The Method — Step by Step
Start by draining and rinsing two 15‑ounce cans of chickpeas. Pat them dry with a kitchen towel; this step is crucial because excess water will make your mash soupy. I like to give them a quick shake in a colander to remove any lingering liquid. Once dry, transfer them to a large mixing bowl.
Grab a potato masher or the back of a fork and begin smashing the chickpeas. Aim for a coarse texture—think chunky hummus, not a smooth puree. This texture provides the perfect bite, allowing you to feel the legume’s natural grain. Power tip: Add a pinch of salt while mashing to draw out moisture and enhance flavor.
In a small bowl, whisk together ½ cup of Greek yogurt, 1 tablespoon of hot chili sauce, 2 teaspoons of red chili flakes, and 1 teaspoon of dried oregano. The yogurt should be thick enough to coat the back of a spoon; if it’s runny, strain it through a cheesecloth. This mixture is the heart‑pounding flavor bomb that will coat every chickpea fragment.
Now, drizzle in 2 tablespoons of balsamic vinegar reduction while stirring the yogurt‑chili blend. Watch as the dark syrup swirls like a miniature galaxy, adding depth and a glossy sheen. The reduction should be thick enough to cling to the spoon without sliding off.
Combine the yogurt‑chili mixture with the smashed chickpeas, folding gently until everything is evenly distributed. Taste and adjust with a pinch of salt and a grind of fresh black pepper. Remember, seasoning is the bridge that ties all the flavors together; don’t be shy.
While the chickpea mixture rests, heat a large skillet over medium‑high heat. Lightly brush each slice of whole grain bread with a drizzle of olive oil—just enough to coat the surface. Place the bread slices in the skillet, pressing down gently with a spatula. Listen for that satisfying sizzle; the edges should start turning golden within 1‑2 minutes.
Flip the bread and toast the other side until it reaches the same beautiful amber hue. This toasting step adds a subtle crunch that will contrast the creamy chickpea spread. Once both sides are toasted, remove the bread from the pan and let it cool for a minute—this prevents the hot mash from making the bread soggy.
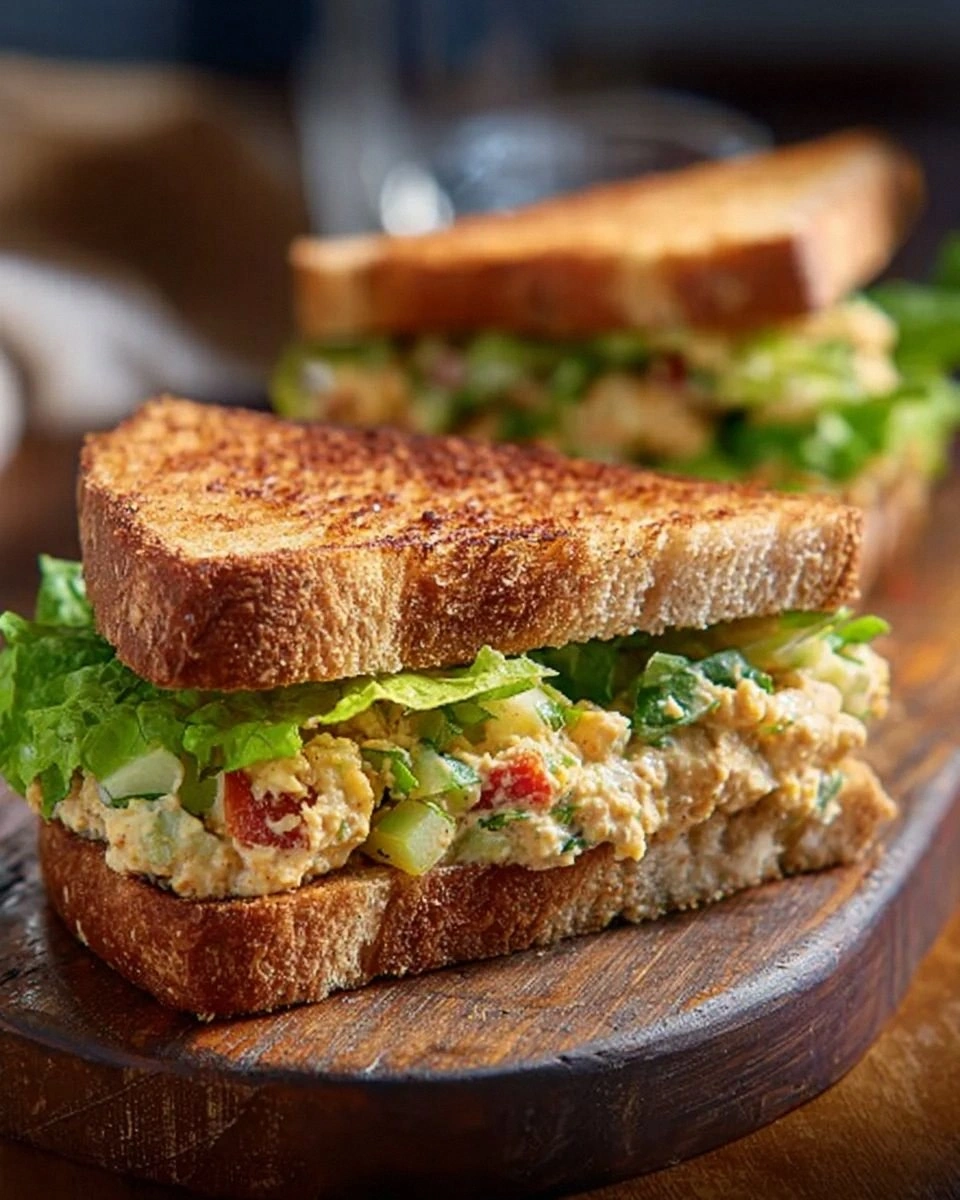
Assemble the sandwich: spread a generous heap of the chickpea mash onto one slice of toasted bread, then top with another slice. Press gently so the layers meld together, but don’t crush the texture. Slice the sandwich diagonally for that classic presentation that makes Instagram‑ready photos inevitable.
Serve immediately, or wrap tightly in parchment and a foil if you’re taking it on the go. The sandwich holds its structure for up to two hours, making it perfect for a packed lunch. And now the fun part—take a bite and let the flavors dance on your palate. That moment? Pure magic.
That's it — you did it. But hold on, I've got a few more tricks that'll take this to another level...
Insider Tricks for Flawless Results
The Temperature Rule Nobody Follows
Most home cooks toast bread on low heat, resulting in a limp slice that sags under the weight of the filling. I always crank the skillet to medium‑high, allowing the bread to develop a crisp crust in under two minutes. This high heat creates a Maillard reaction that adds nutty, caramelized notes—think of it as a quick, edible fireworks show. If you’re using a panini press, pre‑heat it for at least five minutes to achieve the same effect.
Why Your Nose Knows Best
Before you even taste the sandwich, trust your nose. When the chickpea mixture is done, you should smell a faint tang from the yogurt, a sweet whisper from the balsamic, and a lingering heat from the chili sauce. If any of those aromas are missing, adjust the seasoning—add a dash more hot sauce or a splash of extra reduction. Your nose is the first line of quality control; don’t ignore it.
The 5‑Minute Rest That Changes Everything
After mixing the chickpeas with the yogurt‑chili blend, let the mixture sit for five minutes. This short rest allows the flavors to meld, and the chickpeas absorb some of the moisture, resulting in a firmer spread that doesn’t slide off the bread. I once skipped this step in a rush and ended up with a soggy sandwich that fell apart at the first bite—lesson learned.
Seasoning Layers, Not Just a Sprinkle
Instead of dumping all the salt and pepper at once, season in stages: a pinch while mashing the chickpeas, another dash after mixing in the yogurt, and a final sprinkle just before assembling. This layered seasoning builds depth and ensures every bite is perfectly balanced. If you’re using sea salt, the flaky crystals add a subtle crunch that enhances the texture.
The Crunch Factor
For an extra crunch, toast a handful of pumpkin seeds or sunflower seeds and sprinkle them over the chickpea mash before closing the sandwich. The seeds add a nutty flavor and a satisfying crack that elevates the overall mouthfeel. I’ve tried using crumbled crispy onions, but the seeds keep the sandwich lighter and more wholesome.
Creative Twists and Variations
This recipe is a playground. Here are some of my favorite ways to switch things up:
Mediterranean Sunrise
Swap the hot chili sauce for a spoonful of sun‑dried tomato pesto and add crumbled feta cheese to the chickpea mash. The result is a tangy, herb‑forward sandwich that feels like a sunny Greek brunch. Garnish with fresh basil leaves for an aromatic finish.
Spicy Asian Fusion
Replace the balsamic reduction with a drizzle of soy‑ginger glaze, and stir in a teaspoon of toasted sesame oil. Add thinly sliced cucumber and shredded carrots for crunch. The combination of chili heat and umami creates a bold, exciting flavor profile.
Southern Comfort
Introduce a spoonful of honey and a dash of smoked paprika into the chickpea mixture. Use a slice of cornbread instead of whole grain bread for a rustic touch. This version feels like a comforting hug on a chilly evening.
Vegan Delight
Swap Greek yogurt for a plant‑based coconut yogurt and ensure the hot chili sauce is free from animal products. Add a handful of roasted chickpeas on top for extra texture. The sandwich remains creamy and spicy while staying fully vegan.
Breakfast Booster
Fold a soft‑boiled egg into the chickpea spread and sprinkle with microgreens. The richness of the yolk melds with the yogurt, creating a luxurious breakfast sandwich that will keep you powered through the morning.
Storing and Bringing It Back to Life
Fridge Storage
Transfer the leftover chickpea mixture into an airtight container and store it in the refrigerator for up to three days. Keep the bread separate to maintain its crispness. When ready to eat, give the mash a quick stir and add a splash of water or extra yogurt if it looks a bit dry.
Freezer Friendly
Portion the chickpea spread into freezer‑safe bags, flatten them for even thawing, and freeze for up to two months. Thaw overnight in the fridge, then whisk in a tablespoon of olive oil to restore creaminess. The bread can be toasted from frozen for a quick snack.
Best Reheating Method
To revive the sandwich, preheat a skillet over medium heat, add a tiny splash of water to the pan, and cover with a lid for 30 seconds. The steam will re‑hydrate the chickpea mash while the bread regains its crunch. Avoid microwaving, as it makes the bread rubbery and the mash soggy.