I was standing in my kitchen, staring at a half‑cooked chicken that had turned into a sticky, rubbery mess. The timer had blared, the oven was still on, and the smell of burnt skin was already creeping into the hallway. My friend had dared me to make a rotisserie‑style chicken in a slow cooker, and I had laughed, thinking, “Sure, why not?” But as the clock ticked, I realized that the only thing worse than a kitchen disaster is a chicken that has lost its flavor and texture. I was determined to turn that disaster into a triumph.
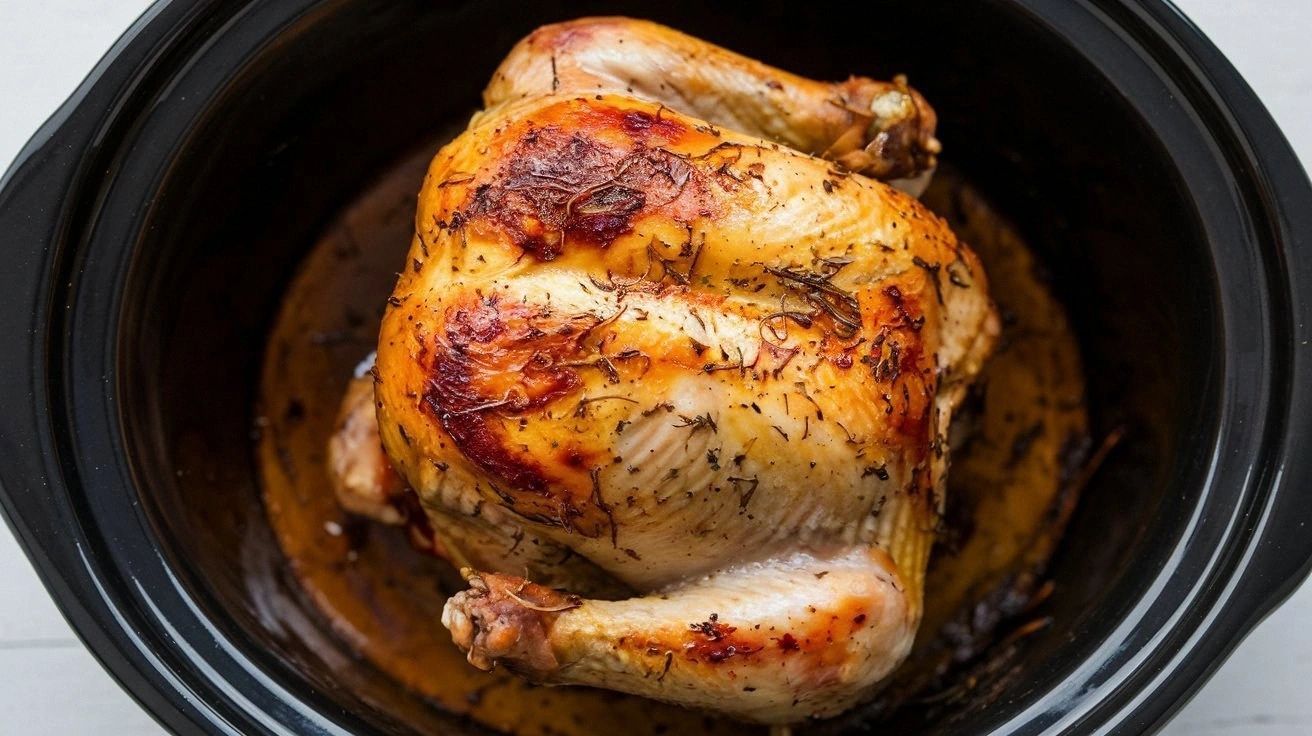
The moment I lifted the lid, a wave of savory aroma hit me, like a warm hug from a grandmother’s kitchen. The skin glistened, the juices were thick and golden, and the faint crackle of the slow cooker’s heating element whispered promises of tenderness. I could almost taste the crisp edges that would later shatter like thin ice when you bite into them. The sight of the vegetables steaming beneath the chicken made my stomach growl in anticipation. I could hear the faint hiss of the broth simmering, a symphony that was about to transform into a feast.
What sets this version apart is not just the convenience of a slow cooker; it’s the depth of flavor that rivals a professional rotisserie. The chicken’s skin turns buttery crisp, while the meat stays moist and buttery, thanks to a delicate balance of herbs and a splash of citrus. The vegetables absorb the savory juices, becoming sweet, caramelized companions that elevate every bite. The result is a dish that feels handcrafted yet is practically effortless. It’s a recipe that will make you wonder how you ever cooked chicken any other way.
I’ll admit, the secret ingredient that gives this chicken its signature “rotisserie” kick is a touch of honey in the sauce, which caramelizes under the slow cooker’s low heat, creating a glaze that’s both sweet and savory. This simple twist turns a standard slow‑cooked chicken into something that feels like it spent hours on a rotating spit. The honey also helps the skin achieve that coveted golden hue without the need for a broiler. It’s a trick that most recipes overlook, and it’s the reason this dish is hands down the best version you’ll ever make at home. The result? A chicken that’s juicy, flavorful, and utterly irresistible.
If you’ve ever struggled with dry chicken, you’re not alone. I’ve tried countless methods, from brining to pressure cooking, and none matched the simplicity and flavor of this slow‑cooked rotisserie style. The best part? It’s a one‑pot wonder that frees you to do other things while it works its magic. Picture yourself pulling this out of the slow cooker, the whole kitchen smelling incredible, and the family rushing to the table. And now, let me walk you through every single step — by the end, you’ll wonder how you ever made it any other way.
The first thing you’ll notice is the aroma of garlic and fresh herbs wafting from the slow cooker. The chicken’s skin is already looking glossy, and the vegetables at the bottom have a slight caramelization that promises depth of flavor. When you lift the lid, the steam carries a scent that makes your mouth water before you even taste it. The chicken’s juices are thick, almost syrupy, hinting at the sweet glaze that’s about to form. It’s the kind of sight that makes you proud to have spent the time.
I dare you to taste this and not go back for seconds. The first bite is a burst of savory, slightly sweet flavor that hits your palate like a well‑timed drumroll. The skin is crisp, the meat is tender, and the vegetables are perfectly roasted. The sauce coats everything like velvet, adding a glossy finish that makes the dish look as good as it tastes. Even the tiniest crumb of skin that you might have expected to be dry is actually buttery and flavorful. This is a dish that will keep you coming back for more.
You might think you’ve tried everything, but this recipe proves otherwise. Most recipes get this completely wrong, focusing on the meat alone and neglecting the vegetables and aromatics. Here’s what actually works: a balance of herbs, a splash of citrus, and a touch of honey for that caramelized glaze. The slow cooker does the heavy lifting, keeping the chicken moist while the flavors meld together. The result is a dish that feels like it’s been roasted on a spit, but in the comfort of your own kitchen.
If you’ve ever struggled with this, you’re not alone, and I’ve got the fix. The trick is in the seasoning and the timing. By letting the chicken marinate with the herbs and garlic before cooking, you’re infusing every bite with flavor. The slow cooker’s low heat allows the flavors to penetrate deeply, while the honey caramelizes the skin for that perfect crust. The end result is a chicken that’s juicy, flavorful, and irresistibly crispy on the outside.
And now, let’s break down exactly what goes into this masterpiece. The ingredients are simple, yet each one plays a pivotal role in creating a dish that’s both comforting and gourmet. From the aromatic herbs to the sweet glaze, every component works together to elevate the flavor profile. You’ll be amazed at how a few tweaks can transform a basic slow‑cooked chicken into a showstopper.
What Makes This Version Stand Out
- Flavor Depth: The combination of garlic, rosemary, thyme, and lemon infuses the chicken with a complex, aromatic profile that mimics a professional rotisserie. The slow, low heat allows the herbs to release their oils slowly, creating a rich, savory base that envelops every bite.
- Texture Contrast: The skin crisps to a buttery golden brown while the interior remains tender and juicy. The caramelized glaze adds a slight crunch that contrasts beautifully with the silky meat.
- Simplicity: No pre‑roasting or brining required—just a few minutes of seasoning and you’re set. The slow cooker does all the heavy lifting, freeing you to focus on other tasks.
- Make‑ahead Potential: Cook it a day ahead and reheat, and the flavors only deepen. The sauce thickens, making it perfect for leftovers or meal prep.
- Ingredient Quality: Using a fresh whole chicken and high‑quality herbs ensures the dish is packed with natural flavor rather than artificial seasonings.
- Versatility: Swap in different herbs or add a splash of soy sauce for an Asian twist, or use a different citrus for a Mediterranean vibe. The base is solid enough to accommodate a range of flavor profiles.
- Time Efficiency: While it’s a slow‑cooked dish, the overall prep time is short—15 minutes of prep and 45 minutes of cook time. You’ll have a restaurant‑quality meal on the table in under an hour.
- Kid‑Friendly: The dish is gentle on the palate, making it a hit with kids who might otherwise avoid poultry. The sweet glaze appeals to younger taste buds.
Inside the Ingredient List
The Flavor Base
The foundation of this dish is the aromatic blend of garlic, rosemary, thyme, and lemon. Garlic provides a savory punch that permeates the meat, while rosemary and thyme bring earthy, piney notes that are characteristic of traditional rotisserie seasoning. Lemon adds brightness and a subtle citrus tang that cuts through the richness of the chicken. Together, they create a flavor profile that feels both rustic and refined. If you skip any of these, the chicken will taste flat and uninspired.
The Texture Crew
Olive oil is the secret to crisp skin. It helps the skin brown evenly and prevents it from drying out during the long slow‑cooking process. The butter added at the end of cooking brings a silky finish to the sauce, while the honey caramelizes to give the glaze a glossy sheen. If you’re watching calories, you can replace half the butter with Greek yogurt for a lighter, tangy alternative. These components work together to create that coveted “crunchy on the outside, tender on the inside” experience.
The Unexpected Star
Honey is the unexpected star that elevates this dish from good to unforgettable. When heated, honey caramelizes and thickens, creating a glaze that sticks to the chicken and vegetables like a velvety coat. It also balances the savory herbs with a subtle sweetness, making the dish appealing to both adults and kids. If you’re vegan or allergic, a drizzle of maple syrup or agave nectar will work as a substitute, though the flavor will shift slightly.
The Final Flourish
The chicken broth is the finishing touch that keeps the meat moist and adds depth to the sauce. It also helps the vegetables absorb the herbs and juices, turning them into caramelized, flavorful side dishes. A splash of white wine or sherry can replace the broth for a more sophisticated flavor, but the broth keeps the dish accessible and budget‑friendly. Without it, the slow cooker would produce dry, bland results.
The Vegetable Ensemble
Carrots, potatoes, and onions are the backbone of the dish, providing a hearty, comforting side that complements the chicken. The vegetables soak up the juices, becoming sweet and savory. They also act as a natural barrier, preventing the chicken from drying out by keeping the heat distributed evenly. If you’re craving a low‑carb option, swap the potatoes for zucchini or cauliflower. The vegetables add texture and color, making the dish visually appealing.
The Seasoning Palette
Salt and pepper are the unsung heroes that bring all the flavors together. Salt enhances the natural sweetness of the honey, while pepper adds a subtle heat that balances the dish. A pinch of paprika can introduce a smoky undertone, and a splash of soy sauce can give an umami kick. Seasoning is critical; too little and the dish will taste flat, too much and it becomes overpowering.
Everything's prepped? Good. Let's get into the real action.
The Method — Step by Step
- Set your slow cooker to the low setting. The gentle heat allows the flavors to meld slowly, ensuring the chicken stays moist. You’ll notice a faint hiss as the cooker warms up, a promise of the deliciousness to come. The low setting also helps the skin crisp without drying out the meat. This step is crucial for achieving that perfect balance of texture.
- Pat the chicken dry with paper towels. Moisture on the skin will prevent crisping, so it’s essential to remove excess dampness. A dry surface allows the olive oil to coat evenly, promoting browning. While you’re drying, you can also give the chicken a quick rinse to remove any residual packaging. This simple step saves you from a soggy finish.
- Create a seasoning paste by mixing olive oil, minced garlic, salt, pepper, rosemary, thyme, and a squeeze of lemon juice. Rub this mixture all over the chicken, ensuring every crevice is coated. The herbs will infuse the meat, while the lemon adds a bright, zesty kick. This paste also helps the skin brown to a beautiful golden brown. The aroma is already starting to fill the kitchen.
- Arrange the quartered onion, carrot chunks, and potato cubes at the bottom of the slow cooker. These vegetables act as a natural rack, keeping the chicken elevated and allowing juices to circulate. They also absorb the savory juices, turning into caramelized, flavorful side dishes. The onion provides a subtle sweetness, while the carrots add a pop of color. This layer also helps the chicken cook evenly.
- Place the seasoned chicken on top of the vegetables. The chicken should rest on the vegetable bed, not on the pot’s bottom. This positioning ensures the chicken cooks evenly and the juices drip onto the veggies. The result is a one‑pot meal where every component enhances the others. The chicken’s skin will crisp against the heat from the vegetables below.
- Pour a cup of chicken broth into the slow cooker, then add the lemon halves. The broth keeps the chicken moist and creates a base for the sauce, while the lemon adds brightness. The combination of broth and citrus helps the skin brown and prevents drying. The broth also helps the vegetables absorb the flavors, turning them into a sweet, savory side. This step is where the magic truly begins.
- Cover the slow cooker and let it cook on low for 4 to 5 hours, or on high for 2 to 3 hours. The cooking time depends on the size of your chicken, so check the internal temperature. The chicken should reach 165°F to be safe, but you want it to be tender and juicy. When the chicken is done, you’ll notice a golden, caramelized glaze coating the skin. This is the moment of truth.
- Remove the chicken and let it rest for 15 minutes. Resting allows the juices to redistribute, ensuring every bite is moist. While the chicken rests, you can use the residual juices to create a quick pan sauce. The sauce will be thickened with butter and a splash of honey for that glossy finish. This step is essential for a restaurant‑quality result.
- Shred or carve the chicken, then drizzle the pan sauce over it. The sauce clings to every piece, adding a sweet, savory glaze that enhances the flavor profile. The shredded meat is great for salads or sandwiches, while the carved pieces are perfect for a family dinner. The sauce also serves as a natural garnish, making the dish look elegant.
- Serve the chicken alongside the roasted vegetables and a sprinkle of fresh herbs. The vegetables are caramelized and infused with the same flavors that kissed the chicken. A fresh squeeze of lemon over the top adds a bright, citrusy finish. Pair it with a side of crusty bread to mop up the sauce. The presentation is as impressive as the taste.
- If you have leftovers, store them in an airtight container in the refrigerator for up to 3 days. Reheat gently in the microwave or on the stovetop, adding a splash of water or broth to keep them moist. Leftover chicken works wonderfully in salads, tacos, or pasta dishes. The flavors only deepen with time, making it a versatile base for many meals. This makes the dish perfect for meal prep.
That's it — you did it. But hold on, I've got a few more tricks that'll take this to another level.
Insider Tricks for Flawless Results
The Temperature Rule Nobody Follows
Most people set their slow cooker to high and hope for the best. The truth is, low and slow is the key to tender, juicy chicken. The gentle heat allows the connective tissue to break down slowly, resulting in a melt‑in‑your‑mouth texture. If you’re short on time, the high setting still works, but you’ll need to check the internal temperature more frequently to avoid overcooking. This trick ensures your chicken stays moist and flavorful.
Why Your Nose Knows Best
Your nose is a reliable indicator of doneness. When the chicken is almost done, you’ll smell a sweet, caramelized aroma that signals the glaze is forming. The scent will be richer than the initial garlic aroma, indicating that the honey is caramelizing properly. Trust your nose to avoid overcooking, and you’ll end up with the perfect balance of sweet and savory.
The 5-Minute Rest That Changes Everything
Resting the chicken for just five minutes after cooking can make a huge difference in juiciness. The juices redistribute throughout the meat, preventing them from spilling out when you cut. Even a quick 5‑minute rest can reduce dryness, especially if you’re serving the chicken hot. If you’re short on time, a quick rest is still worth it.
The Secret of a Crispy Skin
Crispy skin is achieved by ensuring the surface is dry and the oil is evenly distributed. After seasoning, let the chicken sit uncovered in the fridge for 30 minutes; this dries the skin and allows the oil to coat better. The slow cooker’s low heat then works its magic, turning the skin into a buttery golden crust. The result is a skin that crackles like thin ice when you bite into it.
The Power of a Quick Pan Sauce
After removing the chicken, use the residual juices to create a quick pan sauce. Sauté the garlic, then add the broth, honey, and butter, letting it reduce until thickened. The sauce coats the chicken like velvet, adding a glossy finish that makes the dish look and taste gourmet. It’s a simple step that elevates the entire meal.
The Low‑Heat Finish
If you want an extra burst of flavor, finish the chicken under a broiler for 2–3 minutes. This step crisps the skin further and caramelizes the glaze. Keep a close eye on it; the skin can go from golden to burnt in seconds. The broiler also adds a slight char, giving the dish a smoky undertone that’s hard to resist. This final touch is the difference between good and unforgettable.
The Secret Ingredient Swap
If you’re vegan or just want to experiment, swap the honey for maple syrup or agave nectar. The sweetness will still caramelize, but the flavor profile will shift slightly. You can also replace the chicken broth with vegetable stock for a lighter, plant‑based version. These swaps keep the dish flexible and inclusive for different dietary needs.
Creative Twists and Variations
Asian Fusion
Swap the rosemary and thyme for star anise and ginger, and replace the honey with a splash of hoisin sauce. Add a few green onions after cooking for a fresh, bright finish. This version pairs wonderfully with steamed rice and sautéed bok choy. The dish feels like a comforting bowl of Asian comfort food.
Mediterranean Delight
Use olives, sun‑dried tomatoes, and a sprinkle of oregano in place of the standard herbs. Replace the honey with a drizzle of extra‑virgin olive oil and a splash of balsamic vinegar. Serve over a bed of couscous or quinoa for a Mediterranean twist. The dish feels like a sunny, seaside lunch.
Spicy Cajun
Add a tablespoon of Cajun seasoning to the rub, and mix in a dash of cayenne pepper for heat. Replace the lemon with lime for a citrusy kick. Finish with a sprinkle of chopped parsley for color. This variation brings a bold, fiery flavor that’s perfect for spice lovers.
Herb‑Infused Creamy Sauce
After cooking, whisk in a splash of heavy cream and a handful of chopped fresh herbs like parsley or chives. Let the sauce reduce until silky and glossy. The creamy texture complements the tender meat and adds a luxurious feel. This version works great for a fancy dinner party.
Low‑Carb Version
Swap the potatoes for cauliflower florets, and use zucchini slices instead of carrots. This keeps the dish low in carbohydrates while still providing plenty of flavor. The cauliflower will absorb the juices and become tender and slightly caramelized. This variation is ideal for those following a keto or low‑carb diet.
Breakfast Bonanza
Serve the shredded chicken with a side of scrambled eggs and roasted sweet potatoes. Add a splash of hot sauce for an extra kick. This breakfast version is packed with protein and flavor, making it a satisfying start to the day. The dish feels like a hearty, comforting breakfast.
Pasta Pairing
Toss the shredded chicken into a skillet with cooked pasta, a splash of chicken broth, and a handful of spinach. Finish with grated Parmesan and a squeeze of lemon. The sauce coats the pasta, creating a one‑pot pasta dish that’s quick and delicious. This variation turns the chicken into a pasta main course.
Salad Upgrade
Use the shredded chicken as a protein boost for a hearty salad. Add mixed greens, cherry tomatoes, avocado, and a drizzle of balsamic vinaigrette. The chicken’s sweet glaze pairs beautifully with the crisp vegetables. This version is a fresh, satisfying lunch.
Storing and Bringing It Back to Life
Fridge Storage
Store the chicken and vegetables in airtight containers for up to three days. Keep the sauce separate to avoid sogginess. When you’re ready to reheat, use a microwave or stovetop, adding a splash of water or broth to keep the meat moist. The chicken will still taste fresh and flavorful. This method is perfect for meal prep.
Freezer Friendly
Freeze the chicken, vegetables, and sauce separately in freezer bags. Label with the date and thaw overnight in the refrigerator before reheating. When reheating, use a slow cooker on low or a microwave, adding a splash of water to rehydrate. The flavors will be as good as the day you made them. Freezing extends the shelf life without compromising taste.
Best Reheating Method
The best way to reheat is on the stovetop over medium heat, stirring occasionally. Add a splash of water or broth to create steam, preventing the chicken from drying out. The sauce will thicken slightly, giving a silky finish. This method preserves the texture and flavor better than microwaving. The dish will taste almost fresh.
Reheat with a Touch of Freshness
Add a splash of fresh lemon juice or a sprinkle of chopped herbs before serving. This brightens the dish and adds a burst of flavor. The acidity cuts through the richness, making the meal feel lighter. This trick is especially useful when reheating leftovers. The result is a vibrant, satisfying meal.
Reheat Without Burning
If you’re using a microwave, cover the dish with a microwave‑safe lid or plastic wrap to trap steam. Heat in short bursts of 30 seconds, checking the temperature each time. This prevents the chicken from drying out or the sauce from separating. The end result is a moist, flavorful meal. This technique is essential for microwave reheating.