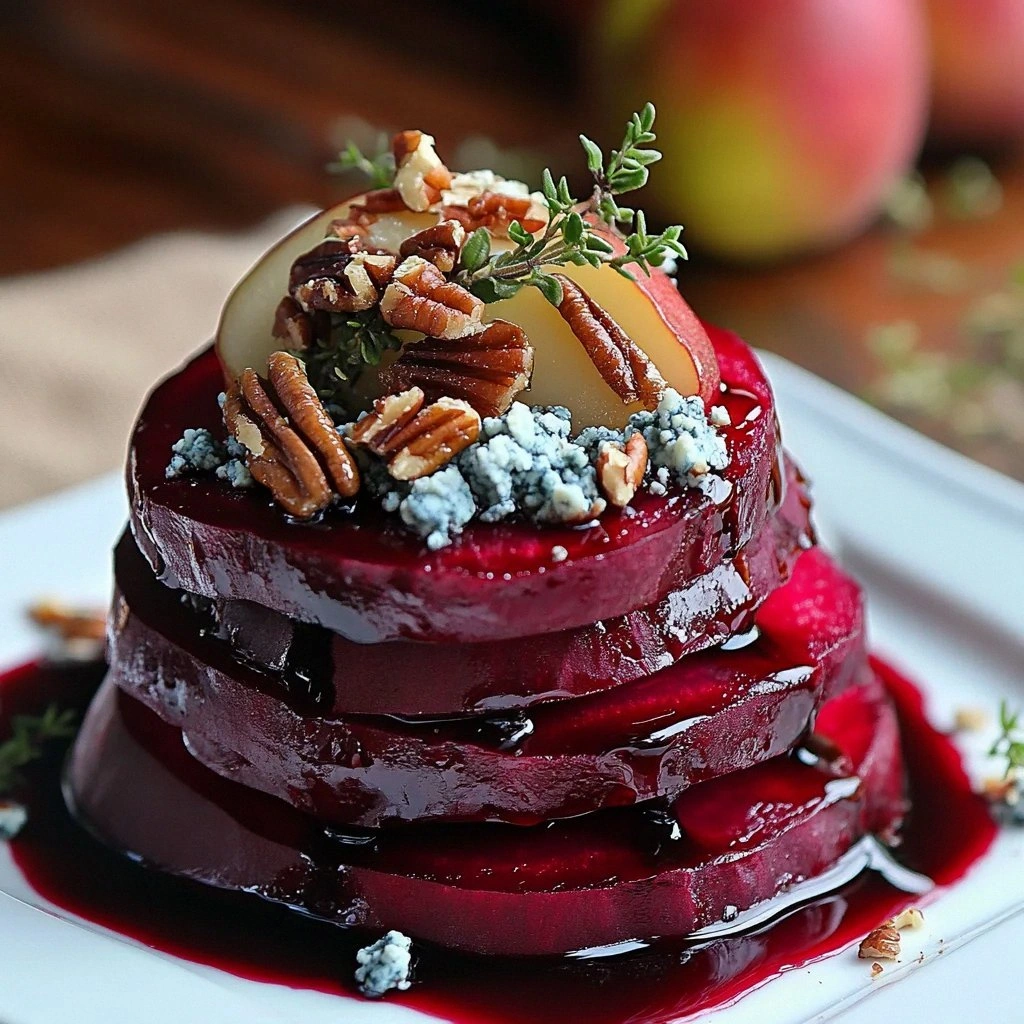
I still remember the day I swore off beet recipes forever. There I was, hosting my first dinner party, proudly presenting a sad, soggy beet salad that looked like something from a horror movie. My guests politely poked at it with their forks while I died inside. Fast forward three months, and I'm standing in my kitchen at midnight, stacking these ruby-red beauties into towers so stunning they could grace a magazine cover. The transformation wasn't just about technique — it was about discovering the magic that happens when earthy beets meet their perfect match in bold blue cheese, creating a flavor symphony that makes your taste buds do a happy dance.
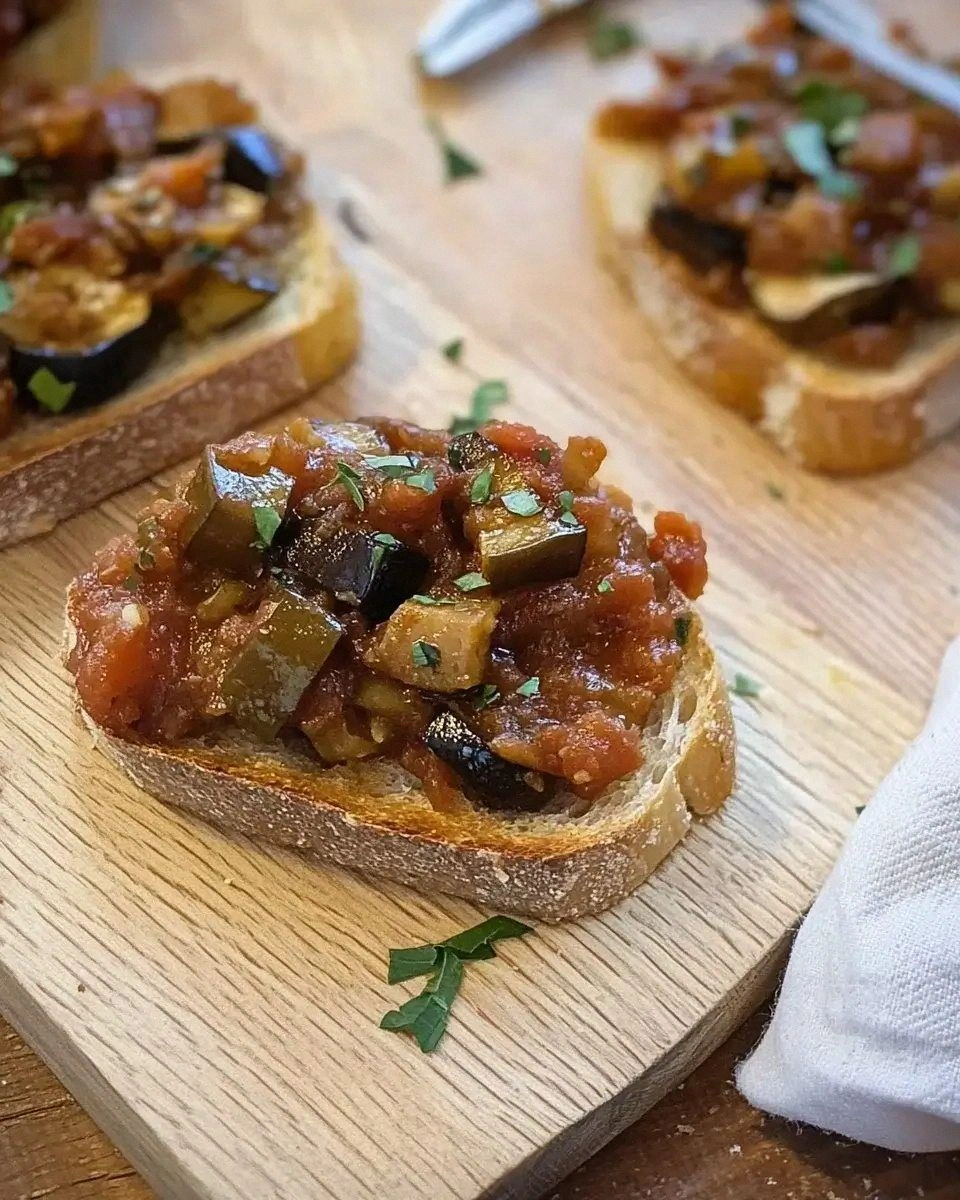
Picture this: It's a rainy Tuesday evening, and you're craving something that feels restaurant-worthy but doesn't require culinary school. You pull out some humble beets from the fridge — maybe they were an impulse buy at the farmers market, maybe they've been sitting there intimidating you for weeks. I get it. Beets can be scary. They're messy, they stain everything, and most recipes turn them into mush. But here's what nobody tells you: when you roast them just right, they become candy-sweet with crispy edges that shatter like thin ice, while staying tender inside like a perfectly baked potato.
The real game-changer came when I accidentally knocked over some blue cheese near my cooling beets. The pungent, tangy aroma mingled with the earthy sweetness in a way that made me stop mid-cleanup. That happy accident led to weeks of experimentation — different roasting temperatures, various cheese types, countless stacking methods. I tested this recipe on everyone from my picky nephew to my food-snob friend who claims to hate beets (she asked for seconds, by the way). Each tower disappeared faster than the last, and I knew I'd cracked the code.
What makes these towers absolutely irresistible isn't just the flavor combination — it's the drama. We're building edible architecture here, people. Layers of jewel-toned beets alternating with creamy, melty blue cheese, finished with a honey-balsamic glaze that ties everything together like the perfect accessory. The first bite hits you with sweet and salty, then the tang kicks in, and suddenly you're reaching for another before you've even swallowed the first. Let me walk you through every single step — by the end, you'll wonder how you ever made it any other way.
What Makes This Version Stand Out
Flavor Bomb: Most beet recipes play it safe, but we're going bold. The combination of roasted beets' natural sweetness with sharp blue cheese creates a taste explosion that makes your palate sit up and pay attention. It's like your favorite sweet and salty snack grew up and got sophisticated.
Texture Paradise: Forget everything you think you know about beet texture. We're roasting these babies until the edges caramelize into crispy perfection while the centers stay fork-tender. The blue cheese melts into every crevice, creating pockets of creamy goodness that contrast beautifully with the beet's firm bite.
Visual Showstopper: These towers look like they belong in a fine dining restaurant, but they're surprisingly easy to assemble. The deep purple beets layered with white cheese create a stunning visual that'll have your guests whipping out their phones before they even taste it.
Make-Ahead Magic: Here's the beautiful secret — you can roast the beets up to three days ahead. When you're ready to serve, just warm them slightly, stack with cheese, and boom. Restaurant-quality appetizer in under ten minutes. I've served these at everything from fancy dinner parties to casual game nights.
Ingredient Integrity: This recipe celebrates each component rather than masking them. The beets aren't buried under heavy sauces, and the blue cheese isn't competing with a dozen other flavors. It's honest, straightforward cooking that lets quality ingredients shine.
Universal Crowd-Pleaser: I dare you to taste this and not go back for seconds. Even self-proclaimed beet haters get converted. There's something about the sweet-salty-tangy combo that hits all the pleasure centers in your brain. My neighbor's eight-year-old, who survives on chicken nuggets, devoured three towers.
Effort-to-Impact Ratio: For something that looks this impressive, the actual work time is minimal. Most of it is hands-off roasting time while you binge-watch your favorite show. The assembly takes minutes, but everyone will think you slaved away for hours.
Alright, let's break down exactly what goes into this masterpiece...
Inside the Ingredient List
The Flavor Foundation
The beets are obviously the star here, but not just any beets will do. You want medium-sized ones — about the size of a tennis ball — because they roast evenly and stack perfectly. Baby beets are too small and get lost in the cheese, while the massive ones take forever to cook and can be woody in the center. Look for firm, unblemished skins with deep color. The darker the beet, the more intense that sweet-earth flavor we're after.
Blue cheese selection is where most people go wrong. They grab whatever's cheapest and then wonder why their towers taste like feet wrapped in gym socks. You want something creamy and tangy, not crumbly and aggressive. I discovered that Danish blue or gorgonzola dolce work perfectly — they melt beautifully and have enough punch to stand up to the beets without overwhelming them. If you've ever struggled with blue cheese being too strong, you're not alone — and I've got the fix.
The Texture Crew
Walnuts add the crucial crunch factor that takes these towers from good to legendary. Don't skip them — they're not just garnish, they're texture insurance. Toast them until they smell nutty and look slightly darker. That toasty flavor complements both the beets and cheese like they were born to be together. I've tried pine nuts and pecans, but walnuts have that perfect earthy note that echoes the beets.
Honey might seem like an odd addition, but it's the secret weapon that bridges sweet and savory. It melts into the warm beets, creating a glossy glaze that makes everything taste more expensive. Don't substitute sugar here — honey's complex floral notes add depth that plain sugar can't touch. A little goes a long way, but without it, the towers taste flat and one-dimensional.
The Unexpected Star
Balsamic vinegar reduction is where the magic happens. We're not just drizzling straight balsamic — we're reducing it until it becomes syrupy and intensely flavored. This concentrates the sweetness and creates a sauce that coats the back of a spoon like velvet. The tangy notes cut through the rich cheese and sweet beets, creating perfect balance. It's like having a professional sauce chef living in your kitchen.
Fresh thyme adds an herby note that makes everything taste more sophisticated. Dried herbs won't work here — they taste like dusty hay compared to fresh. Strip the leaves from woody stems and scatter them over the warm beets. The heat releases their essential oils, perfuming the whole dish with woodsy aromatics.
The Final Flourish
Good olive oil for drizzling shouldn't be the cheap stuff you use for cooking. This is your finishing touch, the last thing that hits the plate. A peppery, grassy olive oil adds another layer of flavor that makes people close their eyes and sigh contentedly. It's the difference between good and unforgettable.
Flaky sea salt isn't just for show — those crunchy crystals provide little bursts of salinity that wake up all the other flavors. Regular table salt dissolves and disappears, but flaky salt adds texture and visual appeal. Sprinkle it on just before serving so it stays crisp and doesn't dissolve into the warm ingredients.
Everything's prepped? Good. Let's get into the real action...
The Method — Step by Step
- Preheat your oven to 425°F — and yes, you need it this hot. Lower temperatures make beets steam instead of roast, and we want those crispy, caramelized edges that make people weak in the knees. While it's heating, scrub your beets under cold water, but don't peel them yet. The skins slip right off after roasting, and they protect the flesh from drying out. Trim off the greens (save them for later) and any long root tails, but leave about an inch of stem to prevent bleeding.
- Wrap each beet individually in foil — this is crucial for even cooking. Think of it like giving each beet its own little sauna. Place them on a baking sheet because they'll leak beet juice, and you don't want to explain purple stains on your oven to anyone. Roast for 45-60 minutes, depending on size. They're done when a knife slides in with no resistance, like butter. The smell that fills your kitchen? Pure earthy sweetness that'll make you understand why people fall in love with root vegetables.
- While the beets roast, make your balsamic reduction. Pour one cup of balsamic vinegar into a small saucepan and bring it to a gentle simmer. Don't walk away from the stove here — it goes from perfect to burnt faster than you can say "beet towers." Stir occasionally and watch it transform from thin liquid to glossy syrup. When it coats the back of a spoon and you can see the bottom of the pan briefly when you drag a spatula through, you're there. This takes about 15-20 minutes, and your house will smell like an Italian grandmother's kitchen.
- Toast your walnuts in a dry skillet over medium heat. This isn't optional — untoasted walnuts taste like cardboard and will ruin your towers. Shake the pan every 30 seconds so they don't burn. They're ready when they smell nutty and look slightly darker. Tip them onto a plate immediately because they'll keep cooking in the hot pan. Roughly chop them so you get some big pieces for crunch and some smaller bits for even distribution.
- When the beets are cool enough to handle, slip off the skins — they'll come off like silk stockings. The contrast between the rough exterior and smooth interior always amazes me. Slice them into 1/4-inch rounds, trying to keep them uniform so your towers don't topple. If some slices are thicker than others, group similar sizes together for even stacking. Don't worry about perfect circles — the rustic look is part of the charm.
- Warm a non-stick skillet over medium heat. This is where the magic happens — we're going to crisp up those beet slices on both sides. Work in batches so you don't crowd the pan. Let them sizzle for 2-3 minutes per side until the edges caramelize and turn almost black in spots. That sizzle when it hits the pan? Absolute perfection. The sugars in the beets are caramelizing, creating complex flavors that'll make your knees weak.
- Assembly time — my favorite part! Start with a beet slice on each plate. Crumble a thin layer of blue cheese over it, letting it fall into all the nooks and crannies. Top with another beet slice and repeat the cheese layer. Most towers are 3-4 layers high, depending on your beet size. Don't go taller or they'll become a Jenga situation waiting to happen. The cheese should be visible but not overwhelming — we're building flavor, not a cheese mountain.
- Slide the towers under the broiler for 2-3 minutes — watch them like a hawk! The cheese should melt and bubble but not brown. This is the moment of truth. When you see the cheese start to glisten and slump slightly, they're ready. Overcooking makes the cheese separate and get greasy, so pull them out the second they look glossy. Let them rest for 2 minutes — this lets the cheese set slightly so your towers don't collapse when you add the final touches.
- Drizzle with your balsamic reduction in a zigzag pattern — channel your inner Jackson Pollock. Add a light shower of toasted walnuts, letting some fall around the plate for visual appeal. Finish with a few fresh thyme leaves, a glug of good olive oil, and those flaky salt crystals. Serve immediately while the cheese is still warm and melty. The first person to dig in will make that involuntary "mmm" sound, and you'll know you've achieved greatness.
That's it — you did it. But hold on, I've got a few more tricks that'll take this to another level...
Insider Tricks for Flawless Results
The Temperature Rule Nobody Follows
Here's what separates amateur beet cooks from the pros: temperature management. Your beets need to be warm when they meet the cheese, or the cheese won't melt properly into all those crevices. But if they're too hot, the cheese separates and gets oily. The sweet spot is warm enough to touch but not hot enough to burn your fingers. Think warm bath water temperature. A friend tried skipping this step once — let's just say it didn't end well. Her cheese stayed in solid chunks and the whole thing tasted like a salad bar gone wrong.
Why Your Nose Knows Best
Smell is your most underutilized kitchen tool here. When the beets are perfectly roasted, your kitchen will smell like sweet earth and caramel. When the walnuts are toasted, you'll get that nutty aroma that makes your mouth water. Trust these smells — they're better than any timer. If something doesn't smell amazing, it probably isn't ready yet. I once pulled beets too early because the timer said so, and they tasted like crunchy dirt. Your nose knows.
The 5-Minute Rest That Changes Everything
After you broil the towers, resist every instinct to serve them immediately. Those five minutes let the cheese settle into every beet crevice, creating a unified flavor that's greater than the sum of its parts. The cheese firms up just enough to hold everything together, but stays melty and luscious. During this time, the beets absorb some of the cheese flavor, and the whole thing becomes cohesive rather than just stacked ingredients. It's like the difference between a good band and a great one — they need to play together, not just at the same time.
The Plate Temperature Secret
Warm plates aren't just for fancy restaurants — they're your insurance policy against congealed cheese. Cold plates shock the warm cheese, making it seize up and get rubbery. Pop your serving plates in a warm (not hot) oven for 2 minutes, or run them under hot water and dry them thoroughly. Your towers will stay luscious longer, and you won't have that awkward moment where the cheese forms an unappetizing skin. It's a small step that makes a huge difference, especially if you're serving these at a dinner party where people might linger over conversation.
The Cheese Distribution Trick
Instead of randomly crumbling cheese, use a microplane or fine grater for the bottom layers and save the bigger crumbles for the top. This creates a better melt-to-coverage ratio and prevents the cheese from sliding out when you cut into the tower. The fine shreds melt into the beet's surface, acting like delicious glue, while the bigger pieces on top give you those Instagram-worthy cheese pulls. It's all about strategic cheese placement, my friends.
Creative Twists and Variations
This recipe is a playground. Here are some of my favorite ways to switch things up:
The Mediterranean Makeover
Swap the blue cheese for creamy goat cheese, add a layer of sun-dried tomatoes between beet slices, and finish with a sprinkle of za'atar instead of thyme. The tang of goat cheese plays beautifully with sweet beets, and those sun-dried tomatoes add umami depth that makes people ask for your secret ingredient. Drizzle with good olive oil infused with lemon zest for brightness.
The Fall Harvest Version
Add a layer of caramelized onions between each beet slice — they add sweetness and depth that screams autumn comfort. Use aged cheddar instead of blue for a milder, nuttier flavor profile. Top with candied pecans instead of walnuts, and add a few sage leaves fried in butter. This version tastes like Thanksgiving decided to get fancy and I am here for it.
The Heat Seeker's Dream
Add a thin layer of pepper jelly between beet slices for sweet heat that builds slowly. Use a blue cheese that's been blended with a touch of cream cheese to tame the fire. Finish with pickled jalapeños and a drizzle of hot honey. The contrast between cool, creamy cheese and spicy jelly creates a flavor rollercoaster that's addictive. If you've ever struggled with blue cheese being too mild, this version fixes that completely.
The Breakfast Tower
Smaller towers served on toasted English muffins with a poached egg on top — suddenly you've got the most impressive brunch dish ever. The runny yolk mingles with the melted cheese and creates a sauce that's pure luxury. Add some wilted spinach between layers for color and nutrition. Your brunch guests will think you've been secretly attending culinary school.
The Dessert Beet
Before you run away screaming, hear me out. Use golden beets instead of red, swap blue cheese for mascarpone sweetened with honey, and add a layer of candied ginger between slices. Finish with a dark chocolate drizzle and candied orange peel. It's like beet cheesecake meets tiramisu, and it's surprisingly incredible. The skeptical faces turn to wide-eyed wonder after the first bite.
The Everything Bagel Version
Everything bagel seasoning is having a moment, and it works shockingly well here. Mix some into your cream cheese layer between beet slices, top with smoked salmon bits, and finish with capers and dill. It's like your favorite bagel got deconstructed and dressed up for a black-tie event. The sesame and poppy seeds add nuttiness that complements the beets perfectly.
Storing and Bringing It Back to Life
Fridge Storage
Here's the reality — these towers are best fresh, but life happens. Store components separately for best results: roasted beet slices in an airtight container for up to 5 days, blue cheese wrapped tightly for 1 week, and balsamic reduction in a jar at room temperature indefinitely. Assembled towers will keep for 2 days, but the cheese might get a bit weepy. Add a tiny splash of water before reheating — it steams back to perfection. The key is not over-reheating, or you'll have cheese soup with beet chunks.
Freezer Friendly
Roasted beet slices freeze beautifully — who knew? Lay them in a single layer on a baking sheet, freeze until solid, then transfer to freezer bags. They'll keep for 3 months and thaw in minutes on the counter. The texture stays surprisingly good, though they're best used in applications where they'll be warmed. I wouldn't recommend freezing assembled towers unless you enjoy cheese with the texture of rubber bands. But having roasted beets ready to go means you can whip these up for unexpected guests in under 15 minutes.
Best Reheating Method
The microwave is your enemy here — it turns cheese into a rubbery mess faster than you can say "leftovers." Instead, warm beet slices in a dry skillet over medium heat for 2-3 minutes per side. Add cheese to the warm beets and let it melt from residual heat. If you're in a rush, a 300°F oven for 5-7 minutes works too. The goal is gentle warming, not cooking. Think of it like waking up the flavors rather than recooking them. Your future self will thank you when you're eating towers that taste almost as good as fresh.