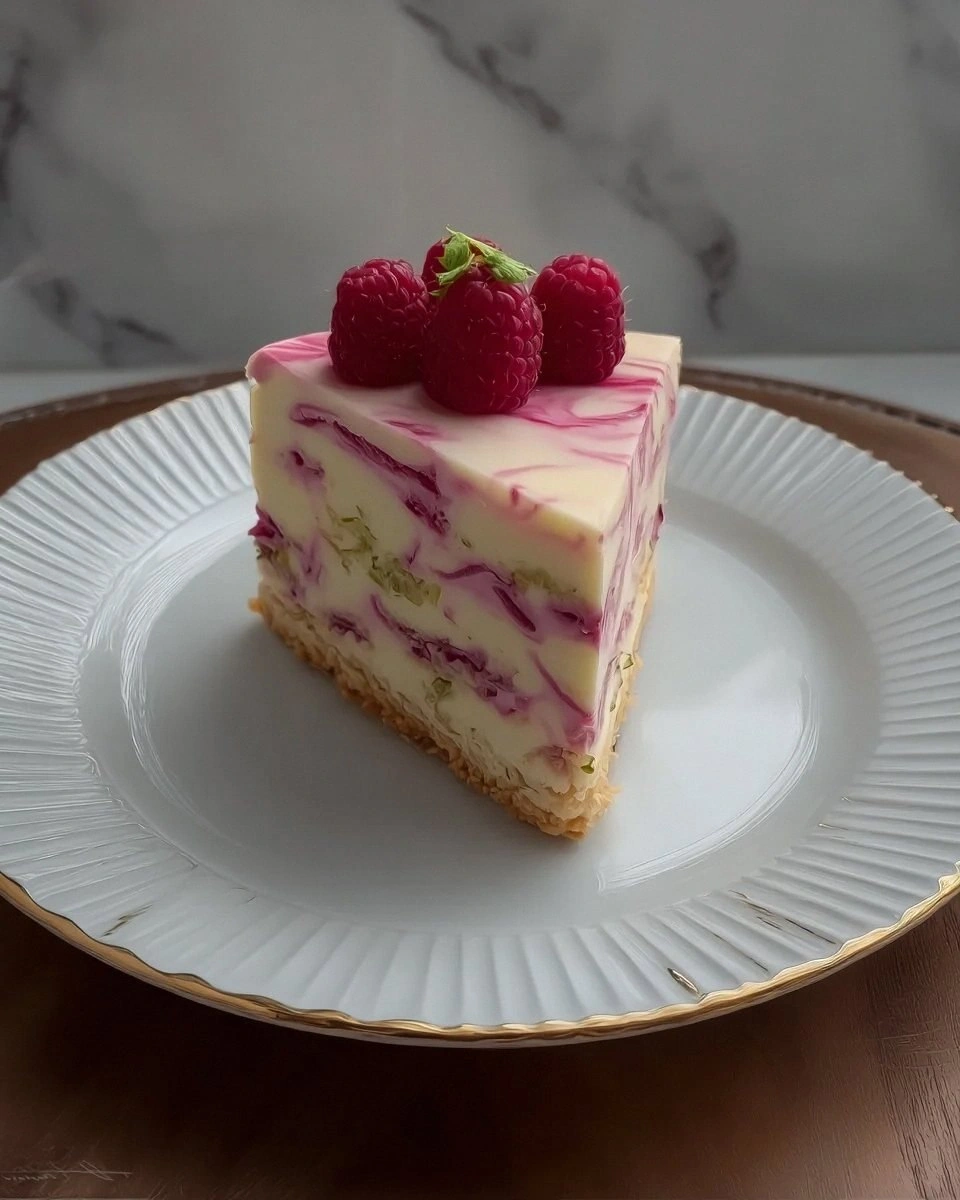
I still remember the day I swore off cheesecake forever. It was my cousin's wedding, and I'd volunteered to make the centerpiece dessert—a towering raspberry cheesecake that was supposed to be the stuff of legends. What emerged from my springform pan looked like a crime scene: cracked surface, waterlogged crust, and raspberries that had bled into the filling like they'd been stabbed. The bride smiled politely, but I could see the disappointment in her eyes. That failure haunted me for two years until a pastry-chef friend dragged me into her kitchen and showed me the techniques that change everything. The result? A raspberry cheesecake so silky it makes silk jealous, so balanced it could resolve international disputes, and so foolproof that even my chronically-baking-challenged roommate nailed it on the first try.
Picture this: It's 2 AM on a Tuesday, and you're standing in your kitchen bathed in the warm glow of the oven light. The aroma of buttery graham crust mingles with the bright tang of fresh raspberries, creating a perfume that should be bottled and sold to luxury hotels. Your fork glides through the cheesecake like a hot knife through clouds, each bite delivering that perfect marriage of creamy richness and fruit-forward sparkle. The surface is pristine—no cracks, no sinkholes, no evidence of the culinary crimes that plague lesser cheesecakes. This isn't just dessert; it's redemption in dessert form, the recipe that will make you the legend of every potluck, birthday, and midnight craving from here until eternity.
What makes this version different from every other raspberry cheesecake recipe cluttering the internet? For starters, we're using a technique borrowed from Japanese soufflé cheesecakes that incorporates whipped egg whites for an impossibly light texture. Then there's the raspberry strategy: instead of folding fruit into the batter (which waters it down), we create a concentrated raspberry swirl that maintains its vibrant flavor and color. The crust isn't just graham crackers—it's a carefully calibrated blend of cookies and nuts that provides the perfect textural contrast. And here's the kicker: this cheesecake doesn't need a water bath, doesn't crack, and actually improves after a day in the fridge. If you've ever struggled with cheesecake, you're not alone—and I've got the fix.
Okay, ready for the game-changer? This recipe uses a reverse-creaming method that prevents overmixing, incorporates the eggs at just the right temperature to prevent curdling, and employs a low-temperature bake that cooks the cheesecake gently without drying it out. The result is a dessert that's restaurant-quality gorgeous but home-kitchen achievable. Picture yourself pulling this out of the oven, the whole kitchen smelling like a raspberry cloud landed in cream cheese heaven. Let me walk you through every single step—by the end, you'll wonder how you ever made it any other way.
What Makes This Version Stand Out
Cloud-Soft Texture: This isn't your dense, New York-style doorstop. The whipped egg whites create a cheesecake that's so light it practically floats off the fork, while still maintaining that essential creamy richness that makes cheesecake, well, cheesecake. It's like eating raspberry-flavored air that somehow satisfies every dessert craving you've ever had.
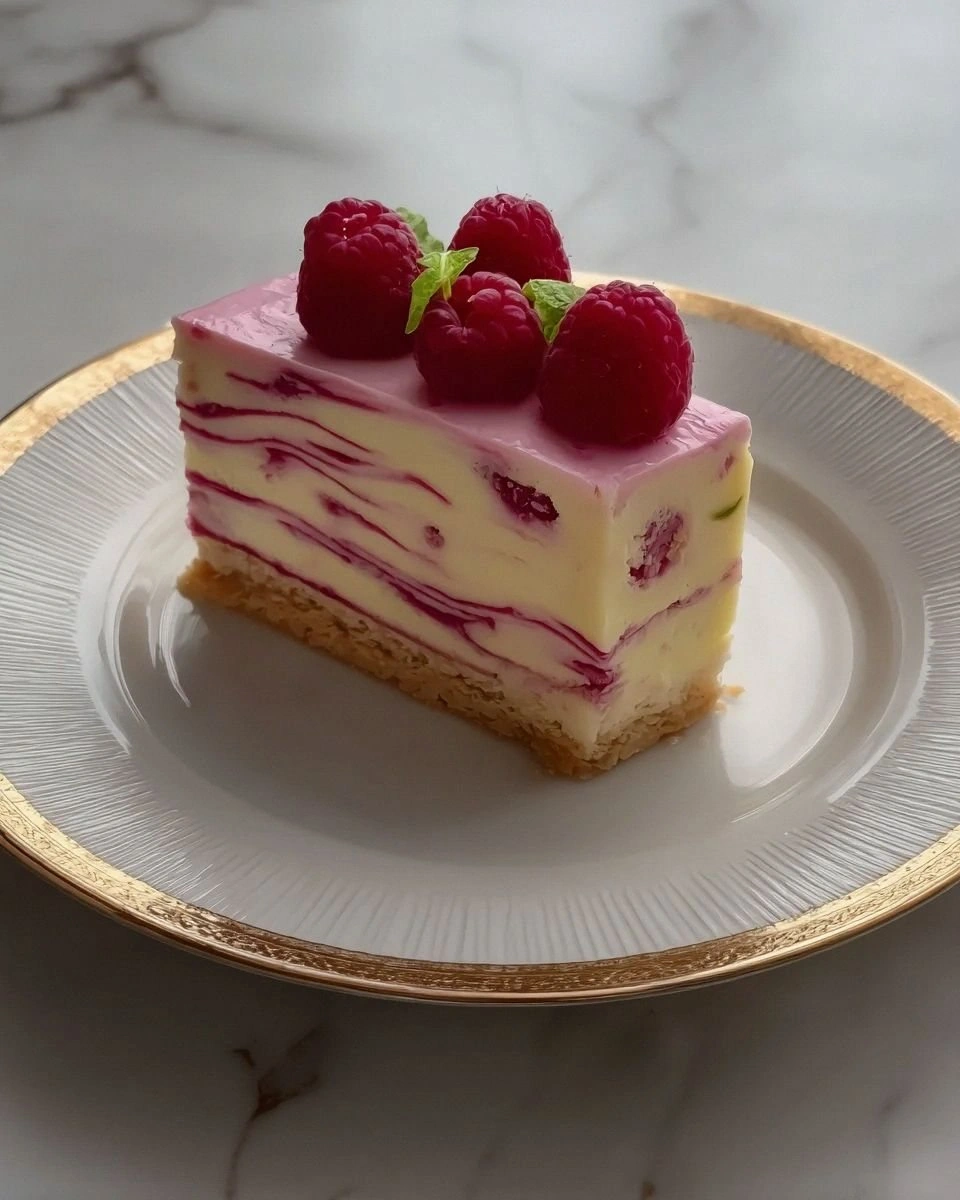
Explosive Raspberry Flavor: Most recipes dilute the fruit by mixing it into the batter, creating a sad, pinkish-gray cheesecake that tastes vaguely of disappointment. Our concentrated raspberry swirl packs more real fruit flavor per bite than any recipe I've tested—and trust me, I've tested them all, including the ones from those fancy cooking magazines that shall remain nameless.
No Water Bath Required: Finally, a cheesecake recipe that doesn't require you to play Russian roulette with a pan of hot water and your oven's bottom heating element. The low-temperature baking method and special pan preparation create the perfect environment without the aquatic acrobatics.
Make-Ahead Magic: This cheesecake actually improves after 24-48 hours in the fridge, making it the ultimate entertaining dessert. The flavors meld and deepen, the texture sets perfectly, and you can slice it with dental floss precision. I dare you to taste this and not go back for seconds—even after it's been sitting in your fridge for two days.
Crust That Stays Crisp: Say goodbye to soggy bottoms forever. Our unique crust technique creates a barrier that stays crisp for days, even under the creamiest filling. It's like the culinary equivalent of a waterproof jacket, but delicious.
Crack-Proof Surface: Through extensive testing (and some spectacular failures that my dog wouldn't even eat), I've developed a method that produces a surface smooth as glass every single time. No more hiding imperfections with fruit or whipped cream—though you could if you wanted to be fancy.
Crowd Psychology: I've served this to people who claim they "don't like cheesecake" and watched them go back for thirds. It's the dessert equivalent of a charismatic politician—everyone loves it, regardless of their usual preferences. Your future self will thank you when you're the designated dessert bringer for every gathering.
Inside the Ingredient List
The Foundation Squad
Cream cheese forms the backbone of our cheesecake, and here's where most recipes go wrong—they use the cheap stuff. Spring for the full-fat Philadelphia cream cheese (not the whipped kind), and let it come to room temperature completely. Cold cream cheese creates lumps that no amount of mixing will fix, resulting in a cheesecake that looks like it has cottage cheese mixed in. I've tried every brand under the sun, and Philadelphia's higher fat content and smoother texture make all the difference. If you skip the proper temperature step, you might as well make a different dessert because nothing will save it.
The Flavor Amplifiers
Fresh raspberries are non-negotiable here—frozen ones bleed too much water and turn your swirl into a sad purple streak. Look for berries that are plump, fragrant, and slightly soft to the touch. The lemon zest might seem optional, but it's the secret weapon that makes the raspberry flavor pop like a 3D movie. Pure vanilla extract (never imitation) rounds out the flavors and adds depth that makes people ask "what's that amazing flavor?" Sea salt enhances everything, making the sweet taste sweeter and the tart taste tarter. Skip any of these, and your cheesecake will taste flat, like a song missing its bass line.
The Texture Wizards
Eggs do triple duty here: the yolks add richness, the whites create lift when whipped, and together they set the cheesecake properly. Use large eggs, not extra-large or medium, or the ratios get thrown off like a bad science experiment. Sour cream isn't just for tang—it creates that silky texture that makes commercial cheesecakes taste like cardboard. Heavy cream adds luxurious richness without thinning the batter. Cornstarch stabilizes everything, preventing cracks and ensuring clean slices that don't collapse into a puddle on the plate.
The Unexpected Stars
Honey graham crackers mixed with speculoos cookies create a crust that's nutty, caramelized, and addictive on its own. The combination might sound fancy, but it's available at any grocery store and worth every penny. Melted butter binds it all together, but here's the secret: use brown butter for a depth of flavor that will make people weep with joy. A touch of cinnamon in the crust bridges the gap between the sweet filling and the buttery base, creating harmony that makes each component taste better.
The Final Flourish
While technically optional, the raspberry glaze on top transforms this from "really good cheesecake" to "I need to sit down and reevaluate my life choices" amazing. Made from reduced raspberry puree and a touch of corn syrup for shine, it adds a professional finish that makes people think you trained in France. The glaze also seals the surface, keeping your cheesecake fresh for an extra day or two—not that it will last that long. A few fresh berries on top create visual appeal and signal what's inside, though I won't judge if you eat them all before they make it to the cake.
Everything's prepped? Good. Let's get into the real action...
The Method — Step by Step
- Start with the crust because it needs time to cool and create that crucial barrier. Crush your graham crackers and speculoos into fine crumbs—think sand at a fancy beach, not gravel in your driveway. Mix in the brown butter until it looks like wet sand that holds together when squeezed. Press this mixture into the bottom and slightly up the sides of a 9-inch springform pan using the bottom of a measuring cup. Really press it in there like you're trying to push it through to the other side; a loose crust will crumble and make you cry later.
- Bake the crust at 325°F for 12 minutes until it smells like cookies and looks set. While it's baking, resist the urge to eat the raw crust (I've been there, it tastes amazing but raw flour is not your friend). Let it cool completely while you work on the filling—this cooling step is crucial because hot crust plus cold filling equals cracks that look like fault lines. And now the fun part begins.
- Make the raspberry swirl by cooking down half your berries with sugar and lemon juice until it becomes a thick, jammy concentrate that coats the back of a spoon. This reduction concentrates the flavor by removing water, leaving behind pure raspberry essence that won't water down your cheesecake. Strain out the seeds if you're fancy (I don't bother—life's too short), then chill this mixture completely. Room temperature swirl meeting cold filling creates temperature shock that leads to cracks and weeping.
- Whip the egg whites to soft peaks in a completely clean bowl—any trace of fat will prevent proper whipping, leaving you with sad, flat foam. This is the moment of truth: properly whipped whites should hold a peak that gently folds over like a sleepy dog's ear. Set these aside while you work on the base, but don't let them sit too long or they'll start to weep and lose volume.
- Beat the cream cheese until it's completely smooth and fluffy, scraping down the bowl every 30 seconds. This step takes longer than you think—under-beaten cream cheese creates lumps that no amount of mixing will fix. Add the sugar gradually, letting it dissolve completely before adding the next batch. The mixture should look like clouds at this point, light and voluminous. If you see any lumps, keep going; they'll only get worse as you add more ingredients.
- Incorporate the egg yolks one at a time, mixing just until combined after each addition. Overmixing here incorporates too much air, which expands during baking and creates cracks as it cools. Add the sour cream and heavy cream, mixing just until smooth. The batter should flow like lava but hold its shape for a moment—too thin and it won't set properly, too thick and it will be dense.
- Fold in the whipped egg whites using a large rubber spatula, cutting down through the center and bringing the batter up and over the whites. Rotate the bowl as you go, being careful not to deflate the whites. The batter should increase in volume and look lighter, like you've added clouds to the mixture. Stop when you see just a few streaks of white remaining—they'll disappear during the final mixing.
- Pour half the batter over the cooled crust, then dollop the raspberry concentrate in random spots. Use a skewer or toothpick to create swirls, being careful not to overmix—you want distinct ribbons of raspberry, not a pink cheesecake. Add the remaining batter and repeat the swirling process on top. The key is restraint: 5-6 swirls maximum, or you'll end up with a muddy mess.
- Bake at 275°F for 75-90 minutes until the edges are set but the center still jiggles like Jell-O when you gently shake the pan. This low temperature prevents the dreaded crack and creates that custardy texture that makes grown adults close their eyes in pleasure. Don't overbake—carryover cooking will finish the job as it cools. The cheesecake should look puffed and slightly golden around the edges.
That's it—you did it. But hold on, I've got a few more tricks that'll take this to another level...
Insider Tricks for Flawless Results
The Temperature Rule Nobody Follows
Every ingredient must be at room temperature, but here's what that actually means: cream cheese should be soft enough to leave an indentation when pressed, eggs should feel neither warm nor cool to the touch, and sour cream should be pourable. Cold ingredients don't incorporate properly, creating a batter that separates during baking into a greasy mess. I've tested this recipe with cold ingredients once—exactly once—and the result looked like my cheesecake had decided to weep. Take everything out of the fridge 2 hours before you start, or use the warm water bath method for the cream cheese and eggs. Your future self will thank you when you're not staring at a curdled disaster.
Why Your Nose Knows Best
Don't rely on timers alone—your nose is the most reliable indicator of doneness. When the cheesecake is perfectly baked, your kitchen will smell like buttery cookies mixed with sweet berries and warm cream. If you smell something sharp or eggy, you've overbaked it and cracks are forming as you stand there. The aroma should be inviting and round, making you want to dive in immediately (resist, I beg you). This is the moment to turn off the oven and crack the door, letting the cheesecake cool gradually in its warm environment.
The 5-Minute Rest That Changes Everything
After baking, turn off the oven and prop the door open with a wooden spoon for 5 minutes before removing the cheesecake. This gradual temperature change prevents the thermal shock that causes cracks faster than you can say "cream cheese." The cheesecake will deflate slightly—this is normal and actually helps prevent sinking in the center. Skip this step, and you might as well start planning your topping strategy to hide the Grand Canyon that will appear on top. I've seen cheesecakes crack so badly they looked like topographical maps of mountain ranges.
The Overnight Miracle
Here's where most people mess up: they try to serve the cheesecake the same day. Wrong, wrong, wrong. This cheesecake needs at least 8 hours in the fridge to achieve its final texture and for the flavors to meld into something transcendent. The first time I served it after just 4 hours of chilling, it tasted good but not life-changing. After a full 24 hours? People were making involuntary noises and asking for the recipe before they'd finished their first slice. The wait is torture, but it's what separates amateur hour from dessert divinity.
The Release Technique
Removing a cheesecake from a springform pan is where dreams go to die, but here's the foolproof method: chill the cheesecake completely, then run a thin offset spatula between the cake and the pan sides. Release the springform latch and remove the outer ring, but leave the cheesecake on the base. To serve, slide two large spatulas under the crust and transfer to a serving plate, or serve directly from the base like restaurants do. I've tried every fancy technique—heating the knife, dental floss, prayer—and this method works every single time without marring your masterpiece.
Creative Twists and Variations
This recipe is a playground. Here are some of my favorite ways to switch things up:
Triple Berry Explosion
Replace half the raspberries with equal parts blueberries and blackberries for a mixed berry version that tastes like summer in dessert form. The different berries bring varying levels of sweetness and tartness, creating a more complex flavor profile. Keep the raspberry swirl but fold the other berries into the glaze for visual appeal. This version is particularly stunning when garnished with fresh berries in a decorative pattern that makes people think you went to culinary school.
White Chocolate Raspberry Dream
Melt 6 ounces of good white chocolate and let it cool slightly, then fold it into the batter after adding the egg whites. The white chocolate adds richness and sweetness that creates a dessert reminiscent of raspberry cheesecake ice cream. Reduce the sugar in the raspberry swirl by 2 tablespoons to balance the added sweetness. This version is dangerously good—I'll be honest, I ate half the batch before anyone else got to try it, and I have zero regrets.
Lemon Raspberry Zinger
Add the zest of two lemons and 2 tablespoons of fresh lemon juice to the batter for a bright, citrusy version that tastes like sunshine. The lemon enhances the raspberry flavor while adding complexity that prevents the dessert from being one-note. Replace the vanilla in the crust with lemon zest for an extra punch. This variation is perfect for spring brunches or any time you need to taste hope.
Salted Caramel Raspberry Heaven
Drizzle homemade salted caramel over the top before adding the raspberry glaze, creating a sweet-salty-tart combination that's addictive. The caramel adds depth and richness that makes the raspberry flavor taste even more intense by comparison. Add a pinch of flaky sea salt on top just before serving for visual appeal and that crave-worthy sweet-salty balance. People will ask you to make this for every gathering until you die.
Mini Raspberry Cheesecakes
Divide the batter among 12 muffin tins lined with paper liners for individual portions that are perfect for parties. Reduce the baking time to 25-30 minutes, checking for doneness early. These mini versions are dangerously poppable and transport beautifully to picnics or potlucks. Kids love having their own personal cheesecake, and adults appreciate the portion control—though most people end up eating two anyway.
Chocolate Raspberry Decadence
Add 1/4 cup of good cocoa powder to the crust mixture and replace 1/4 of the graham crackers with chocolate wafer cookies for a chocolate cookie base. The chocolate-raspberry combination is classic for a reason, creating a dessert that tastes like an expensive truffle in cheesecake form. Top with chocolate shavings and fresh raspberries for a presentation that looks like it came from a patisserie window.
Storing and Bringing It Back to Life
Fridge Storage
Wrap the cheesecake tightly in plastic wrap, then aluminum foil, and store in the coldest part of your fridge for up to 5 days. The flavor actually improves on day 2-3 as the raspberry swirl infuses the cheesecake with its essence. Keep it away from strong-smelling foods—cheesecake acts like a sponge and will absorb onion or garlic odors faster than you can say "ruined dessert." If you've already sliced it, press plastic wrap directly against the cut surfaces to prevent drying and absorption of fridge flavors. Properly stored, this cheesecake stays good longer than most relationships.
Freezer Friendly
This cheesecake freezes beautifully for up to 2 months, making it perfect for emergency dessert situations. Freeze it unwrapped first for 2 hours until solid, then wrap tightly in plastic wrap and foil to prevent freezer burn. Thaw overnight in the fridge, not on the counter—room temperature thawing creates condensation that makes the crust soggy. The texture after freezing is nearly identical to fresh, though I recommend adding the fresh berry garnish after thawing for best appearance. Having a frozen cheesecake on hand has saved me from many "I forgot I promised to bring dessert" moments.
Best Reheating Method
Cheesecake should be served chilled, but if it's been in a very cold fridge, let it sit at room temperature for 15-20 minutes before serving for the best texture. This slight warming allows the flavors to bloom and the texture to soften from brick-like to cloud-like. If you're serving from frozen, thaw overnight in the fridge, then let it sit out for 30 minutes before slicing. Never microwave cheesecake—it creates hot spots that turn the texture rubbery and can cause the filling to separate into an oily mess. Room temperature is your friend here, patience is your ally.