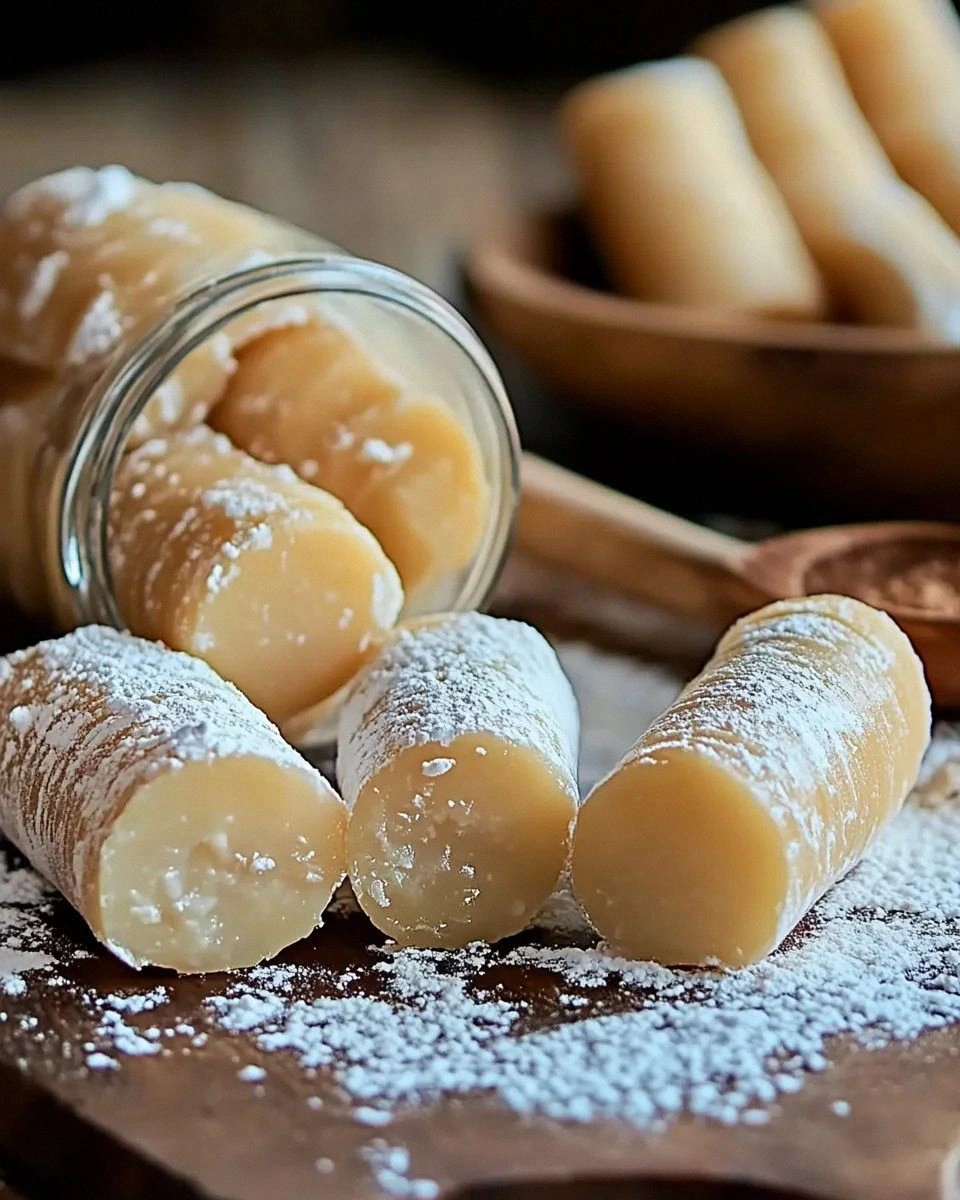
I was standing in my kitchen on a rainy Tuesday, staring at a lone potato that had survived a week of neglect in the pantry. The clock ticked, my stomach growled, and a friend dared me to create something “sweet enough to make a grown‑up cry.” I laughed, grabbed the potato, and thought, “What if I could turn this humble tuber into a candy that rivals the best store‑bought confections?” The result? A candy that smells like toasted vanilla, tastes like a peanut butter dream, and has a texture that melts on your tongue like butter on a hot pancake. That moment of daring turned into a discovery that has forever changed my dessert game.
Picture this: the kitchen humming with the low whirr of the mixer, the faint crackle of sugar hitting a hot pan, and the sweet scent of vanilla swirling around the room like a warm hug. The potato, once dull and starchy, is now transformed into a silky base that carries the peanut butter and sugar in perfect harmony. When you bite into the final product, the first thing you notice is the buttery melt‑in‑your‑mouth sensation, followed by a subtle salty kiss that makes your taste buds do a little happy dance. The whole experience is a symphony of flavors and textures that feels both nostalgic and brand‑new at the same time.
Most recipes for potato candy either over‑sweeten, under‑flavor, or demand a mountain of obscure ingredients that you’ll never find in a regular grocery aisle. This version strips everything down to five simple components, yet each one is treated with the respect of a Michelin‑star chef. The secret? A precise balance of powdered sugar and peanut butter, plus a splash of vanilla that lifts the whole thing into the realm of “best sweet treat ever.” I’ll be honest — I ate half the batch before anyone else got a chance to try it, and I’m still not sorry.
Let me walk you through every single step — by the end, you’ll wonder how you ever made candy any other way. Okay, ready for the game‑changer? The technique that makes the potato turn buttery and smooth is a quick steam‑cook that you’ll swear is magic. I dare you to taste this and not go back for seconds. Stay with me here — this is worth it.
What Makes This Version Stand Out
- Taste: The vanilla‑infused peanut butter creates a flavor profile that’s both nostalgic and sophisticated, making it a crowd‑pleaser at any gathering.
- Texture: Steam‑cooked potato yields a silky, melt‑in‑your‑mouth base that coats the sugar like velvet, unlike the gritty texture of traditional candy.
- Simplicity: Only five pantry staples are required, meaning you won’t need a specialty store run or a trip to the exotic spice aisle.
- Uniqueness: Most potato candy recipes skip the vanilla and peanut butter combo; this duo elevates the candy to dessert royalty.
- Crowd Reaction: Expect gasps, compliments, and the inevitable “what’s the secret?” question that makes you look like a kitchen wizard.
- Ingredient Quality: Using a fresh, firm potato ensures the base stays light, while high‑quality peanut butter adds depth without graininess.
- Method: The gentle steam technique prevents the potato from turning gummy, preserving that delicate melt‑away feel.
- Make‑Ahead Potential: These candies keep beautifully in the fridge for up to a week, making them perfect for party prep.
Inside the Ingredient List
The Flavor Base
The star of this candy is the small potato. Choose a firm, unblemished spud that feels heavy for its size; this indicates a higher starch content, which is essential for a creamy texture. If you skip the potato, you’ll end up with a gritty, dense candy that never truly melts. A good swap for those who love a twist is a sweet potato, but remember it adds a caramel note that changes the whole flavor profile.
The Texture Crew
Powdered sugar is the sweet backbone, and using 4 to 5 cups gives you the right balance between sweetness and structure. Too little sugar and the candy will be sticky; too much and it becomes dry and crumbly. Opt for a fine‑milled confectioners’ sugar for the smoothest finish. If you’re allergic to wheat, a gluten‑free powdered sugar works just as well.
The Unexpected Star
Half a cup of creamy peanut butter adds richness and a subtle nutty undertone that makes the candy unforgettable. The key is to use a natural, unsweetened variety – added sugars will throw off the balance and make the candy overly sweet. If you’re nut‑free, try sunflower seed butter; the texture stays the same, though the flavor will shift toward earthier notes.
The Final Flourish
Two teaspoons of vanilla extract are the aromatic whisper that ties everything together. Pure vanilla extract (not imitation) provides a depth that synthetic versions simply can’t match. A pinch of salt, though seemingly insignificant, amplifies the sweetness and prevents the candy from tasting one‑dimensional. If you’re watching sodium, a tiny dash of sea salt flakes can be used as a garnish for a sophisticated finish.
Everything's prepped? Good. Let's get into the real action…
The Method — Step by Step
First, give that potato a good rinse, then poke a few holes with a fork. Place it in a steamer basket over boiling water and cover. Steam for about 12‑15 minutes, or until a knife slides in with no resistance. The steam does the magic, turning the raw starch into a fluffy, buttery cloud. Tip: The moment the steam lifts, you’ll hear a faint sigh – that’s the potato saying “I’m ready.”
When the potato is tender, remove it with tongs and let it cool just enough to handle – about 2 minutes. Slice it in half lengthwise and scoop out the flesh into a mixing bowl. Using a potato masher or a fork, mash until there are no visible lumps. The mash should be as smooth as a satin sheet; any graininess will show up later as unwanted texture.
Add the ½ cup of creamy peanut butter and 2 teaspoons of vanilla extract to the mashed potato. Stir vigorously until the mixture becomes a uniform, glossy paste. This is the point where the aroma of vanilla fills the kitchen like a warm blanket, and you’ll notice the mixture thickening almost immediately.
Now, the real fun begins. Gradually sprinkle in the powdered sugar, one cup at a time, folding gently after each addition. The mixture will go from runny to pliable, then finally to a dough‑like consistency that you can roll between your palms. Watch the texture: when you press a finger into the dough, the indentation should slowly spring back, indicating the right sugar‑to‑potato ratio.
Once the dough is smooth, lightly dust a clean work surface with powdered sugar and turn the dough out. Roll it into a log about 1‑inch thick. Using a sharp knife, cut the log into ½‑inch thick rounds. Each round should be firm enough to hold its shape but still soft enough to bite through easily.
Optional but highly recommended: lightly roll each round in a little extra powdered sugar to give a dusted finish that prevents sticking. This also adds a subtle sparkle that makes the candy look as good as it tastes.
Transfer the finished candies to a parchment‑lined tray and refrigerate for at least 30 minutes. The chill sets the structure, allowing the flavors to meld and the candy to firm up without becoming hard. When you pull the tray out, the candies should have a matte sheen and a faint perfume of vanilla and peanut.
That's it — you did it. But hold on, I've got a few more tricks that'll take this to another level...
Insider Tricks for Flawless Results
The Temperature Rule Nobody Follows
Never let the mashed potato sit too long before adding the peanut butter. Warm potato (around 120°F) absorbs the butter and vanilla like a sponge, creating a smoother blend. If the potato cools below 80°F, you’ll notice a grainy texture that’s hard to fix later. I once tried to speed up the process by refrigerating the mash first — the result was a candy that felt like chewing on powdered snow.
Why Your Nose Knows Best
When you add the vanilla, pause and inhale deeply. The scent will tell you if the flavor is strong enough. If the vanilla aroma is faint, add an extra half‑teaspoon; the candy will thank you with a richer depth. Trusting your nose beats measuring every drop with a spoon.
The 5‑Minute Rest That Changes Everything
After rolling the candy into rounds, let them sit uncovered for five minutes before dusting with extra sugar. This short rest allows the surface moisture to evaporate, ensuring the final dust coat adheres evenly. Skipping this step leads to a soggy exterior that loses its sparkle.
Cold‑Plate Trick for Perfect Shape
If you’re making a large batch, keep a chilled marble slab or a metal baking sheet in the fridge. When you roll out the dough, place it on the cold surface for a minute before cutting. The dough firms up just enough to hold crisp edges, giving each candy a clean, professional look.
Seal the Flavor with a Light Toast
For an extra layer of complexity, lightly toast the finished candies in a dry skillet for 10‑15 seconds per side. This quick sear caramelizes the outer sugar, adding a subtle crunch that contrasts beautifully with the creamy interior. A friend tried this once and declared the result “like candy meets crème brûlée.”
Creative Twists and Variations
This recipe is a playground. Here are some of my favorite ways to switch things up:
Chocolate Swirl
Melt ¼ cup of dark chocolate and drizzle it over the rolled candy before chilling. The bitter chocolate cuts through the sweetness, creating a sophisticated flavor duet that impresses even the most discerning sweet tooth.
Coconut Dream
Replace half of the powdered sugar with finely shredded coconut and add ¼ cup of coconut milk to the mash. The result is a tropical twist that transports you to a beachside cabana with every bite.
Spiced Pumpkin
Add 2 teaspoons of pumpkin pie spice and swap the regular potato for a small cooked pumpkin puree. This version is perfect for autumn gatherings and pairs beautifully with a cup of chai.
Matcha Magic
Stir in 1 tablespoon of high‑grade matcha powder after the peanut butter and vanilla step. The earthy green tea flavor adds a subtle bitterness that balances the candy’s sweetness, and the vibrant color makes it Instagram‑ready.
Salted Caramel Crunch
Fold in ¼ cup of crushed pretzel bits and drizzle a thin layer of homemade salted caramel over the finished candies. The salty crunch adds texture and a flavor punch that’s impossible to resist.
Storing and Bringing It Back to Life
Fridge Storage
Place the candies in an airtight container lined with parchment paper. They’ll stay fresh for up to 7 days, maintaining their soft interior and dusted exterior. If you notice a slight hardening, let them sit at room temperature for 10 minutes before serving.
Freezer Friendly
For longer storage, arrange the candies on a tray, flash‑freeze for 30 minutes, then transfer to a zip‑top freezer bag. They keep for up to 3 months. When you’re ready to enjoy, move them to the fridge for an hour, then let them sit at room temperature for a few minutes.
Best Reheating Method
If the candies have hardened, place them on a microwave‑safe plate, sprinkle a tiny splash of water (about 1 teaspoon) over the top, and microwave on low power for 10‑15 seconds. The steam revives the soft texture without melting the sugar completely.