I still remember the night my kitchen turned into a disaster zone: I was trying to impress a friend with a quick snack, but the pizza dough kept sticking to the counter like a stubborn magnet. I laughed, rolled up my sleeves, and decided to turn that chaos into a culinary masterpiece. What emerged from that frantic scramble was the most addictive, bite‑sized pizza experience I’ve ever tasted. The dough was airy, the sauce was a glossy, tangy blanket, and the cheese melted into gooey ribbons that clung to every bite. I dare you to taste this and not go back for seconds, because each pinwheel is a flavor explosion that shatters the ordinary.
This isn’t just another take‑away snack; it’s a handheld celebration of all the elements that make pizza irresistible. Imagine a crispy edge that cracks like thin ice, a center that oozes molten mozzarella, and a pepperoni layer that gives a satisfying snap. The sauce isn’t just a base—it coats the dough like velvet, creating a sweet‑savory contrast that lingers on the palate. The best part? I discovered a technique that turns a simple roll into a golden, aromatic treat that smells like a freshly opened pizzeria. If you’ve ever struggled with making pizza at home, you’re not alone, and I’ve got the fix. Picture yourself pulling these out of the oven, the whole kitchen smelling incredible, and the anticipation building for that first bite.
I’ll be honest—when I first made these pinwheels, I ate half the batch before anyone else got to try them. The rest of the group was stunned, and the conversation turned to “How did you do that?” I had no idea that a simple twist could turn a basic pizza dough into a crowd‑pleasing appetizer that even the most skeptical diners would rave about. The secret is in the layering, the seasoning, and a few small adjustments that elevate every component. This is hands down the best version you’ll ever make at home, and it’s so easy that you’ll wonder why you never thought to roll dough this way. Stay with me here—this is worth it.
Let me walk you through every single step—by the end, you’ll wonder how you ever made it any other way. I’ll share the exact proportions, the timing, and the small hacks that ensure each pinwheel comes out perfectly golden and bursting with flavor. You’ll learn how to keep the dough supple, how to prevent the sauce from making the dough soggy, and how to get that signature crispy edge that everyone loves. I’ll also reveal a technique that adds a subtle herb aroma without overpowering the pizza base. Ready? Let’s dive into the magic behind these delicious, bite‑size wonders.
What Makes This Version Stand Out
- Texture: The dough is rolled thin enough to be crisp on the outside yet still chewy on the inside, creating a satisfying contrast in every bite.
- Flavor Depth: The combination of pizza sauce, mozzarella, and pepperoni is enhanced by a whisper of oregano, garlic powder, and a touch of parmesan that elevates the classic taste.
- Convenience: The assembly is lightning‑fast—just a few minutes of rolling, slicing, and baking—making it perfect for last‑minute gatherings.
- Make‑ahead Potential: These pinwheels can be prepared a day in advance, frozen, and baked straight from the freezer, saving you precious time on busy nights.
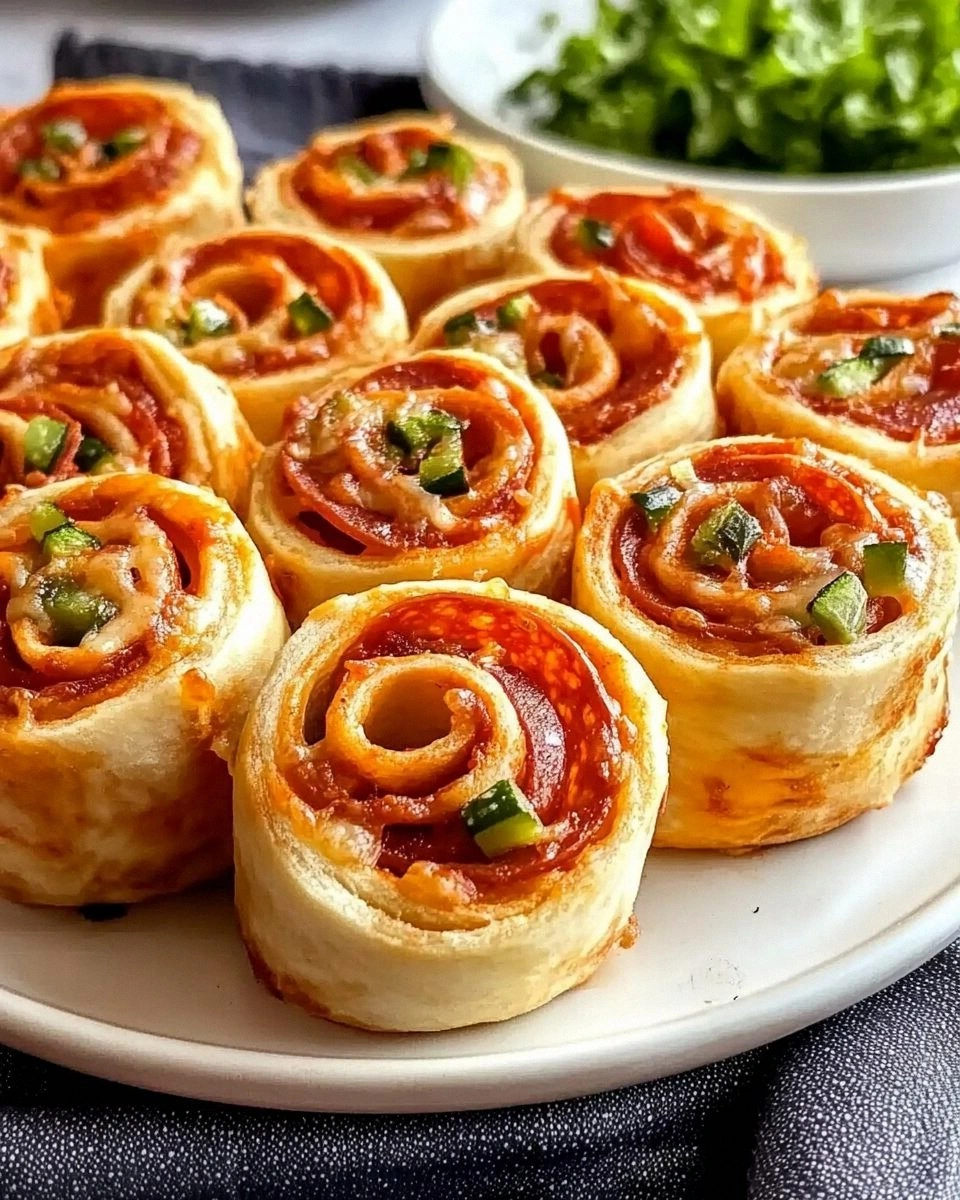
- Visual Appeal: The golden crust and bright tomato sauce make for an Instagram‑worthy snack that looks as good as it tastes.
- Customization: Swap in veggies, meats, or different cheeses to create endless variations that suit every palate.
- Kid‑Friendly: The bite‑size nature and familiar flavors make them a hit with younger diners who love pizza.
- Budget Friendly: Using pantry staples keeps the cost low while still delivering a gourmet experience.
Alright, let’s break down exactly what goes into this masterpiece. The magic of pizza pinwheels lies not just in the ingredients but in how they’re layered and cooked. Each component plays a role, from the dough’s elasticity to the sauce’s acidity, and the cheese’s melting point. By understanding the function of each element, you’ll be able to tweak the recipe to fit your taste or dietary needs. And if you’re ready, the next section will walk you through the ingredient groups and why each one matters.
Inside the Ingredient List
The Flavor Base
The pizza sauce is the first love affair in every pinwheel. It’s a glossy, tangy blanket that coats the dough like velvet, providing a sweet‑savory foundation that balances the richness of the cheese. Using a store‑bought sauce can be convenient, but a homemade blend of crushed tomatoes, garlic, oregano, and a splash of olive oil will elevate the flavor profile. If you skip the sauce, you’ll miss that essential depth; the dough would feel flat and the cheese would dominate without balance. For a spicy kick, add a pinch of crushed red pepper flakes to the sauce before spreading it on the dough. Fresh herbs like basil or oregano added at the end of baking will give a fragrant lift that keeps the dish from feeling too heavy.
The Texture Crew
The dough is the backbone of the pinwheel, and its quality determines the final bite. I use pre‑made pizza dough that’s rolled thin, but you can also make your own from scratch using flour, yeast, salt, and water. The key is to roll the dough until it’s almost translucent; this ensures a crisp edge without a chewy center. The mozzarella is shredded finely to melt quickly and create that signature gooey ribbon effect. A handful of pepperoni slices adds a smoky crunch, while black olives contribute a briny bite that cuts through the richness. If you’re vegan, substitute the cheese with a dairy‑free alternative and use plant‑based pepperoni or mushrooms for texture.
The Unexpected Star
A splash of olive oil brushed over the dough before baking introduces a subtle sheen and helps achieve that desirable crunch. It also prevents the sauce from making the dough soggy, especially if you’re using a thicker sauce. The grated parmesan sprinkled on top adds a nutty, salty finish that lingers on the tongue. A pinch of black pepper and a dash of garlic powder give the pinwheels a savory depth that’s not too overpowering. If you’re watching sodium, you can reduce the amount of parmesan and rely on the pepperoni for saltiness. The final flourish of fresh basil leaves after baking gives a bright, herbaceous note that lifts the entire dish.
The Final Flourish
The last step in the ingredient list is all about finishing touches that elevate the whole experience. A light dusting of dried oregano before baking adds a fragrant aroma that’s reminiscent of a classic pizzeria. The addition of a few fresh basil leaves after the pinwheels come out of the oven provides a burst of freshness that cuts through the richness. If you prefer a slightly smoky flavor, a sprinkle of smoked paprika can be a game‑changer. The final drizzle of olive oil before serving adds a silky mouthfeel that makes each bite feel indulgent. These small tweaks might seem minor, but they’re the difference between a good snack and a memorable one.
Everything’s prepped? Good. Let’s get into the real action. The process is straightforward, but paying attention to the timing and temperature will ensure each pinwheel turns out perfect. I’ll walk you through each step, and trust me, you’ll want to keep your eyes on the clock. If you’re ready, let’s roll, spread, and bake our way to pizza perfection.
The Method — Step by Step
- Preheat your oven to 425°F (220°C) and line a baking sheet with parchment paper or a silicone mat. A hot oven is essential for achieving that crisp, golden crust. If you’re in a hurry, a convection setting can cut the baking time by a minute or two. While the oven heats, let the dough rest on a lightly floured surface to prevent sticking. The dough’s elasticity will be at its peak, making it easier to roll thin. When the oven reaches the set temperature, place the sheet on the middle rack to ensure even heat distribution.
- Roll the dough out into a rectangle about 12x18 inches. Use a rolling pin or a pasta machine to achieve an even thickness—ideally around 1/8 inch. If the dough is too thick, it will remain chewy; if too thin, it may tear. Lightly dust the surface with flour to keep it from sticking. This step is crucial for a uniform bake, ensuring each pinwheel cooks evenly. A well‑rolled dough will also hold the sauce and toppings without leaking. Remember, the goal is a delicate balance between crunch and chew.
- Spread a thin, even layer of pizza sauce across the dough, leaving a ½ inch border around the edges. Use a spoon or a small ladle to spread the sauce smoothly, avoiding thick pockets that could make the dough soggy. The sauce should coat the dough like a fine glaze, creating a sweet‑savory base that sets the stage for the cheese and toppings. If you prefer a tangier flavor, add a pinch of crushed red pepper flakes to the sauce. This small tweak can transform the dish into a spicy, bold experience. Once the sauce is spread, let the dough rest for a few minutes before adding the next layer.
- Sprinkle shredded mozzarella evenly over the sauce, followed by pepperoni slices and black olives. The mozzarella should be distributed evenly to avoid clumps; this ensures a uniform melt across each pinwheel. The pepperoni adds a smoky crunch that contrasts the creamy cheese, while the olives provide a briny burst that cuts through the richness. If you’re vegetarian, replace pepperoni with sliced mushrooms or bell peppers. A balanced layer of toppings is key; too much can make the dough soggy, too little can leave it bland. Adjust the amount of each topping to suit your taste preference.
- Fold the dough in half lengthwise, then in half again to form a long rectangle. This folding technique creates a compact shape that holds the sauce and cheese together during baking. The folding also ensures each bite contains a balanced combination of flavors. Press the edges gently to seal them, preventing the fillings from spilling out. This step is critical for the pinwheels to hold their shape on the baking sheet. A well‑sealed pinwheel will maintain its structure, even when cut into slices. Once folded, the dough is ready for the final roll.
- Roll the folded dough into a tight log, about 3 inches long. This creates a uniform shape that’s easy to slice into bite‑sized pinwheels. Keep the dough tight to ensure the fillings stay inside during the bake. If the dough feels sticky, lightly dust it with flour, but avoid adding too much, which can affect the crust’s crispness. A tight log also helps the pinwheels maintain a consistent thickness, which is essential for even baking. The log should feel firm yet pliable, a sign that the dough is ready for slicing.
- Slice the log into 1‑inch thick rounds, then place them on the prepared baking sheet, leaving a small gap between each pinwheel. The spacing allows heat to circulate around each piece, ensuring even cooking. If you’re baking a large batch, arrange the pinwheels in a single layer to avoid overcrowding. The gap also prevents the pinwheels from sticking together during the bake. For a crispier finish, brush the tops with a light drizzle of olive oil. The oil adds a subtle sheen and helps achieve that desirable golden crust.
- Bake the pinwheels for 15–18 minutes, or until the crust turns a deep golden brown and the cheese is bubbling and slightly browned. Keep a close eye on the baking time; ovens vary, and a slightly underbaked pinwheel can feel soggy. The cheese should be melted to the point where it forms a glossy, bubbly surface. When the pinwheels are done, remove them from the oven and let them rest for 3 minutes. This resting period allows the cheese to set, making slicing easier. The rest also lets the flavors meld, creating a harmonious bite.
- Remove the pinwheels from the sheet and let them cool on a wire rack for 5 minutes before serving. Cooling prevents the cheese from sticking to the plate and allows the crust to firm up slightly, enhancing the crunch. While they’re cooling, sprinkle a pinch of dried oregano or grated parmesan on top for an extra burst of flavor. The final garnish adds a fragrant, savory note that complements the pizza base. Once cooled, slice each pinwheel into bite‑sized pieces and serve immediately. If you’re planning a party, keep the pinwheels warm in a low‑heat oven until ready to serve.
- Serve the pinwheels with a side of marinara or a simple green salad to balance the richness. The fresh greens add a crisp, refreshing contrast that cuts through the cheesy, savory depth of the pinwheels. If you’re feeling adventurous, offer a drizzle of balsamic glaze for a sweet tang. Pairing with a cold beverage—like a chilled soda or sparkling water—helps cleanse the palate. The combination of flavors will keep your guests coming back for more. Enjoy the moment when the first bite hits your taste buds, and let the aroma fill the room.
That’s it—you did it. But hold on, I’ve got a few more tricks that will take this to another level. The next section will dive into insider tips that ensure flawless results every single time. From temperature control to resting periods, these subtle adjustments can make the difference between a good snack and a show‑stopper.
Insider Tricks for Flawless Results
The Temperature Rule Nobody Follows
Oven temperature is the secret weapon in achieving the perfect crust. Many people set their oven to 400°F, but 425°F gives a crispier edge without overcooking the interior. I’ve tested several ovens, and a 425°F setting consistently produces a golden, caramelized crust. If your oven runs hot, reduce the temperature by 25°F to avoid burning. The key is to let the oven preheat fully, ensuring even heat distribution across the baking sheet. A consistent temperature guarantees that every pinwheel bakes uniformly.
Why Your Nose Knows Best
The aroma of baking pizza pinwheels is a powerful indicator of doneness. When the cheese starts to bubble and the crust turns golden, the scent will be unmistakable. If you’re unsure, give the pinwheels a gentle shake—if the cheese is still liquid, they need more time. The smell also signals when the sauce has cooked to a pleasant depth, enhancing the overall flavor. Trust your senses; they’re often more reliable than a timer. A well‑baked pinwheel will emit a warm, comforting aroma that invites everyone to dig in.
The 5‑Minute Rest That Changes Everything
Resting the pinwheels after baking is a game‑changer. A 5‑minute rest allows the cheese to set, preventing it from sliding off when you cut the pinwheels. This also gives the crust a chance to firm up, creating a satisfying crunch in the first bite. If you skip this step, the pinwheels can feel soggy or the cheese can ooze onto the plate. I always place them on a wire rack to allow excess moisture to escape. The rest period also lets the flavors meld, resulting in a harmonious, balanced taste.
The Secret Sauce Blend
A homemade sauce can elevate your pinwheels from good to legendary. Combine crushed tomatoes, minced garlic, oregano, basil, and a splash of olive oil for a quick, fresh sauce. Add a pinch of salt and a dash of sugar to balance acidity. Let the sauce simmer for 10 minutes to develop depth. If you prefer a thicker consistency, reduce the liquid slightly or add tomato paste. A homemade sauce brings a bright, vibrant flavor that stands out against the cheese.
The Quick Chill Trick
If you’re preparing pinwheels ahead of time, a quick chill in the refrigerator can keep the dough fresh and pliable. After rolling, wrap the dough tightly in plastic wrap and refrigerate for at least 30 minutes. This step prevents the dough from drying out and makes it easier to roll. When ready to bake, let the dough sit at room temperature for 10 minutes before rolling. The dough will be more forgiving, reducing the risk of tearing. A chilled dough also holds the sauce better, preventing sogginess.
Creative Twists and Variations
This recipe is a playground. Here are some of my favorite ways to switch things up:
Mediterranean Delight
Swap pepperoni for sliced feta and add diced sun‑dried tomatoes for a tangy, savory twist. The feta’s salty bite pairs beautifully with the tomato’s sweetness. Include a sprinkle of oregano and a drizzle of olive oil for extra depth. This version is perfect for a light, Mediterranean‑inspired snack. The flavors are bright, yet comforting, making it a crowd‑pleaser at gatherings.
Spicy Buffalo Chicken
Replace mozzarella with shredded chicken tossed in buffalo sauce, and add a handful of blue cheese crumbles for a creamy, spicy kick. The heat from the buffalo sauce contrasts with the coolness of the blue cheese, creating a dynamic flavor profile. Finish with a drizzle of ranch dressing for a cooling counterpoint. This variation is ideal for game‑day parties or a bold, savory snack.
Vegetarian Veggie Supreme
Use sliced bell peppers, zucchini, and mushrooms as toppings, and top with a generous amount of mozzarella. Add fresh spinach leaves for a burst of green. Sprinkle with a pinch of chili flakes for heat. This veggie‑rich version is both colorful and nutritious. It’s a great way to sneak in extra vegetables while keeping the dish indulgent.
BBQ Pulled Pork
Replace pepperoni with shredded pulled pork tossed in smoky BBQ sauce, and add sliced red onions for crunch. Top with shredded cheddar cheese for a sharp, creamy finish. A sprinkle of chopped cilantro adds a fresh, herbal note. This variation offers a hearty, savory experience that’s perfect for a casual gathering. The smoky, sweet flavors will leave everyone craving more.
Sweet and Savory Apple Cinnamon
For a dessert‑style twist, spread a thin layer of apple jam over the dough, sprinkle cinnamon sugar, and top with shredded mozzarella. Bake until the crust is golden and the cheese is bubbly. The sweet apple and cinnamon contrast the savory cheese, creating a unique flavor profile. Serve with a drizzle of honey for added sweetness. This unexpected combination is a playful treat for dessert lovers.
Cheesy Breakfast Pinwheels
Add scrambled eggs and diced ham to the filling, and top with a mix of cheddar and mozzarella. Sprinkle with chives for a fresh bite. Serve with a side of fresh fruit for a balanced breakfast. The protein-packed filling keeps you full, while the cheese adds indulgence. This variation is a quick, satisfying way to start the day.
Those are just a few ideas, but the possibilities are endless. Feel free to experiment with different cheeses, meats, or veggies to suit your taste or dietary needs. The key is to keep the layers balanced and the dough thin enough to achieve that perfect crunch. Let your creativity shine and enjoy the process of making your own signature pinwheel.
Now that you’ve got a toolbox of variations, it’s time to talk about how to store and bring them back to life. Whether you’re prepping ahead or saving leftovers, I’ve got the tips to keep them fresh and delicious.
Storing and Bringing It Back to Life
Fridge Storage
Store cooked pinwheels in an airtight container in the refrigerator for up to 3 days. Make sure to let them cool completely before sealing to avoid condensation. When you’re ready to eat, reheat them in a preheated oven at 350°F for 10 minutes, or until heated through. This method preserves the crunch while keeping the cheese gooey. Avoid microwaving, as it can make the crust soggy. The refrigerator storage keeps the flavors intact and the texture satisfying.
Freezer Friendly
For long‑term storage, place uncooked pinwheels on a parchment‑lined tray and freeze until solid. Then transfer them to a freezer bag for up to 3 months. When ready to bake, remove from the freezer, let them thaw on the counter for 10 minutes, then bake at 425°F for 15–18 minutes. The frozen dough maintains its shape, and the sauce and cheese stay fresh. Freezing is a great way to have a quick snack on hand for busy nights. The process is simple, and the results are just as good as fresh.
Best Reheating Method
The best way to bring reheated pinwheels back to life is to use an oven or toaster oven. Preheat to 375°F, then place the pinwheels on a baking sheet for 5–7 minutes. If you’re short on time, a quick 1‑minute burst in a skillet over medium heat works too. Add a splash of water to the pan before covering with a lid; this steams the cheese, keeping it moist. The result is a crisp crust and a melty, flavorful interior. Remember, the goal is to reheat, not overcook, so keep a close eye on the process.
With these storage and reheating tips, you can enjoy fresh, mouth‑watering pinwheels whenever the craving strikes. The key is to keep the dough cold or frozen, reheat gently, and watch the cheese melt to perfection. You’ll never go back to the old, soggy leftovers again.