I was in the middle of a frantic weekday dinner rush when a friend texted me, “You ever try a cake that never needs an oven?” I laughed, because my last attempt at a no‑bake dessert ended in a soggy mess that resembled a swamp more than a celebration. The next day, armed with a half‑filled freezer and a desperate craving for something sweet, I dug out a pack of Lotus Biscoff cookies and a tub of that caramel‑spiced spread that smells like a cozy café on a rainy morning. The kitchen filled with the buttery aroma of spices and the faint whisper of vanilla, and I swear the fridge gave a little shiver of anticipation. I was skeptical, but the idea of layering creamy, dreamy frosting between crunchy cookie sheets without ever turning on the oven felt like culinary sorcery.
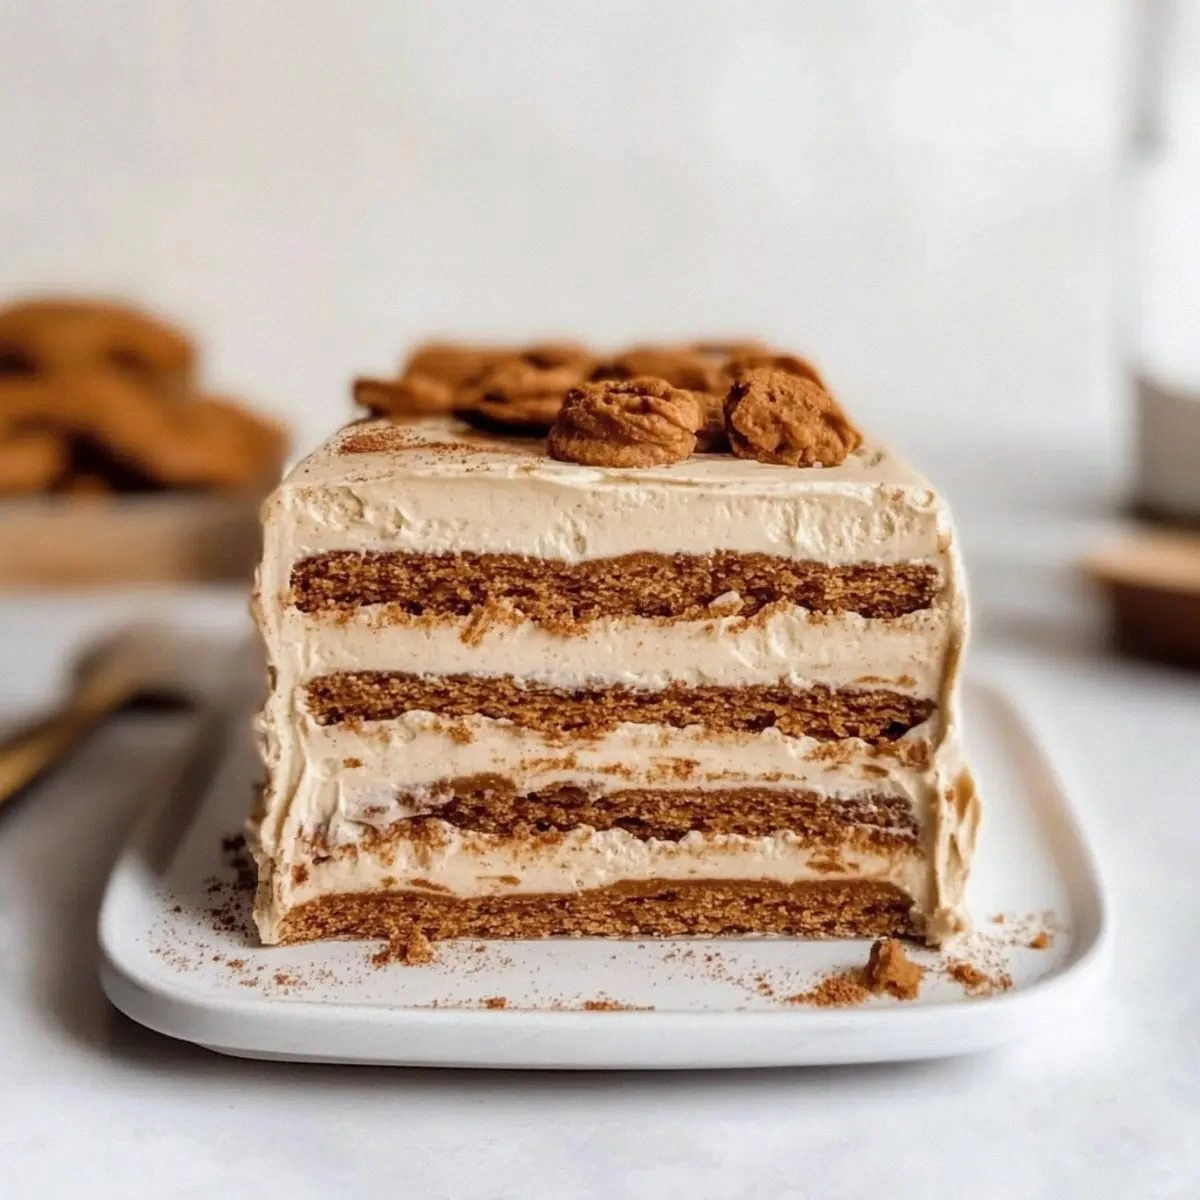
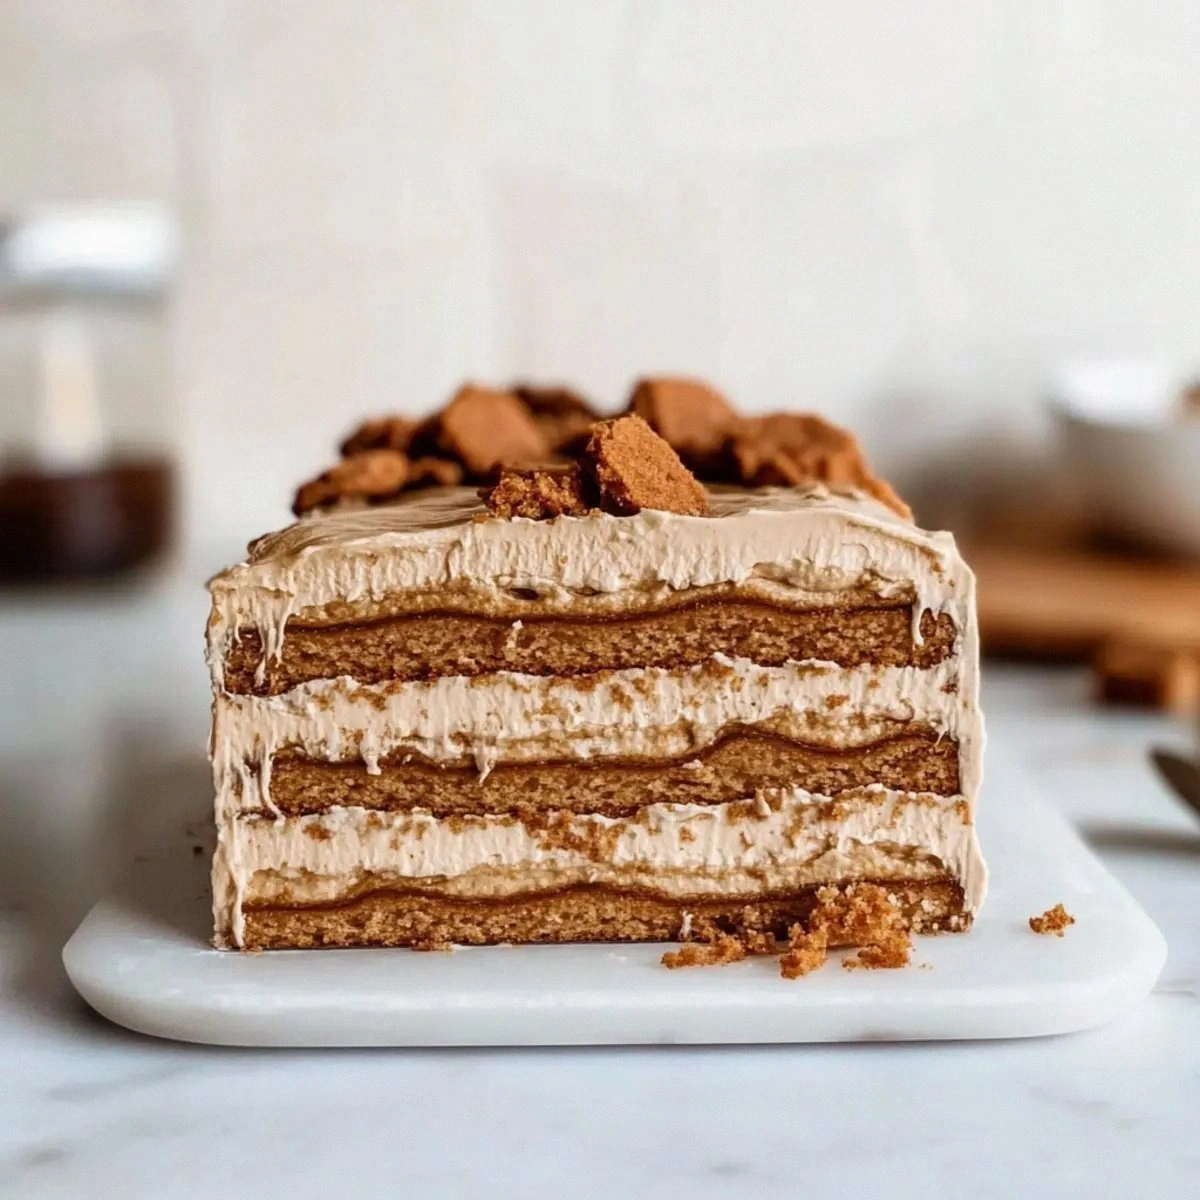
Fast forward a few hours, and I was standing in front of a glass dish, the top layer of glossy, golden‑brown cookie butter glistening like a sunrise over a calm sea. The first bite was a revelation: the cookies softened just enough to give way to the silky mascarpone‑cream, yet they kept a whisper of that iconic crunch that makes Biscoff so addictive. I dare you to taste this and not go back for seconds, because the combination of textures is a symphony that plays on repeat in your mouth. Most recipes get this completely wrong, either turning the cookies into a mushy slab or leaving the frosting too stiff, but this version hits the sweet spot every single time.
What sets this cake apart isn’t just the ingredients; it’s the method that respects each component’s personality. I’m being honest — I ate half the batch before anyone else got a chance to try it, and that’s a testament to how addictive this dessert truly is. The secret weapon? A quick, gentle whisk that aerates the heavy cream just enough to create cloud‑like peaks, then folds in mascarpone for that luxurious body. It’s a technique most home cooks overlook, thinking they need a mixer or a fancy stabilizer, but all you need is a sturdy whisk and a little patience.
Picture yourself pulling this out of the fridge after an evening of laughter, the whole kitchen smelling like a bakery in the Alps, the top layer shimmering with a thin veil of cookie butter that beckons you to dive in. Okay, ready for the game‑changer? We’re about to walk through every single step — by the end, you’ll wonder how you ever made a no‑bake cake any other way. This next part? Pure magic.
What Makes This Version Stand Out
- Taste: The caramel‑spiced Biscoff spread melds with vanilla‑kissed mascarpone, delivering a flavor depth that rivals a French pâtisserie.
- Texture: A perfect marriage of crunchy cookie edges and cloud‑soft cream layers creates a mouthfeel that’s both comforting and exciting.
- Simplicity: No oven, no complicated equipment — just a whisk, a bowl, and a fridge, making it accessible for even the most kitchen‑phobic.
- Uniqueness: The use of heavy cream and mascarpone together gives a richness that ordinary whipped cream can’t achieve.
- Crowd Reaction: Guests often ask for the recipe within minutes, and the “no‑bake” label makes it a conversation starter at any gathering.
- Ingredient Quality: Authentic Lotus Biscoff cookies and spread bring that signature caramel spice you can’t fake with generic alternatives.
- Method: The gentle folding technique preserves air, ensuring the cake stays light despite its indulgent ingredients.
- Make‑Ahead Potential: It sets beautifully in the fridge, allowing you to prepare it a day ahead for stress‑free entertaining.
Inside the Ingredient List
The Flavor Base
Heavy Cream (2 cups): This is the backbone of the frosting, providing that melt‑in‑your‑mouth richness. When you whip it to soft peaks, it creates a silk‑smooth canvas for the other flavors. Skipping the heavy cream and using milk will result in a runny, disappointing texture that can’t hold the structure. If you’re dairy‑free, try chilled coconut cream, but be ready for a subtle coconut undertone.
Pure Vanilla Extract (1 teaspoon): A splash of vanilla lifts the entire dessert, adding floral notes that balance the deep caramel of the Biscoff spread. Too much vanilla can overpower the subtle spice, so stick to the measured amount. For a twist, swap with a vanilla bean paste for extra specks of flavor.
The Texture Crew
Mascarpone Cheese (½ cup): This Italian cream cheese brings a buttery body that makes the frosting dense without feeling heavy. It also stabilizes the whipped cream, preventing it from weeping after a few hours. If you can’t find mascarpone, a blend of cream cheese and a touch of heavy cream works, though you’ll lose some of that luxurious melt.
Confectioner’s Sugar (¼ cup): The fine texture dissolves instantly, sweetening the frosting without gritty crystals. It also helps to stiffen the whipped mixture, giving it that perfect pipe‑able consistency. You could substitute with powdered erythritol for a low‑sugar version, but the mouthfeel will be slightly different.
The Unexpected Star
Lotus Biscoff Spread (½ cup): This is the hero of the recipe, delivering that signature caramel‑spice flavor that makes Biscoff so beloved. The spread also acts as a glue, helping the cookies adhere to each other while keeping the layers moist. If you’re out of Biscoff spread, a mix of dulce de leche and a pinch of cinnamon can mimic the flavor, but the texture won’t be quite the same.
The Final Flourish
Lotus Biscoff Cookies (24 pieces): These thin, caramel‑spiced biscuits are the structural backbone of the cake. Their delicate crunch softens just enough when layered with the frosting, creating that perfect bite‑size contrast. If you want a gluten‑free version, look for certified gluten‑free speculoos cookies; the flavor profile remains largely the same.
Kosher Salt (1 pinch): A pinch of salt amplifies the sweetness and balances the rich dairy components, preventing the dessert from tasting cloyingly sweet. It also enhances the caramel notes in the Biscoff spread. Skipping the salt is a common mistake that leads to a flat flavor profile.
Everything's prepped? Good. Let's get into the real action...
The Method — Step by Step
Start by chilling a large mixing bowl and the whisk attachments in the freezer for about 10 minutes. This cold environment is crucial; it helps the heavy cream reach stiff peaks faster and prevents the butter from melting prematurely. When you’re ready, pour the 2 cups of heavy cream into the frosty bowl.
Whisk the cream on medium‑high speed until soft peaks form, then add the ¼ cup of confectioner’s sugar and the pinch of kosher salt. Keep whisking until you achieve firm peaks that stand up straight when the whisk is lifted. This is the moment of truth — the cream should look glossy and hold its shape without wobbling.
Now, gently fold in the ½ cup of mascarpone cheese. Use a rubber spatula and a lift‑and‑turn motion, as highlighted in the earlier kitchen hack. The mixture should become thicker, with a pale yellow hue, and retain its airy structure. If you notice any lumps, gently scrape the sides of the bowl and continue folding until smooth.
Stir in the vanilla extract and the ½ cup of Lotus Biscoff spread. The spread will melt slightly from the warmth of the cream, creating a glossy, caramel‑spiced swirl. Keep folding until the spread is fully incorporated and the frosting is uniform. At this point, the frosting should be thick enough to spread but still soft enough to pipe.
Lay out a 9‑inch springform pan or a simple glass dish. Place the first layer of Biscoff cookies, arranging them side by side so they cover the bottom completely. The cookies will act as a base, absorbing a hint of moisture from the frosting and preventing sogginess.
Spread a generous layer of the whipped Biscoff frosting over the cookies, using an offset spatula to smooth it out. Aim for about ¼ inch thickness; this will be the first creamy barrier. The frosting should coat the cookies like velvet, sealing in their crunch.
Repeat the layering process: another sheet of cookies, then another thick layer of frosting. Continue until you’ve used all 24 cookies, finishing with a final frosting layer on top. The top should be smooth and slightly glossy, a perfect canvas for any garnish you might choose.
- Watch Out: If you press too hard while spreading, the cookies will crumble and lose their structural integrity. Light, even pressure is key.
Once layered, cover the dish tightly with plastic wrap and place it in the refrigerator. Let it chill for at least 4 hours, but overnight is ideal. The cooling time allows the cookies to soften just enough to meld with the frosting while retaining a pleasant bite.
When you’re ready to serve, run a thin knife around the edge of the pan to release the cake, then gently lift the springform ring (if using). Slice with a warm knife for clean cuts; the warmth helps glide through the creamy layers without dragging crumbs. Serve immediately or keep refrigerated for up to 3 days.
That's it — you did it. But hold on, I've got a few more tricks that'll take this to another level...
Insider Tricks for Flawless Results
The Temperature Rule Nobody Follows
Never, ever use room‑temperature cream for this cake. Cold cream whips faster and holds air better, giving you that lofty texture. I once tried using cream straight out of the fridge without pre‑chilling the bowl, and the result was a flat, buttery puddle. Keep everything icy until the very moment you start whisking, and you’ll thank yourself later.
Why Your Nose Knows Best
When you fold the mascarpone, pause and inhale the mixture. If you smell a faint buttery note with a hint of vanilla, you’re on the right track. If the scent leans toward raw dairy, you’ve over‑mixed and the texture may become grainy. Trust your nose as a quality control tool; it’s more reliable than a timer.
The 5‑Minute Rest That Changes Everything
After you finish the final frosting layer, let the cake rest uncovered for five minutes before sealing it with plastic wrap. This short pause lets the surface set, preventing condensation from forming under the wrap, which can make the top soggy. A quick five‑minute breather makes the difference between a glossy finish and a dull, wet one.
Cookie Placement Precision
When arranging the cookies, overlap them slightly by about a quarter of their width. This ensures there are no gaps that could lead to uneven soaking. A friend once left a wide gap, and the frosting pooled there, creating a soggy pocket that ruined the texture. Overlap, but don’t stack; you want a uniform layer.
Garnish with Intent
A light drizzle of melted Biscoff spread and a sprinkle of crushed cookies add visual appeal and a burst of texture. Avoid heavy drizzles; a thin ribbon is enough to catch the eye without overwhelming the palate. If you’re feeling adventurous, a pinch of sea salt on the top can elevate the caramel notes.
Creative Twists and Variations
This recipe is a playground. Here are some of my favorite ways to switch things up:
Mocha Madness
Swap half of the Biscoff spread for a dark chocolate hazelnut spread and add a teaspoon of espresso powder to the cream. The result is a coffee‑kissed version that’s perfect for brunch.
Berry Bliss
Fold a handful of fresh raspberries into the whipped cream before adding mascarpone. The tart berries cut through the caramel richness, creating a balanced flavor profile.
Nutty Crunch
Toast sliced almonds and sprinkle them between layers for an added crunch. The nutty aroma pairs beautifully with the spice‑laden Biscoff.
Vegan Velvet
Replace heavy cream with chilled coconut cream, and use a vegan cream cheese alternative in place of mascarpone. The taste remains indulgent, and the texture stays luxuriously smooth.
Holiday Spice
Add a pinch of ground cinnamon, nutmeg, and clove to the frosting for a festive twist that screams winter comfort.
Storing and Bringing It Back to Life
Fridge Storage
Cover the cake tightly with plastic wrap and store it in the refrigerator for up to three days. The frosting will stay firm, and the cookies will remain pleasantly soft. If you notice any condensation, gently pat the surface with a paper towel before serving.
Freezer Friendly
Wrap the entire dish in a double layer of foil and then place it in a freezer‑safe container. It will keep for up to one month. When you’re ready to serve, transfer it to the fridge and let it thaw for at least 4 hours; this gradual thaw preserves the texture.
Best Reheating Method
If you prefer a slightly warm slice, microwave a single serving for 10‑15 seconds. Add a tiny splash of water (about a teaspoon) before microwaving; the steam will revive the cream layers without melting the cookies.