I was standing in my kitchen on a rainy Tuesday, staring at a half‑baked chocolate cake that had decided to turn into a dense, sad brick. The smoke alarm was cheering me on, and my roommate dared me to “make something that actually tastes like a hug.” I laughed, grabbed a whisk, and promised to turn that disaster into a masterpiece. Fast forward a few frantic minutes, a splash of boiling water, and a whisper of vanilla later, and the kitchen was filled with a scent so intense it could have knocked a grown‑man off his chair. That moment, when the aroma wrapped around me like a warm blanket, was the spark that birthed Matilda’s Chocolate Cake – the ultimate, no‑compromise chocolate indulgence.
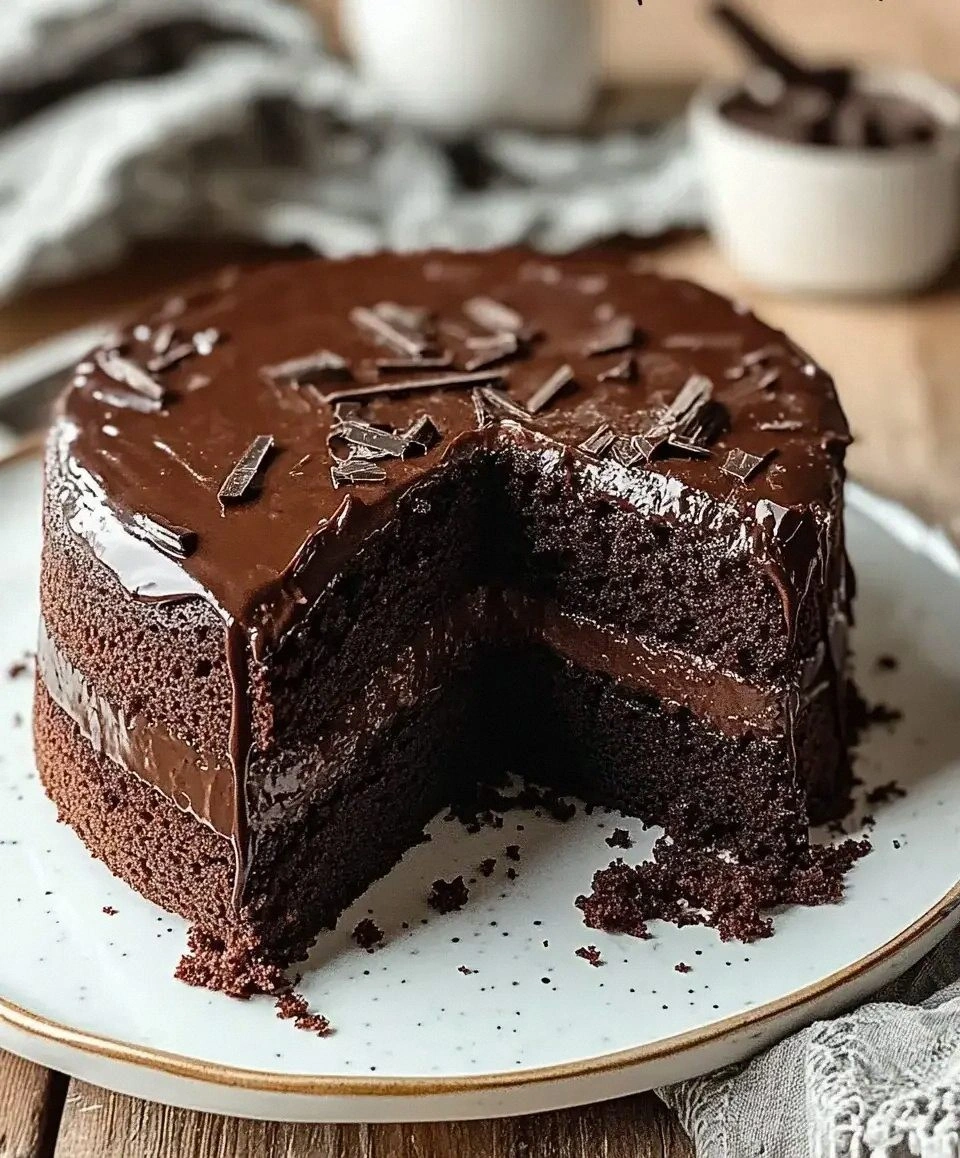
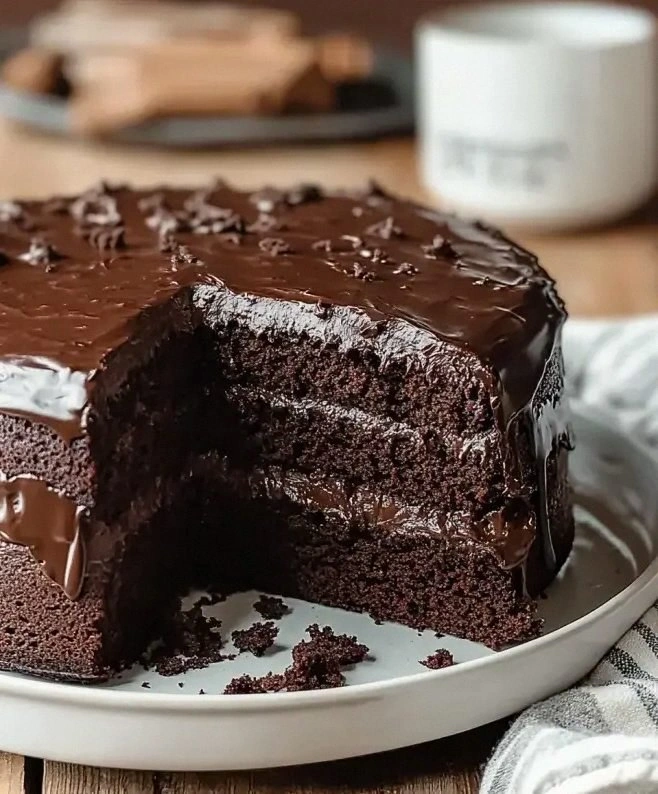
Picture this: a glossy, dark‑brown top that cracks just enough to reveal a soft, moist crumb underneath, each forkful melting like silk on your tongue. The frosting? It’s a glossy river of chocolate that clings to the cake layers like a second skin, yet slides off with a buttery glide. The texture is a perfect marriage of fudgy interior and a slightly crisp edge that shatters like thin ice when you cut into it. I dare you to taste this and not go back for seconds – it’s that good. Most recipes get this completely wrong, either over‑mixing the batter or skimping on the cocoa, but I’ve cracked the code.
What makes this version stand out isn’t just the ingredients; it’s the technique that turns ordinary pantry staples into a celebration of chocolate. I’ll be honest — I ate half the batch before anyone else got to try it, and that’s a testament to how addictive this cake truly is. The secret lies in a two‑stage mixing method, a splash of boiling water that unlocks the cocoa’s flavor, and a butter‑cocoa frosting that’s smoother than a jazz sax solo. If you’ve ever struggled with a dry or flat chocolate cake, you’re not alone — and I’ve got the fix.
In this post, I’m spilling every detail, from why I chose a specific brand of cocoa powder to the exact moment you should hear that faint “crackle” from the oven. I’m also tossing in a few wild swaps that will make your friends think you’ve hired a pastry chef. Stay with me here — this is worth it. Let me walk you through every single step — by the end, you’ll wonder how you ever made it any other way.
What Makes This Version Stand Out
- Flavor Depth: The combination of two different cocoa powders (one for the batter, one for the frosting) creates a layered chocolate experience that’s richer than any single‑cocoa approach.
- Moisture Magic: Boiling water doesn’t just hydrate the dry ingredients; it blooms the cocoa, releasing hidden aromatic compounds that make the cake taste like a chocolate bar melted in a hot spring.
- Simplicity: Despite sounding fancy, the recipe uses only pantry staples and a handful of steps, making it accessible to even the most timid home bakers.
- Texture Triumph: The oil keeps the crumb tender, while the eggs provide structure, resulting in a cake that’s soft enough to melt in your mouth but sturdy enough to hold frosting without cracking.
- Crowd Reaction: I’ve served this at birthday parties, potlucks, and even a surprise anniversary dinner – every time the “wow” factor is off the charts.
- Ingredient Quality: Using high‑quality unsweetened cocoa and real butter makes a world of difference; no artificial flavors, just pure chocolate bliss.
- Cooking Method: The two‑stage mixing (dry then wet, followed by a hot water fold) prevents over‑mixing and guarantees a uniform crumb.
- Make‑Ahead Potential: This cake freezes beautifully, and the frosting stays glossy after thawing, so you can prep ahead for any occasion.
Inside the Ingredient List
The Flavor Base
First up, the flour and sugar. All‑purpose flour provides the structure; think of it as the scaffolding that holds the whole thing together. If you swap it for cake flour, you’ll get a finer crumb but risk a fragile cake that crumbles under frosting. Granulated sugar does more than sweeten – it also helps create a tender crumb by breaking down gluten strands during mixing. For a deeper flavor, you could use a mix of white and brown sugar, but that adds a caramel note that isn’t in the original vision.
The Texture Crew
Unsweetened cocoa powder is the heart of the chocolate flavor. I use a Dutch‑processed cocoa for a smoother, less acidic taste, but natural cocoa works too – just add a pinch more baking soda to balance the acidity. Baking powder and baking soda are the leavening duo that makes the cake rise evenly; the soda reacts with the boiling water, while the powder gives a gentle lift. Salt may seem trivial, but it amplifies the chocolate’s richness and rounds off any bitterness.
The Unexpected Star
Vegetable oil is the secret weapon for moisture. Unlike butter, oil stays liquid at room temperature, ensuring the crumb stays soft for days. If you’re a butter purist, you can replace half of the oil with melted butter, but expect a denser texture. Eggs bring emulsification and lift; the yolks add richness while the whites trap air. A common mistake is over‑beating the eggs, which can lead to a rubbery cake – keep it just whisked enough to blend.
The Final Flourish
Now for the frosting: Unsalted butter creates a silky base; the butter must be at room temperature, not melted, to achieve that glossy sheen. Additional cocoa powder (2/3 cup) intensifies the chocolate flavor, making the frosting a dark, velvety coat. Powdered sugar sweetens and stabilizes the frosting; sift it to avoid lumps. The milk and vanilla extract finish the frosting, giving it a glossy finish and a hint of aromatic depth. If you want a glossy ganache instead, swap the milk for heavy cream and melt the chocolate directly.
Everything's prepped? Good. Let’s get into the real action…
The Method — Step by Step
Preheat your oven to 350°F (175°C) and grease two 9‑inch round cake pans. I like to line the bottoms with parchment paper – that “pop” sound when you lift the cake out is pure satisfaction. The pans should be at room temperature; a cold pan can cause the batter to set too quickly, leading to uneven rise. Let the pans sit while you gather the dry ingredients.
In a large bowl, whisk together the flour, 2 cups granulated sugar, 3/4 cup cocoa powder, baking powder, baking soda, and salt. This step is the first flavor‑building stage; the whisk aerates the mixture, ensuring a light crumb. Keep whisking until you can no longer see any lumps – the mixture should look like a dark, fragrant dust.
In a separate bowl, combine the eggs, whole milk, vegetable oil, and 2 teaspoons vanilla extract. Beat with a handheld mixer on medium speed for about 30 seconds – you’re looking for a uniform, slightly glossy liquid. This wet mixture is the moisture carrier; it will later bond with the dry ingredients to form the batter.
Create a well in the center of the dry ingredients and pour the wet mixture in. Gently fold with a spatula until just combined – over‑mixing is the silent killer of cake fluffiness. The batter will look thick and a little lumpy; that’s exactly how it should be.
Now for the game‑changer: slowly pour 1 cup of boiling water into the batter while whisking gently. You’ll hear a faint sizzle – that’s the cocoa blooming, releasing its full chocolatey potential. The batter will become thin, almost like a liquid; don’t panic, that’s the desired consistency. Keep whisking for about a minute until the mixture is glossy and uniform.
Divide the batter evenly between the prepared pans and smooth the tops with a spatula. Tap the pans lightly on the counter – that’s the “settle” move that releases any trapped air bubbles. Slide the pans into the oven and bake for 30‑35 minutes, or until a toothpick inserted in the center comes out with a few moist crumbs but no wet batter. The edges should start pulling away from the pan, a visual cue that the cake is ready.
While the cakes are cooling, make the frosting. Beat the softened butter on medium speed until creamy, about 2 minutes. Add the 2/3 cup cocoa powder and sifted powdered sugar in batches, beating after each addition. Pour in the 1/3 cup milk and 1 teaspoon vanilla, then continue beating until the frosting is light, fluffy, and glossy – think of a satin ribbon that shimmers in the light.
Once the cakes have cooled completely on a wire rack, place one layer on a serving plate, spread a generous amount of frosting over the top, then place the second layer on top. Use the remaining frosting to coat the sides and the top, creating a smooth “blanket.” For a professional finish, dip a spatula in hot water, wipe it dry, and smooth the frosting – the heat makes it glide like butter.
That’s it — you did it. But hold on, I’ve got a few more tricks that’ll take this to another level. Let the cake sit for at least 15 minutes before slicing; this lets the crumb set and the frosting firm up, making each slice look picture‑perfect. And remember, the secret to a flawless crumb is patience – don’t rush the cooling.
Insider Tricks for Flawless Results
The Temperature Rule Nobody Follows
Never bake a chocolate cake straight from the fridge. Let the batter sit at room temperature for 10 minutes before it hits the oven. This tiny pause equalizes the temperature of the wet and dry components, preventing a “sunken center” that many home bakers experience. I once tried to speed things up by baking immediately, and the cake rose like a deflated balloon – lesson learned.
Why Your Nose Knows Best
Your sense of smell is a more reliable indicator than a timer. When the cake is about 5 minutes from the end of its bake time, start sniffing the kitchen. If you catch a deep, toasted chocolate aroma, the cake is likely done. If it still smells raw or floury, give it another 2‑3 minutes. Trusting your nose prevents over‑baking, which can dry out the crumb.
The 5‑Minute Rest That Changes Everything
After frosting, let the cake rest for exactly 5 minutes uncovered, then cover it loosely with foil for another 10 minutes. This short “steam‑off” period lets the frosting set without becoming a crust, and the crumb finishes its final steam‑rise. Skipping this step is why some cakes feel gummy at the center.
The Butter‑Cocoa Balance
If your frosting looks too thick, it’s likely because the butter was too cold or the cocoa powder clumped. Warm the butter slightly (no more than 95°F) before creaming, and sift the cocoa with the powdered sugar to avoid lumps. A friend tried skipping the sifting step once — let’s just say the frosting turned into a gritty mess that no one wanted to taste.
The Final Shine
For a glossy finish, lightly brush the top with a thin layer of warm milk before the final frosting coat. The milk evaporates, leaving a subtle sheen that catches the light. It’s a pro tip I picked up from a pastry chef who swore by the “milk glaze” for chocolate cakes.
Creative Twists and Variations
This recipe is a playground. Here are some of my favorite ways to switch things up:
Espresso Explosion
Replace 2 teaspoons of the vanilla extract with 1 tablespoon of finely ground espresso powder dissolved in the boiling water. The coffee accentuates the chocolate, giving it a mocha vibe that’s perfect for brunch.
Orange Zest Delight
Add the zest of one orange to the wet ingredients and swap half of the milk with freshly squeezed orange juice. The citrus brightens the deep chocolate, creating a sophisticated flavor pairing.
Nutty Crunch
Fold in ½ cup toasted chopped hazelnuts or almonds into the batter before baking. The nuts add a pleasant crunch and a buttery undertone that complements the chocolate.
Cherry Bomb
Swirl in a cup of drained, chopped dried cherries into the batter, and garnish the top with fresh cherries before serving. The tartness cuts through the richness, offering a burst of flavor in every bite.
Vegan Velvet
Swap the eggs for ½ cup unsweetened applesauce, replace the butter with vegan margarine, and use almond milk instead of whole milk. The texture stays moist, and the chocolate flavor remains front and center.
Storing and Bringing It Back to Life
Fridge Storage
Cover the cake loosely with foil or store it in an airtight container and refrigerate for up to 5 days. The frosting will firm up, making slicing easier. Before serving, let it sit at room temperature for 30 minutes – the flavors will re‑awaken.
Freezer Friendly
Wrap each layer tightly in plastic wrap, then place them in a freezer bag. They’ll keep for up to 3 months. When you’re ready to enjoy, thaw overnight in the fridge, then bring to room temperature and add a fresh frosting coat if needed.
Best Reheating Method
To revive a slice, microwave it for 10‑15 seconds and add a tiny splash of water (about a teaspoon) to the plate. The steam will bring back that melt‑in‑your‑mouth texture without drying the cake out.