I was standing in my kitchen on a sweltering July afternoon, the kind of heat that makes the air feel like a thick, citrus‑scented syrup. My friend had dared me to create a dessert that could beat the relentless thirst of a backyard barbecue, and I was armed with nothing but a half‑crushed lime, a bag of butter, and a stubborn belief that I could turn that tang into pure bliss. The first attempt was a disaster: a soggy crust that clung to the pan like a wet sponge, and a filling that tasted more like a lime‑scented cleaning product than a dessert. I laughed, I learned, and I vowed to perfect the ultimate key lime bar that would make even the most skeptical palate swoon.
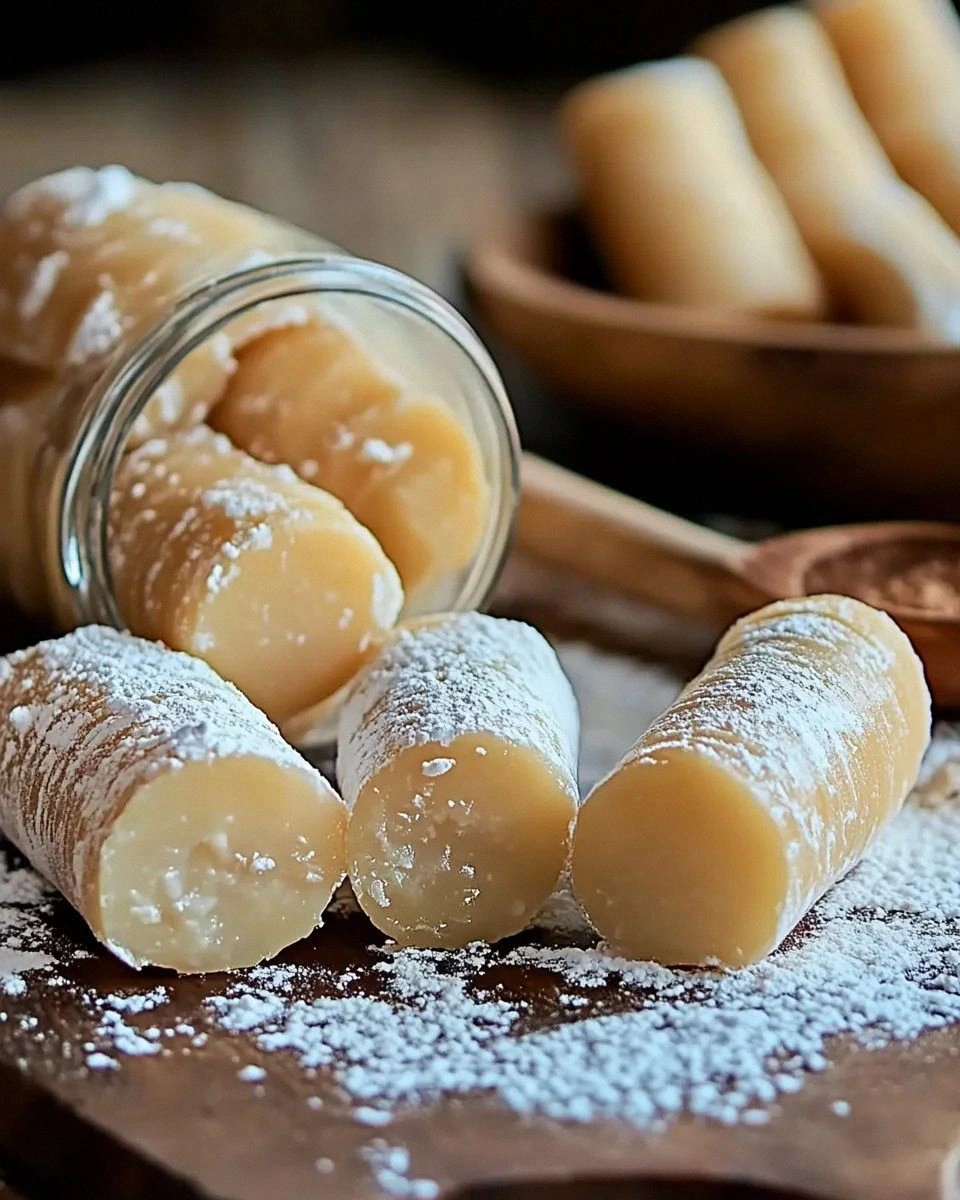
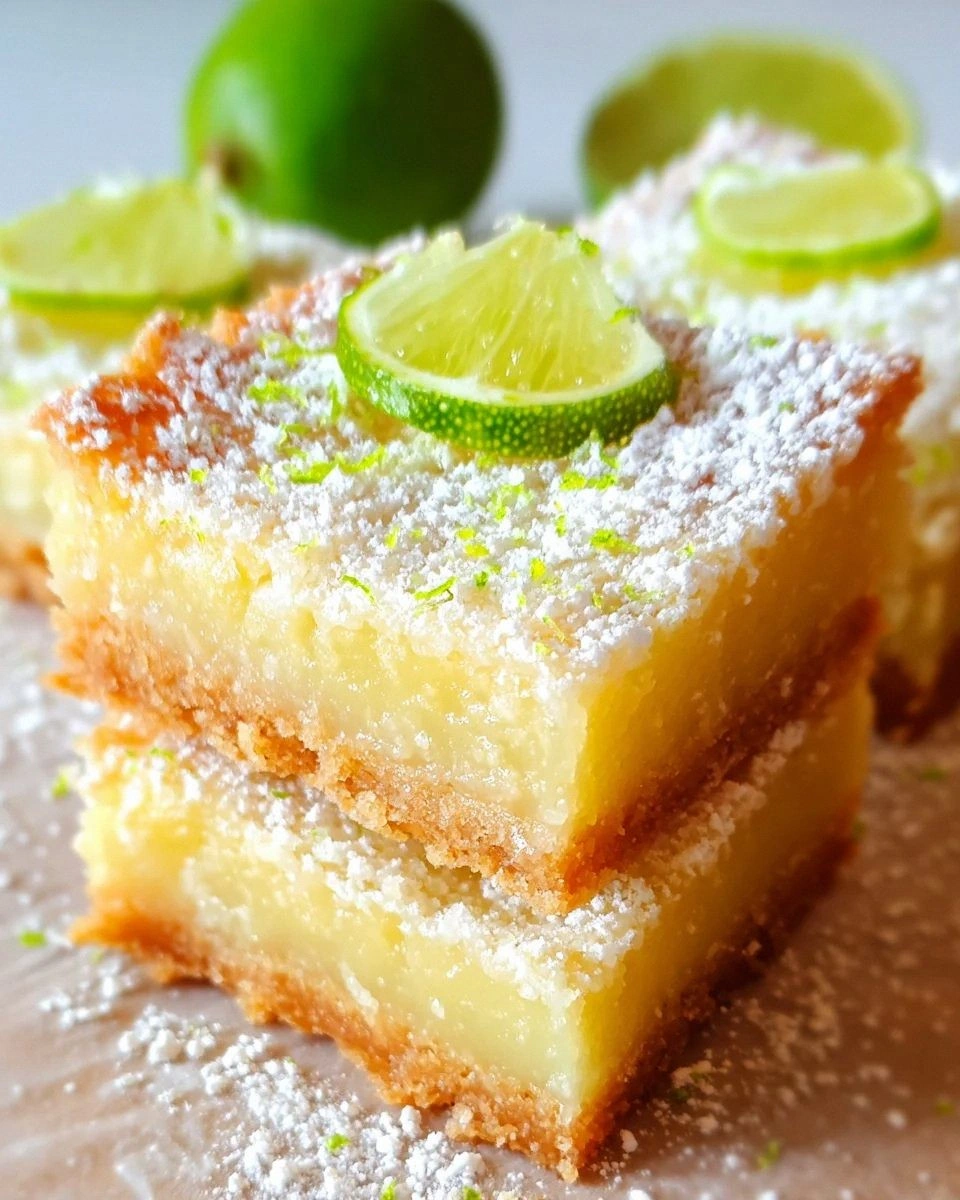
Picture this: you pull a tray of golden‑brown bars from the oven, the crust crackling softly as you tap it with a spatula, releasing a buttery aroma that instantly makes your stomach do a happy dance. The air fills with the bright, zingy perfume of fresh key lime juice, a scent so vivid it feels like sunshine has been bottled and poured onto the countertop. When you cut into a bar, the custard filling glistens like a polished gemstone, its surface smooth and slightly wobbly, promising a melt‑in‑your‑mouth experience that balances tartness with a whisper of sweet. The first bite? A perfect symphony where the buttery shortbread base sings under a tangy, velvety lime custard that leaves a lingering, refreshing aftertaste—like a cool breeze on a hot day.
Most recipes out there either skimp on the buttery crust, resulting in a flimsy base that collapses under the weight of the filling, or they drown the lime flavor in sugar, turning the dessert into a generic sweet treat. This version, however, is engineered with precision: a shortbread crust that’s crisp on the edges yet tender in the center, a custard that sets just enough to hold its shape without becoming rubbery, and a finishing dusting of powdered sugar that adds a delicate sweetness without masking the lime’s brilliance. I’ve even incorporated a secret technique—briefly chilling the crust before adding the filling—to lock in that buttery crunch, a step most cooks overlook.
Okay, ready for the game‑changer? I’m about to walk you through every single step—by the end, you’ll wonder how you ever made this dessert any other way. I’ll share the exact measurements, the temperature tricks, and the little kitchen hacks that turned a simple bar into a show‑stopping centerpiece. Trust me, I dare you to taste this and not go back for seconds. Let’s dive in and make the best key lime bars you’ll ever encounter.
What Makes This Version Stand Out
- Flavor Balance: The tartness of fresh key lime juice is perfectly offset by a modest amount of granulated sugar, delivering a bright yet harmonious taste that never feels overly sour.
- Texture Harmony: A buttery, crumbly shortbread crust gives way to a silky custard filling, creating a contrast that’s as satisfying as a crisp bite followed by a smooth glide.
- Simplicity: Only eight ingredients are needed, and each plays a crucial role—no fancy gadgets, no obscure pantry items, just pure, straightforward goodness.
- Ingredient Quality: Using real key lime juice (not bottled concentrate) and unsalted butter makes the difference between a flat flavor and a vibrant, aromatic treat.
- Crowd Reaction: These bars have a reputation for disappearing within minutes at parties—people swear they’re “addictive” and “the perfect summer dessert.”
- Make‑Ahead Potential: The bars keep beautifully in the fridge for up to three days, and they even freeze well, meaning you can prep them ahead of any gathering.
- Cooking Method: A two‑step bake—first the crust, then the filling—ensures each component is cooked to perfection without compromising the other.
- Visual Appeal: The dusting of powdered sugar adds a snowy finish that makes the bars look as elegant as they taste, perfect for Instagram‑ready plating.
Inside the Ingredient List
The Flavor Base
Unsalted butter is the heart of the shortbread crust. Its fat content creates that melt‑in‑your‑mouth crumb that’s essential for a buttery foundation. If you swap it for margarine, you’ll lose the depth of flavor and the crust may turn greasy rather than crisp. I always recommend using high‑quality European‑style butter, which contains about 82% butterfat for maximum richness.
Granulated sugar does double duty: it sweetens the crust and helps it brown evenly, giving those coveted golden edges. Skipping the sugar or cutting it in half will result in a bland, pale crust that looks more like a biscuit than a dessert bar. If you’re watching sugar, consider a coconut‑sugar alternative, but expect a subtle caramel note to creep in.
The Texture Crew
All‑purpose flour provides the structural backbone for both crust and custard. Too much flour in the filling can make it dense and dry, while too little will cause it to run. I always sift the flour before measuring to avoid compacted pockets that could affect the final texture.
Kosher salt is the unsung hero that amplifies every other flavor. A pinch (about ¼ teaspoon) is enough to bring out the lime’s brightness without making the bars salty. If you accidentally use table salt, reduce the amount by half because it’s finer and more concentrated.
The Unexpected Star
Large eggs are the custard’s secret agents, providing structure and a silky mouthfeel. Room‑temperature eggs incorporate more easily, preventing lumps and ensuring a smooth filling. If you use cold eggs straight from the fridge, you’ll notice a grainy texture that’s impossible to fix after baking.
Key lime juice is the show‑stopper. Freshly squeezed juice delivers a vibrant acidity that bottled juice can’t match. If you can’t find key limes, Persian limes work in a pinch, but the flavor will be less floral and more generic. For the ultimate punch, zest the limes before juicing—this adds aromatic oils that sit on the palate.
The Final Flourish
Key lime zest is the aromatic layer that makes each bite sing. The zest contains essential oils that provide a burst of citrus fragrance, elevating the overall sensory experience. Skipping the zest is a rookie mistake; the bars will still taste good, but they’ll lack that perfume that makes them unforgettable.
Powdered sugar is the finishing touch, dusted lightly over the cooled bars. It adds a subtle sweetness and a visual contrast that makes the dessert look polished. If you prefer a less sweet finish, use a fine sift of confectioners’ sugar mixed with a pinch of extra lime zest.
Everything's prepped? Good. Let’s get into the real action—mixing, baking, and turning these humble ingredients into a citrus masterpiece that will have everyone reaching for seconds.
The Method — Step by Step
Preheat your oven to 350°F (175°C). While the oven warms, line a 9‑by‑13‑inch baking pan with parchment paper, allowing the edges to overhang for easy removal later. This preparation step ensures the bars won’t stick, and the parchment will act as a non‑stick shield that makes cutting clean and effortless.
In a large mixing bowl, combine 2 cups of all‑purpose flour, 1 cup of granulated sugar, and a pinch of kosher salt. Add 1 cup of cold, cubed unsalted butter. Using a pastry cutter or your fingertips, rub the butter into the dry ingredients until the mixture resembles coarse crumbs—think tiny pebbles with occasional buttery clumps. This is the foundation of your shortbread crust.
Press the crumb mixture evenly into the prepared pan, using the back of a measuring cup to flatten it into a uniform layer. The crust should be about ½‑inch thick; if it’s too thin, it may crack, and if too thick, it could dominate the flavor. Power transition: Okay, ready for the game‑changer? Bake the crust for 12‑15 minutes, or until the edges turn a light golden brown and emit a nutty aroma.
- Watch Out: Do not over‑bake the crust; a darkened base will become bitter and will clash with the bright lime filling.
While the crust bakes, whisk together 2 large eggs, ½ cup freshly squeezed key lime juice, and 2 teaspoons of key lime zest in a medium bowl. The mixture should be smooth and slightly frothy; the zest will float, releasing aromatic oils as you whisk. Then, gradually whisk in ¼ cup of granulated sugar until fully dissolved, creating a glossy custard base.
When the crust is lightly golden, remove it from the oven and let it cool on a wire rack for exactly 5 minutes—no more, no less. This brief cooling period is crucial; it prevents the crust from soaking up too much moisture while still being warm enough to hold the custard without cracking.
- Kitchen Hack: Pour the custard over the warm crust and use a spatula to spread it evenly; the residual heat of the crust will help the custard set faster, reducing overall bake time.
Return the pan to the oven and bake for an additional 20‑25 minutes. You’ll know it’s done when the edges of the custard start to pull away from the sides of the pan and the surface looks just set—no wobbling, but still slightly glossy. The scent at this stage is intoxicating: a blend of buttery crust, caramelized sugar, and sharp lime that makes your kitchen feel like a tropical bakery.
Remove the pan and allow the bars to cool completely on a wire rack; this cooling phase lets the custard firm up fully, making slicing easier. Once cool, dust the top with a generous layer of powdered sugar using a fine-mesh sieve. The powdered sugar not only adds a sweet finish but also creates a visual contrast that makes the bars look like tiny snow‑capped islands.
Lift the bars out of the pan using the parchment overhang, place them on a cutting board, and slice into squares or rectangles—about 2‑inch pieces work best for serving. Serve at room temperature or chilled, depending on your preference. That first bite? Expect a crisp buttery edge, a silky lime center, and a lingering sweet finish that will have you reaching for the next piece without hesitation.
That's it — you did it. But hold on, I've got a few more tricks that'll take this to another level, ensuring every batch is flawless, whether you're a first‑time baker or a seasoned pastry pro.
Insider Tricks for Flawless Results
The Temperature Rule Nobody Follows
Never bake the crust and custard at the exact same temperature if you want a perfect edge. Start the crust at 350°F, then lower the oven to 325°F for the custard stage. This subtle reduction prevents the top from over‑browning while allowing the custard to set gently. A friend once tried to keep the oven at 375°F for both steps and ended up with a burnt top and runny center—let’s just say the party was a bit sour.
Why Your Nose Knows Best
Your sense of smell is the ultimate timer. When the crust begins to emit a nutty, buttery aroma and the edges turn a light amber, it’s time to pull it out. Similarly, the custard stage is signaled by a faint citrus perfume that fills the kitchen. Trust these olfactory cues more than the clock; they’re a reliable indicator of doneness.
The 5‑Minute Rest That Changes Everything
After the final bake, let the bars rest for exactly five minutes before dusting with powdered sugar. This short pause allows the surface to set just enough to hold the sugar without it sliding off, while still being warm enough for the sugar to melt slightly and create a subtle glaze. Skipping this step results in a dusty finish that looks unfinished.
The Zest Whisper
When zesting limes, avoid the white pith—it’s bitter and will ruin the delicate balance. Use a microplane and rotate the lime as you go, collecting only the bright green outer layer. If you accidentally include a bit of pith, a quick rinse under cold water can rescue the zest.
The Slice‑And‑Serve Strategy
If you’re serving these bars at a gathering, pre‑slice them while still slightly warm and arrange them on a chilled platter. The chill keeps the custard firm, and the warm slices retain a soft interior, delivering contrasting temperatures in each bite—a trick that impresses guests and makes the dessert feel restaurant‑grade.
The Butter‑Room‑Temp Trick
Cold butter yields a crumbly crust, but if you let it sit at room temperature for 15 minutes before cutting, it becomes pliable enough to press evenly without melting. This small adjustment prevents uneven layers and guarantees a uniform crust across the entire pan.
Creative Twists and Variations
This recipe is a playground. Here are some of my favorite ways to switch things up:
Coconut‑Lime Fusion
Replace half of the butter with coconut oil and add ¼ cup shredded coconut to the crust. The result is a tropical twist that pairs beautifully with the lime filling, giving a subtle coconut aroma that transports you to a beachside cabana.
Spiced Rum Infusion
Stir 1 tablespoon of dark spiced rum into the custard before baking. The rum adds depth, a warm caramel note, and a hint of spice that makes the bars perfect for cooler evenings while still retaining their bright citrus core.
White Chocolate Swirl
Melt ½ cup white chocolate and drizzle it over the custard just before the final bake, then use a toothpick to create a marbled effect. The sweet, creamy chocolate ribbons contrast with the tart lime, creating a sophisticated flavor duo.
Mint‑Lime Surprise
Finely chop fresh mint leaves and fold them into the crust mixture before baking. The mint adds a refreshing aftertaste that elevates the lime’s brightness, making these bars ideal for a garden party.
Berry‑Burst Topping
Top each bar with a spoonful of fresh raspberry coulis after dusting with powdered sugar. The tart berries complement the lime while adding a splash of color that makes the presentation pop.
Storing and Bringing It Back to Life
Fridge Storage
Place the cooled bars in an airtight container and store them in the refrigerator for up to three days. The custard stays firm, and the crust retains its buttery crunch. If you notice the bars drying out, place a damp paper towel over the top before sealing.
Freezer Friendly
Wrap the entire pan tightly in plastic wrap, then add a layer of aluminum foil. Freeze for up to two months. When you’re ready to enjoy, thaw overnight in the fridge, then let sit at room temperature for 20 minutes before serving. This method preserves both texture and flavor.
Best Reheating Method
To revive the bars, preheat the oven to 300°F (150°C) and bake the slices for 8‑10 minutes. Add a tiny splash of water (about a teaspoon) to the pan before reheating; the steam helps the custard regain its silky sheen without drying out. Serve warm for a melt‑in‑the‑mouth experience that rivals fresh‑baked bars.