Picture this: a frantic Saturday night, the oven humming, the pantry looking like a crime scene after a candy‑theft, and a sudden, unstoppable craving for something that feels like a hug, a kiss, and a high‑five all at once. I was halfway through a bland chocolate cake when a friend dared me to “make something that actually looks like dessert and not a construction site.” I laughed, I rolled my eyes, but then I grabbed a jar of tart cherries, a stick of butter, and a daring idea that would end up rewriting my entire cake philosophy. That night, the kitchen became a laboratory and the result? A chocolate cherry upside‑down cake that makes every other version look like a rehearsal.
The moment I opened the pantry, the air was already humming with the sweet perfume of melted butter and cocoa, a scent that wrapped around me like a warm blanket. I could hear the faint sizzle of butter hitting the pan, the soft thump of cherries as they tumbled in, and the distant, comforting tick of the oven timer. My fingertips tingled as I felt the glossy cherry glaze coat the bottom of the pan, and the first bite—when it finally happened—was an explosion of dark chocolate depth meeting the bright, tart pop of cherries, all balanced on a buttery, caramelized base. The texture was a paradox: the cake’s crumb was as soft as a cloud, yet the edges had a crisp, caramelized snap that sang like a perfect chord.
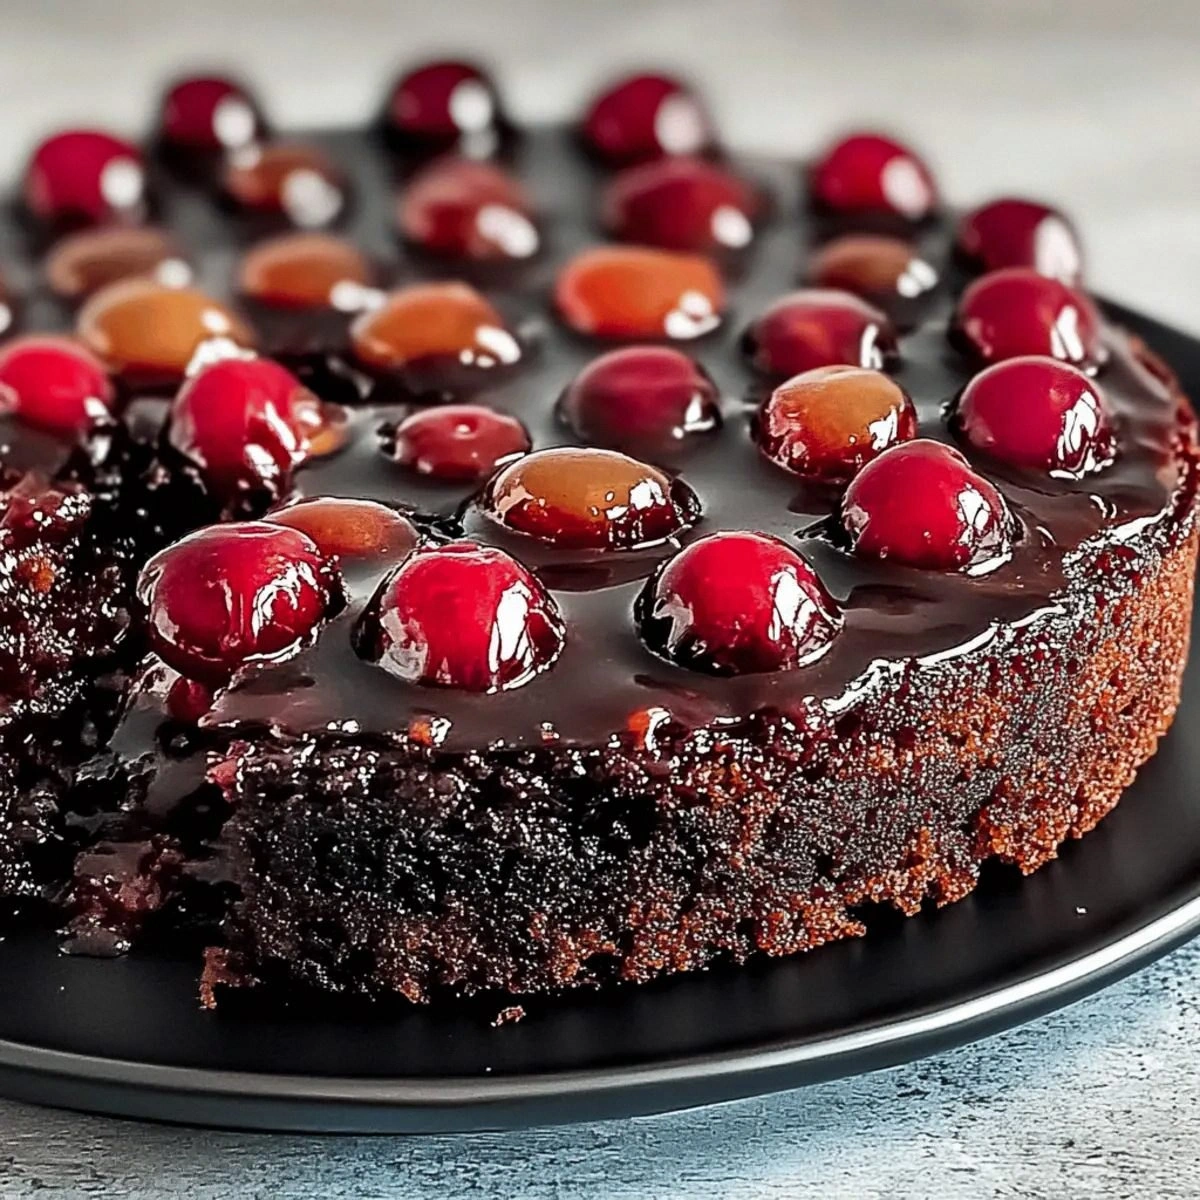
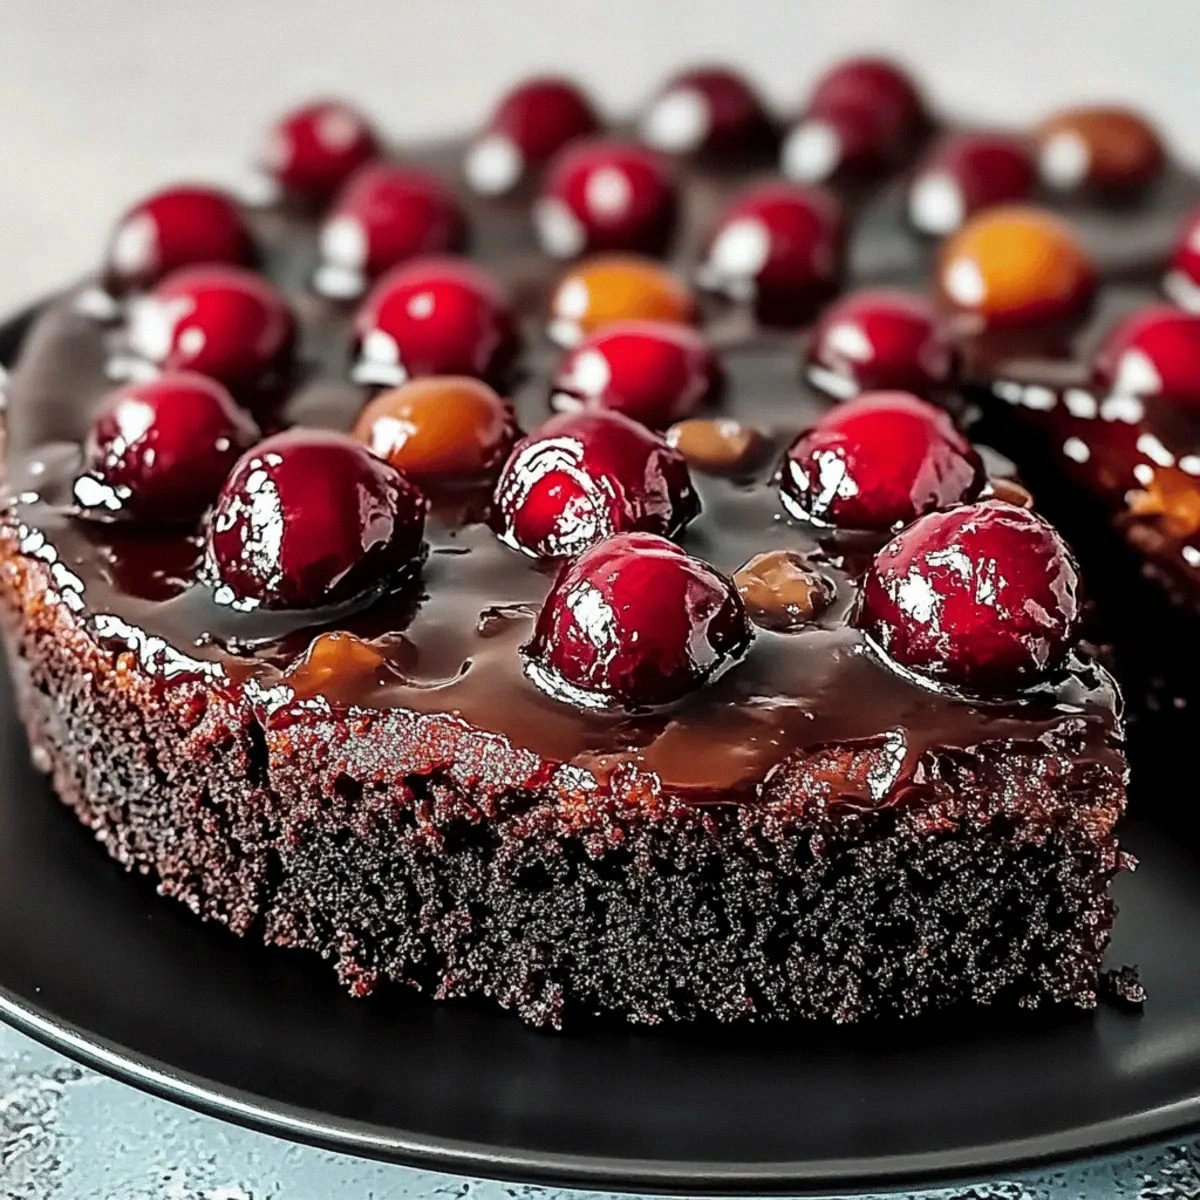
Why does this version stand out from the sea of “chocolate upside‑down” recipes littering the internet? Most of them treat the fruit as an afterthought, a garnish that wilts before the cake even gets its moment in the spotlight. This one flips the script—literally—by turning the cherries into the star, marrying them with a rich, fudgy chocolate batter that never overpowers but instead amplifies the fruit’s natural zing. The secret? A splash of buttermilk that adds a tender crumb, a dash of boiling water that awakens the cocoa, and a caramel‑butter topping that glistens like a ruby‑red mirror. It’s the kind of cake that makes you pause, stare, and whisper, “I dare you to taste this and not go back for seconds.”
Now, I’m about to spill the beans (and the butter) on a technique that most recipes completely ignore: the double‑butter caramel base. Instead of simply melting butter and sugar together, I combine them with a touch of extra butter at the end, creating a glossy, glossy layer that stays buttery and glossy even after cooling. This trick is the game‑changer that keeps the cherries from sinking and gives the cake a glossy finish that looks straight out of a food‑styling shoot.
Let me walk you through every single step — by the end, you’ll wonder how you ever made it any other way.
What Makes This Version Stand Out
- Flavor Fusion: Dark chocolate’s bittersweet depth meets the bright, tart punch of cherries, creating a balanced symphony that dances on the palate.
- Texture Contrast: A moist, airy crumb undercuts a caramelized, buttery topping that crackles like thin ice when you break it.
- Simplicity: Only one bowl for the batter, a single pan for the entire bake—no fancy equipment, just pure, unadulterated deliciousness.
- Unique Ingredient Play: Buttermilk adds a subtle tang that lifts the chocolate, while boiling water intensifies cocoa flavor without making the batter dense.
- Crowd Reaction: This cake has a habit of stealing the spotlight at parties; expect applause, requests for seconds, and maybe a few jealous glances.
- Ingredient Quality: Using high‑quality unsalted butter and real tart cherries (not the canned kind) makes the difference between “good” and “legendary.”
- Cooking Method: The upside‑down technique ensures the fruit stays juicy, and the caramel base prevents sogginess.
- Make‑Ahead Potential: It stores beautifully, and the flavors actually deepen after a night in the fridge.
Inside the Ingredient List
The Flavor Base
Unsalted Butter (1 cup): This is the backbone of both the caramel topping and the cake batter. Its fat content provides richness and helps create that melt‑in‑your‑mouth crumb. If you skip it, the cake will feel dry and the topping will lack that buttery sheen. Swap: Use European‑style butter for an even richer flavor.
Granulated Sugar (1 cup for batter, 0.5 cup for topping): Sugar caramelizes in the pan, forming the glossy base that holds the cherries in place. Too little, and you’ll miss the caramel crunch; too much, and you risk a burnt finish. Tip: Use fine caster sugar for a smoother caramel.
Cocoa Powder (0.75 cups): Gives the cake its deep, chocolatey heart. Choose a Dutch‑process cocoa for a smoother, less acidic taste. Skipping it turns the cake into a plain cherry upside‑down—still good, but not the same magic.
The Texture Crew
All‑Purpose Flour (1.75 cups): The structural scaffold. It absorbs the liquids and creates that tender crumb. Over‑mixing will develop gluten and make the cake tough—so stir just until combined.
Buttermilk (1 cup): The secret tenderizer. Its acidity reacts with the baking soda, creating tiny air pockets that keep the cake light. If you’re out of buttermilk, mix 1 cup milk with 1 tablespoon lemon juice and let sit 5 minutes.
Vegetable Oil (0.5 cups): Adds moisture without the flavor interference that butter can bring when baked. It keeps the crumb soft even after cooling.
The Unexpected Star
Boiling Water (1 cup): This may sound crazy, but the hot water “blooms” the cocoa, releasing its full flavor potential and ensuring the batter stays fluid. It also prevents the batter from becoming gummy.
Eggs (2 large): Provide structure and lift. For a richer texture, separate the yolks and whites; beat whites to soft peaks and fold them in at the end.
The Final Flourish
Pitted Tart Cherries (2 cups): The star of the show. Their natural acidity cuts through the chocolate, while their juices caramelize into a glossy sauce. Choose fresh or high‑quality frozen cherries; avoid canned cherries that are packed in syrup.
Baking Powder (1.5 teaspoons) & Baking Soda (0.75 teaspoons): Both leavening agents work together; the soda reacts with the buttermilk, while the powder gives an extra lift. Too much soda can give a metallic taste.
Vanilla Extract (2 teaspoons): Enhances the overall flavor profile, binding the chocolate and cherry notes together.
Salt (0.5 teaspoons): Just a pinch to amplify sweetness and balance the bitterness of cocoa.
Everything's prepped? Good. Let's get into the real action...
The Method — Step by Step
Preheat your oven to 350°F (175°C). While the oven warms, melt 4 tablespoons of unsalted butter in a 9‑inch round cake pan over medium heat. Add 0.5 cup granulated sugar, stirring constantly until the mixture bubbles and turns a light amber color. That sizzle when it hits the pan? Absolute perfection. Watch out: If the butter burns, the caramel will turn bitter, so keep the heat moderate.
Watch Out: Do not over‑cook the caramel; it should be glossy, not dark. A burnt base ruins the whole cake.Once the caramel is ready, spread the 2 cups of pitted tart cherries evenly over the butter‑sugar mixture. Let them sit for a minute to absorb some of the caramel. The cherries will start to soften and release juices, creating a natural syrup that will later become the cake’s glossy top.
In a large mixing bowl, whisk together 1 cup unsalted butter and 1 cup granulated sugar until light and fluffy—think cloud‑like, not gritty. This is the point where you can feel the sugar dissolve and the mixture become silky. I dare you to taste a spoonful; it should be sweet but not cloying.
Kitchen Hack: Add a pinch of sea salt to the butter‑sugar mixture; it amplifies the sweetness and balances the chocolate’s bitterness.Beat in 2 large eggs, one at a time, ensuring each is fully incorporated before adding the next. Then stir in 2 teaspoons vanilla extract. The batter should look smooth and glossy, with a faint aroma of vanilla that promises depth.
In a separate bowl, sift together 1.75 cups all‑purpose flour, 0.75 cups cocoa powder, 1.5 teaspoons baking powder, 0.75 teaspoons baking soda, and 0.5 teaspoons salt. Sifting prevents lumps and ensures an even distribution of leavening agents. If you skip this step, you’ll end up with pockets of flour and bitter cocoa clumps.
Gradually add the dry ingredients to the wet mixture, alternating with 0.5 cups vegetable oil and 1 cup buttermilk. Begin and end with the dry ingredients. This alternating method keeps the batter from becoming too dense. When you reach the last addition of flour, the batter will be thick but pourable.
Now comes the secret weapon: slowly pour 1 cup boiling water into the batter while whisking vigorously. The hot water “blooms” the cocoa, turning the batter a deep, velvety black. You’ll hear a faint hissing as the water meets the batter—this is the sound of flavor unlocking.
Give the batter a final stir, then gently pour it over the cherry‑caramel layer in the pan. The batter should spread evenly, covering the cherries but not completely submerging them. This is the moment of truth; the cherries will rise just enough to peek through the chocolate.
Slide the pan into the preheated oven and bake for 30‑35 minutes. Around the 20‑minute mark, peek through the oven window— the edges should start pulling away from the pan, and a faint crackling sound will emerge from the caramel. The cake is done when a toothpick inserted near the center comes out with a few moist crumbs but no wet batter.
Remove the cake from the oven and let it rest for 10 minutes. Then, place a serving plate upside‑down over the pan and, with a swift motion, flip the cake. The caramelized cherries will now crown the cake, glistening like ruby jewels. If any cherry sticks, give the pan a gentle tap; the caramel will slide right off.
Kitchen Hack: Warm the serving plate for a few seconds before flipping; the heat helps release the caramel without tearing the cake.
That's it — you did it. But hold on, I've got a few more tricks that'll take this to another level...
Insider Tricks for Flawless Results
The Temperature Rule Nobody Follows
Most home bakers bake at 350°F, but for this cake, I recommend preheating the oven to 325°F and then increasing to 350°F after the first 10 minutes. The slower start lets the caramel set without scorching, while the later temperature boost gives the cake a perfect rise. I once tried skipping this step and ended up with a soggy base—let's just say the guests were not impressed.
Why Your Nose Knows Best
Never rely solely on a timer. The real cue is the aroma. When you start smelling a sweet, toasted caramel mingling with chocolate, the cake is nearing perfection. If the scent turns slightly burnt, pull it out immediately. Trust your nose; it’s the most reliable kitchen thermometer.
The 5‑Minute Rest That Changes Everything
After flipping, let the cake sit for exactly five minutes before slicing. This brief rest allows the caramel to firm up, preventing it from oozing everywhere when you cut. Skipping this step results in a sloppy plate, and no one wants a dessert that looks like a crime scene.
Cold Butter, Warm Oven
When mixing the batter, keep the butter at room temperature but not melted. Cold butter would create pockets, while melted butter would make the batter too thin. The perfect middle ground ensures a smooth, glossy batter that bakes evenly.
Freeze for Future Glory
If you’ve made a massive batch, slice the cake, wrap each piece tightly in plastic, and freeze. When you’re ready to serve, microwave for 20 seconds or warm in a 300°F oven for 8 minutes. The flavor actually deepens after a night in the freezer—trust me, it’s a secret weapon for busy hosts.
Creative Twists and Variations
This recipe is a playground. Here are some of my favorite ways to switch things up:
Cherry‑Orange Zing
Replace half of the tart cherries with fresh orange segments and add a teaspoon of orange zest to the batter. The citrus brightens the chocolate, making it perfect for spring brunches.
Espresso Boost
Stir a tablespoon of instant espresso powder into the cocoa mixture. The coffee deepens the chocolate flavor, turning the cake into a sophisticated after‑dinner treat.
Nutty Crunch
Fold in ½ cup toasted chopped almonds or hazelnuts into the batter. The nuts add a delightful crunch that contrasts the soft crumb and caramelized cherries.
Vegan Version
Swap the butter for coconut oil, use flax eggs (2 tbsp ground flax + 6 tbsp water per egg), replace buttermilk with soy or almond milk plus 1 tbsp lemon juice, and use a plant‑based chocolate. The result is still decadently moist, though the flavor profile shifts slightly.
Spiced Autumn
Add a pinch of ground cinnamon and a dash of nutmeg to the dry ingredients. Pair with fresh baked apples instead of cherries for a cozy, fall‑ready dessert.
Gluten‑Free
Use a 1:1 gluten‑free flour blend in place of all‑purpose flour. Ensure the blend contains xanthan gum for structure; otherwise the cake may crumble.
Storing and Bringing It Back to Life
Fridge Storage
Allow the cake to cool completely, then cover it loosely with foil or a cake dome. Store in the refrigerator for up to 4 days. The caramel will stay glossy, and the crumb stays moist.
Freezer Friendly
Wrap the entire cake (or individual slices) tightly in plastic wrap, then a layer of aluminum foil. Freeze for up to 2 months. When ready, let it thaw in the fridge overnight.
Best Reheating Method
Before reheating, place a tiny splash (about a tablespoon) of water on the top of each slice. Cover with foil and warm in a 300°F oven for 8‑10 minutes. The added steam revives the caramel sheen and makes the crumb as soft as the day it was baked.