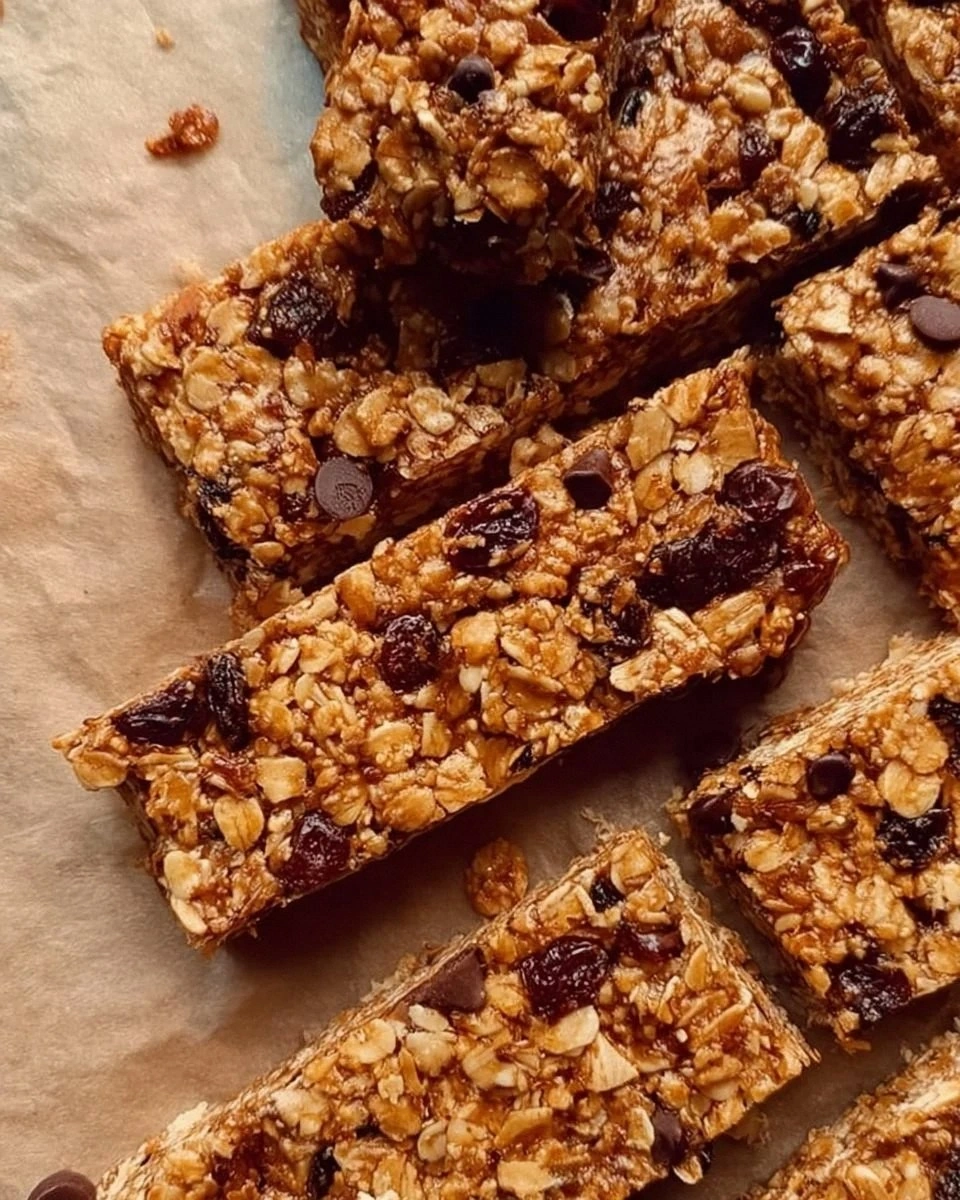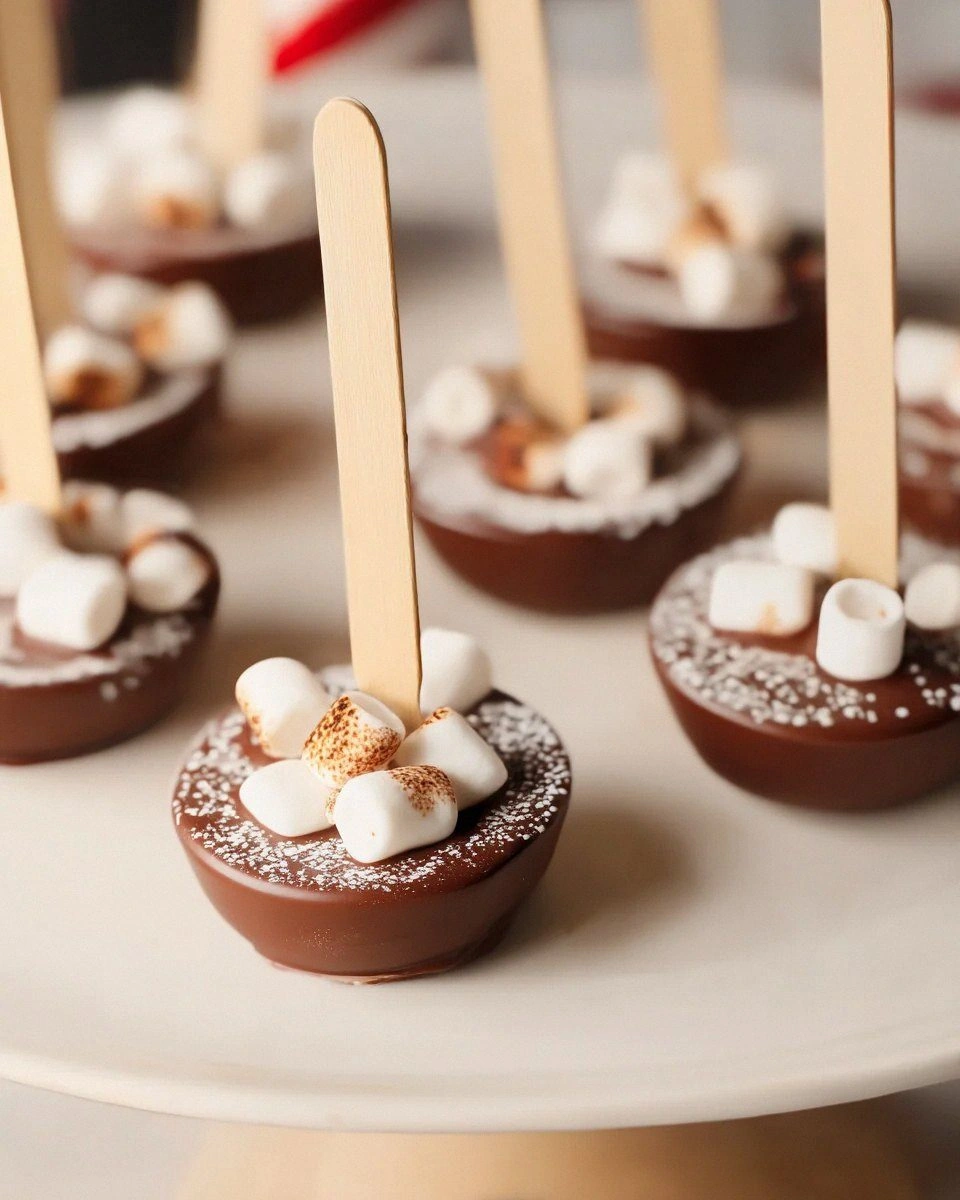
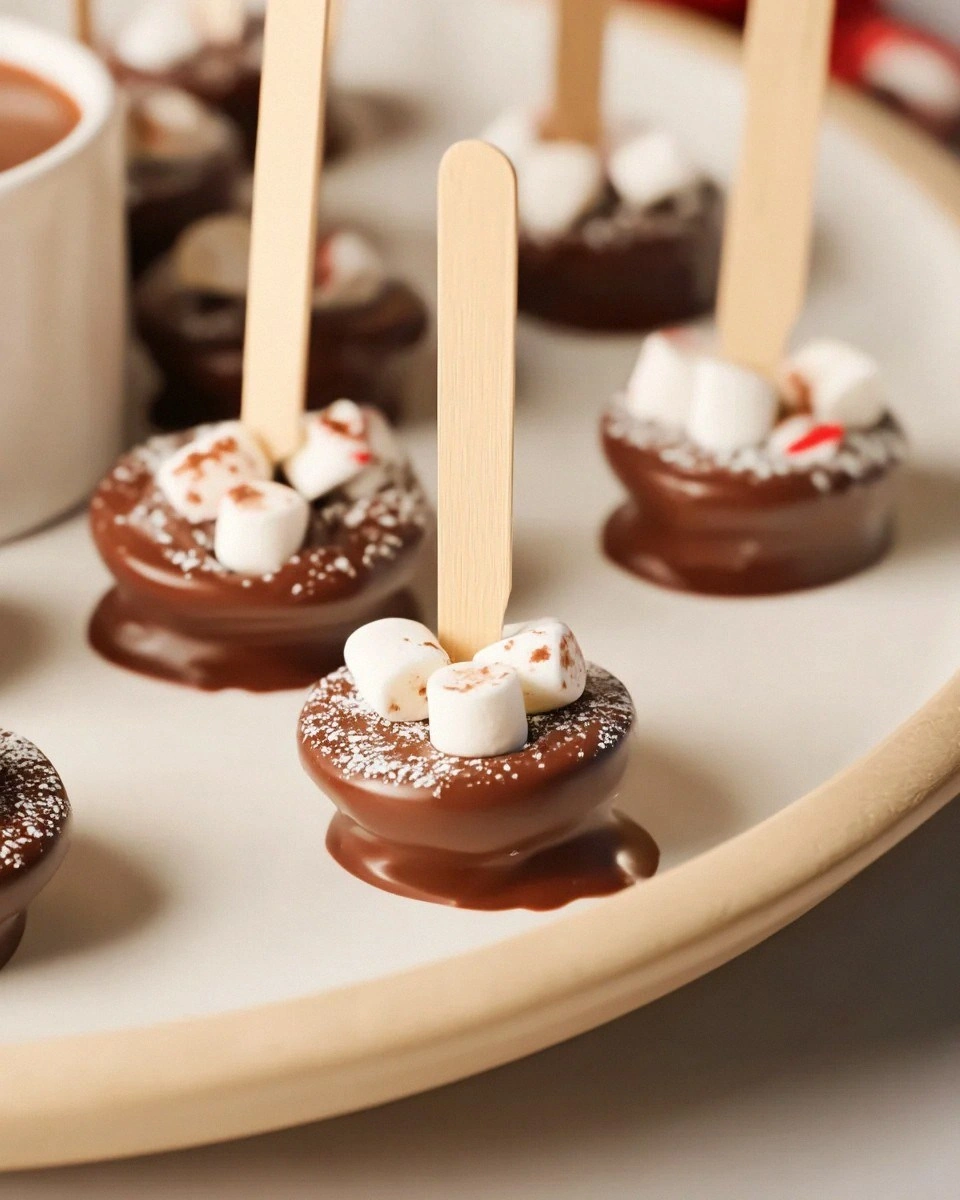
I still remember the night I accidentally invented the best hot chocolate accompaniment of my life. It was one of those evenings when the wind outside sounded like it was auditioning for a horror movie, and I was stuck in my tiny apartment kitchen with nothing but a half-empty bag of marshmallows, some cocoa powder, and a desperate craving for something—anything—that would make my sad instant hot chocolate feel like a hug in a mug. What started as a culinary Hail Mary turned into an obsession that had me texting friends at midnight demanding they come over and try these ridiculous little chocolate-dunkable sticks I’d just pulled from a baking sheet. By the time I’d eaten my fourth one (okay, maybe sixth), I knew I’d stumbled onto something that would ruin all other hot chocolate experiences forever. The crispy edges shattered like caramelized sugar glass, revealing a soft, almost brownie-like center that melted the moment it hit warm milk, creating swirls of chocolate that tasted like someone had distilled the best parts of winter into edible form. I’m not saying these hot cocoa dippers will change your life, but I’m also not not saying that. Let me walk you through every single step—by the end, you'll wonder how you ever made it any other way.
The magic starts with understanding that we’re not just making cookies here, people. We’re creating edible time-release chocolate bombs that dissolve at the perfect rate, giving you that slow-motion chocolate waterfall effect that makes every sip feel like you’re drinking liquid velvet. Most recipes get this completely wrong by treating these like regular cookies that happen to be dunkable, but that’s like using a Ferrari to deliver pizza. These babies need to be engineered from the ground up for maximum chocolate transfer while maintaining enough structural integrity to survive a proper dunk without disintegrating into sad chocolate sludge at the bottom of your mug. The secret lies in the ratio of butter to chocolate to flour—something I discovered after approximately three batches that ended up tasting like chocolate cardboard.
Picture yourself pulling these out of the oven, the whole kitchen smelling like Willy Wonka’s factory had a baby with a French patisserie, while your neighbors start knocking on your door because they think you’ve opened a professional bakery. That first bite when they’re still warm and the chocolate chips are just barely holding their shape? Pure magic. The edges caramelize into this deep mahogany that tastes like someone captured the essence of a campfire s’more and condensed it into cookie form. I’ll be honest—I ate half the batch before anyone else got to try it, standing over the cooling rack like a chocolate-gremlin, justifying it as "quality control testing." My roommate walked in to find me with chocolate smudged on my cheek, holding a cookie in each hand, and I didn’t even feel bad because I knew I was about to change their life too.
Okay, ready for the game-changer? We’re not just mixing chocolate into dough and calling it a day. We’re creating these little rectangular soldiers that stand at attention on the edge of your mug, slowly surrendering their chocolate goodness with each dunk. The technique involves something I call the "double chocolate infusion" where we use both cocoa powder for depth and real chocolate chunks for those melty pockets that create the signature chocolate swirl. Stay with me here—this is worth it. By the time you’re done, you’ll have created something that makes store-bought hot chocolate mix taste like brown water in comparison.
What Makes This Version Stand Out
Chocolate Saturation: Most recipes barely taste like chocolate until you hit a chip, but these dippers are chocolate through and through. We’re talking cocoa in the flour, cocoa butter in the binding, and three types of chocolate for complexity that would make a sommelier weep. The result is a cookie that tastes like it was born in a chocolate river and raised by cocoa beans.
Structural Integrity: These aren’t those sad, floppy cookies that break off in your mug and leave you fishing for soggy bits with a spoon. The edges crisp up like a perfectly baked biscotti while the center stays tender enough to bite through easily. They hold their shape for multiple dunks, getting better with each plunge into hot liquid chocolate.
Texture Play: We’re creating a cookie that’s crispy, chewy, and melty all in one bite. The edges shatter like thin ice while the middle stays fudgy, and the chocolate chunks create these lava-like pockets that burst when they hit warm milk. It’s like someone took all the best textures in the dessert world and crammed them into one perfect dunking vessel.
Speed Demon: From bowl to baking sheet to mouth in under 45 minutes, these come together faster than you can drive to the store for those sad packaged ones. No chilling required, no fancy equipment needed—just one bowl and the willpower to not eat all the dough before it hits the oven.
Customizable Canvas: Once you master the base, you can flavor these like a mad scientist. I’ve done peppermint bark versions that taste like Christmas exploded, spicy Mexican chocolate numbers that warm you from the inside, and even a salted caramel situation that had my dentist giving me the side-eye.
Crowd Psychology: I’ve never seen people lose their minds faster than when you serve these at a party. Adults turn into kids, kids turn into chocolate-fueled rockets, and everyone suddenly becomes best friends over the shared experience of dunking cookies into hot chocolate like it’s a competitive sport.
Make-Ahead Magic: These freeze beautifully, which means you can have fresh hot cocoa dippers whenever the mood strikes. Just slice and bake from frozen—no need to thaw. I keep a log in my freezer at all times because you never know when a hot chocolate emergency might strike.
Alright, let's break down exactly what goes into this masterpiece...
Inside the Ingredient List
The Flavor Foundation
We start with Dutch-processed cocoa powder because it’s been treated with an alkalizing agent that gives it a smoother, more mellow chocolate flavor than natural cocoa. Natural cocoa is too harsh and acidic here—we want that deep, almost Oreo-like chocolate that makes your taste buds do a happy dance. If you skip this and use regular cocoa, your dippers will taste like they’re wearing a slightly bitter chocolate coat instead of that velvety chocolate robe we’re after. The difference is like comparing a cheap chocolate bar to something handcrafted by a Swiss chocolatier who’s been perfecting his craft for three generations.
Dark brown sugar isn’t just sweet—it’s flavor in crystal form, carrying molasses notes that add complexity and help create that chewy center we’re chasing. White sugar would give you a boring one-note sweetness, but brown sugar brings caramel undertones that make these taste like they’ve been slow-cooked over a fire. The moisture content also helps keep the centers tender while the edges crisp up. I’ve tried making these with all white sugar before, and they tasted like chocolate-flavored cardboard that had been left out in the sun too long.
The Texture Crew
Unsalted butter gives us control over the salt level and melts at just the right rate to create those perfect pockets of richness. Salted butter would throw off the balance and make these taste like someone got confused halfway through baking. The butter needs to be properly softened—not melted, not cold, but that perfect room temperature where it indents when you press it but doesn’t collapse into a greasy puddle. This creates the ideal creaming situation that incorporates air for lightness while still giving us that buttery richness that makes these taste like they’re bad for you in the best possible way.
All-purpose flour provides the structure, but we’re using slightly less than a typical cookie to keep these tender and dunkable. Too much flour and you’ve got chocolate hockey pucks that could break teeth. Too little and they spread into chocolate lakes that merge into one giant cookie sheet disaster. The protein content in AP flour hits that sweet spot where we get enough gluten development for structure but not so much that these become tough and bread-like.
The Unexpected Star
Cornstarch is the secret weapon that makes these melt-in-your-mouth tender instead of dense and heavy. It interferes with gluten formation just enough to keep things delicate, like a chocolate whisper rather than a chocolate shout. Just a tablespoon transforms the texture from regular cookie to something that dissolves on your tongue like chocolate snow. I discovered this trick after my first batch came out tasting like chocolate bricks, and now I won’t make cookies without it.
The Final Flourish
Semi-sweet chocolate chips provide those melty pockets of chocolate that burst when they hit warm milk, but we’re also adding dark chocolate chunks for complexity and white chocolate drizzle for visual drama. The three-chocolate approach creates a chocolate symphony instead of a one-note chocolate song. The chips hold their shape while the chunks melt into chocolate rivers, creating that perfect swirl when you dunk. Skip any of them and you’ll miss out on the full chocolate experience—these aren’t just chocolate cookies, they’re a chocolate experience in cookie form.
Everything's prepped? Good. Let's get into the real action...
The Method — Step by Step
- Start by creaming your butter and brown sugar together for a full three minutes—set a timer because you’ll be tempted to rush this. The mixture should turn pale and fluffy, like chocolate-kissed clouds that smell like caramel and promise. This is where we’re incorporating air that’ll give us lift, so don’t half-ass it. Scrape down the bowl halfway through to make sure everything gets evenly incorporated, because nothing ruins cookies like discovering pockets of unmixed butter later.
- Add your egg and vanilla, but crack the egg into a separate bowl first because nothing ruins cookie dough like shell fragments that you’ll never find until someone crunches down on one. Beat until the mixture looks like chocolate mousse—smooth, glossy, and so tempting you’ll want to eat it with a spoon. The vanilla should be real extract, not that imitation stuff that tastes like sadness and artificial dreams. Mix just until combined because overmixing here leads to tough cookies that taste like they’ve got something to prove.
- Whisk together your dry ingredients in a separate bowl—this isn’t just for show, it ensures the leavening agents distribute evenly so you don’t get cookies that rise like mountains in some spots and stay flat like pancakes in others. The cocoa powder should be sifted if it’s clumpy because nobody wants to bite into a dry cocoa pocket that tastes like disappointment. The cornstarch should be evenly distributed because those tiny particles are what’ll give us that tender texture we’re chasing. Take a moment to appreciate how this dry mixture looks like chocolate sand from the most delicious beach in the world.
- Add the dry ingredients to the wet in three additions, mixing just until the flour disappears—this is not the time to multitask because overmixed cookie dough develops gluten and creates tough, sad cookies that no amount of hot chocolate can save. The dough should come together like chocolate Play-Dough that’s been left out just enough to firm up but not so much it cracks. If it seems too soft, that’s perfect—we want it pliable enough to shape but not so stiff it fights back. Scrape the bowl one final time to make sure no flour pockets are hiding at the bottom like chocolate ninjas.
- Fold in your chocolate chips and chunks using a spatula, not the mixer, because we want them evenly distributed without turning them into chocolate gravel. The dough should be studded like a chocolate galaxy with stars of semi-sweet and supernovas of dark chocolate. Take a moment to appreciate that this might be the most beautiful raw cookie dough you’ve ever seen. Resist the urge to eat it all now because baked cookies are infinitely better, and you’ll thank yourself later when you’re dunking these into hot chocolate like a pro.
- Turn the dough out onto a sheet of parchment paper and shape it into a log about 2 inches in diameter—this is where we’re getting those perfect rectangular dippers instead of round cookies that roll around like chocolate wheels. Roll it up in the parchment and twist the ends like a giant chocolate Tootsie Roll, then refrigerate for at least 30 minutes. This firms up the butter so the cookies hold their shape instead of spreading into chocolate lakes. If you’re impatient (I see you), pop it in the freezer for 15 minutes instead.
- Preheat your oven to 350°F and line a baking sheet with parchment because these will stick like chocolate glue if you don’t. Unwrap your dough log and slice it into 1/2-inch thick pieces using a sharp knife—if the dough cracks, let it warm up for 5 minutes because cold dough slices cleaner than room temperature dough. Arrange them with space to spread because they’ll relax in the oven and you don’t want chocolate cookie islands merging into one continent. The slices should look like chocolate coins from the most delicious currency in the world.
- Bake for 12-14 minutes, but start checking at 10 because every oven is a unique snowflake that wants to ruin your cookies. They’re done when the edges look set and the centers are still slightly soft—they’ll continue cooking from residual heat, so pull them when they look almost underdone. The smell should be intoxicating, like someone opened a chocolate factory next door to a caramel shop. Let them cool on the baking sheet for 5 minutes before transferring to a wire rack because they’re fragile when warm and you don’t want chocolate casualties.
- Cool completely before attempting the white chocolate drizzle because warm cookies will melt the drizzle into chocolate puddles instead of decorative stripes. Melt your white chocolate in 30-second bursts in the microwave, stirring between each burst until it’s smooth and pourable—don’t overheat or it’ll seize up like chocolate cement. Transfer to a zip-top bag, snip the corner, and drizzle like you’re Jackson Pollock with a chocolate obsession. The contrast isn’t just pretty—it adds another layer of sweetness that complements the deep chocolate base.
That's it—you did it. But hold on, I've got a few more tricks that'll take this to another level...
Insider Tricks for Flawless Results
The Temperature Rule Nobody Follows
Your butter temperature makes or breaks these cookies, and I’m not being dramatic. Too cold and you’ll be creaming until your arm falls off, creating dense cookies that taste like buttery disappointment. Too warm and the dough will spread like chocolate lava, creating one giant cookie that you’ll have to break apart like a chocolate archaeologist. The sweet spot is cool room temperature—press your finger into the butter and it should make an indent but not sink all the way through like it’s given up on life. If you forgot to take your butter out (we’ve all been there), cut it into small cubes and spread them on a plate—it’ll soften in about 15 minutes instead of an hour.
Why Your Nose Knows Best
Don’t trust the timer alone—your nose is the most sophisticated cookie-detecting device ever invented. When these are perfectly baked, your kitchen will smell like chocolate heaven with caramel undertones, but if you catch even a hint of burnt sugar, you’ve gone too far. The smell changes about 2 minutes before they’re done, giving you just enough time to save them from chocolate cremation. A friend tried skipping this step once—let’s just say it didn’t end well, and her apartment smelled like chocolate disappointment for days.
The 5-Minute Rest That Changes Everything
After you pull these from the oven, let them sit on the baking sheet for exactly 5 minutes—set a timer because this is crucial. During this time, they’re finishing baking from residual heat while the centers set up enough to handle. Move them too early and they’ll break apart like chocolate casualties, leaving you with cookie crumbs that are delicious but not dunkable. Wait too long and they’ll stick to the parchment like chocolate glue, requiring archaeological techniques to remove them intact.
The Freezer Trick for Clean Slices
If your dough log is too soft to slice cleanly, pop it in the freezer for 10 minutes—not longer or it’ll become chocolate granite that fights back against your knife. The perfect firmness feels like chilled playdough that yields to pressure but doesn’t smush. Use a sharp knife and cut in one smooth motion instead of sawing, which creates ragged edges that look like chocolate casualties. Between slices, wipe your knife on a damp towel to prevent buildup that creates uneven cuts and chocolate smears across your beautiful cookies.
The Dunking Sweet Spot
These reach peak dunkability about 2 hours after baking, when they’ve cooled completely but haven’t started going stale. The texture hits that perfect balance between crisp and tender that makes them ideal for hot chocolate submersion. If you’re serving these at a party, bake them the morning of—not the day before, because they’ll start to dry out and lose their dunking magic. Fresh is always best, but if you must make them ahead, store them in an airtight container with a slice of bread to maintain that perfect texture.
Creative Twists and Variations
This recipe is a playground. Here are some of my favorite ways to switch things up:
Peppermint Bark Dippers
Replace the vanilla extract with 1 teaspoon peppermint extract and fold in 1/2 cup crushed candy canes along with the chocolate chips. The peppermint creates this cooling sensation that makes the chocolate taste even richer, like eating a York Peppermint Patty that’s been transformed into the perfect dunkable form. Top with crushed candy canes instead of white chocolate drizzle for extra crunch and minty freshness that tastes like Christmas morning in cookie form. I dare you to taste this and not go back for seconds—it’s impossible, I’ve tried.
Mexican Hot Chocolate Dippers
Add 1 teaspoon cinnamon, 1/4 teaspoon cayenne pepper, and 1/4 teaspoon chili powder to your dry ingredients for cookies that warm you from the inside out. The spice combination enhances the chocolate flavor while adding a gentle heat that builds slowly, creating a complex flavor profile that tastes like authentic Mexican chocolate. Use dark chocolate chunks instead of semi-sweet chips for an even deeper chocolate experience that can stand up to the bold spices. These are perfect for those cold nights when regular hot chocolate just isn’t cutting it.
Salted Caramel Swirl Dippers
Drizzle with caramel sauce instead of white chocolate, then sprinkle with flaky sea salt while the caramel is still warm. The salt enhances the chocolate flavor while the caramel adds buttery richness that makes these taste like gourmet candy bars in cookie form. Use homemade caramel if you’re feeling ambitious, but store-bought works perfectly fine when you’re craving these at 10 PM on a Tuesday. The combination of sweet and salty creates that addictive flavor that keeps you coming back “just for one more” until you’ve accidentally eaten half the batch.
Orange Zest Chocolate Dippers
Add the zest of one orange to your butter while creaming it with the sugar—the oils in the zest infuse throughout the dough, creating a subtle citrus note that makes the chocolate taste brighter and more complex. This combination tastes like those chocolate oranges you get at Christmas but in dunkable form that makes your hot chocolate feel sophisticated and grown-up. Use dark chocolate instead of semi-sweet to complement the orange flavor and create a more adult version that pairs beautifully with coffee or red wine. If you’ve ever struggled with chocolate-orange combinations that taste artificial, you’re not alone—and I’ve got the fix.
Double Peanut Butter Dippers
Replace half the butter with peanut butter and fold in peanut butter chips along with the chocolate chips for a cookie that tastes like a peanut butter cup married a chocolate cookie and had delicious babies. The peanut butter adds richness and depth while creating those addictive sweet-savory notes that make it impossible to eat just one. These are especially dangerous because they taste like health food (peanuts have protein, right?) but deliver all the chocolate satisfaction you’re craving. Warning: these disappear faster than regular dippers, so consider making a double batch.
White Chocolate Raspberry Dippers
Fold in freeze-dried raspberries along with white chocolate chips for cookies that taste like chocolate-covered raspberries in dunkable form. The freeze-dried fruit adds intense raspberry flavor without extra moisture that would throw off the texture, creating little pockets of fruity brightness that cut through the chocolate richness. These taste like summer in cookie form and pair beautifully with white hot chocolate for a dessert that feels fancy enough for company but easy enough for everyday cravings. The combination creates that perfect balance of chocolate richness and fruit brightness that keeps you coming back for more.
Storing and Bringing It Back to Life
Fridge Storage
Store completely cooled cookies in an airtight container at room temperature for up to 5 days—any longer and they’ll start to dry out and lose their dunking magic. Layer them between sheets of parchment paper if you’re stacking them, because nobody wants chocolate casualties stuck together like cookie twins. Add a slice of bread to the container to maintain moisture—the cookies will steal moisture from the bread instead of the air, keeping them tender longer. If they do start to dry out, pop them in the microwave for 5 seconds with a damp paper towel to restore some of that fresh-baked softness.
Freezer Friendly
These freeze beautifully both as dough and as baked cookies—freeze the dough log wrapped in parchment and foil for up to 3 months, or freeze baked cookies in a single layer before transferring to a freezer bag. The dough can be sliced and baked straight from frozen, just add 2-3 minutes to the baking time and watch them closely. Frozen baked cookies thaw in about 30 minutes at room temperature or 10 seconds in the microwave, making them perfect for emergency chocolate cravings. I always keep a log of dough in my freezer because you never know when a hot chocolate emergency might strike at 2 AM.
Best Reheating Method
If your cookies have gone slightly stale, revive them by wrapping in a damp paper towel and microwaving for 10-15 seconds—the steam will restore some of that fresh-baked texture. For a larger batch, place them on a baking sheet and warm in a 300°F oven for 5-7 minutes, which refreshes them without making them tough. Don’t overdo it or they’ll dry out further and become chocolate frisbees that no amount of dunking can save. The key is gentle heat and moisture that brings back that perfect balance between crisp edges and tender centers.