I was standing in the kitchen, staring at a half‑cooked chicken breast that had somehow turned into a sad, limp slab of meat. The oven was still on, the timer had already chimed, and I was about to throw in a bag of frozen peas, when my friend shouted, “Dude, you need a snack that’s actually worth the time.” That moment turned into a culinary epiphany that would change my entire approach to quick bites.
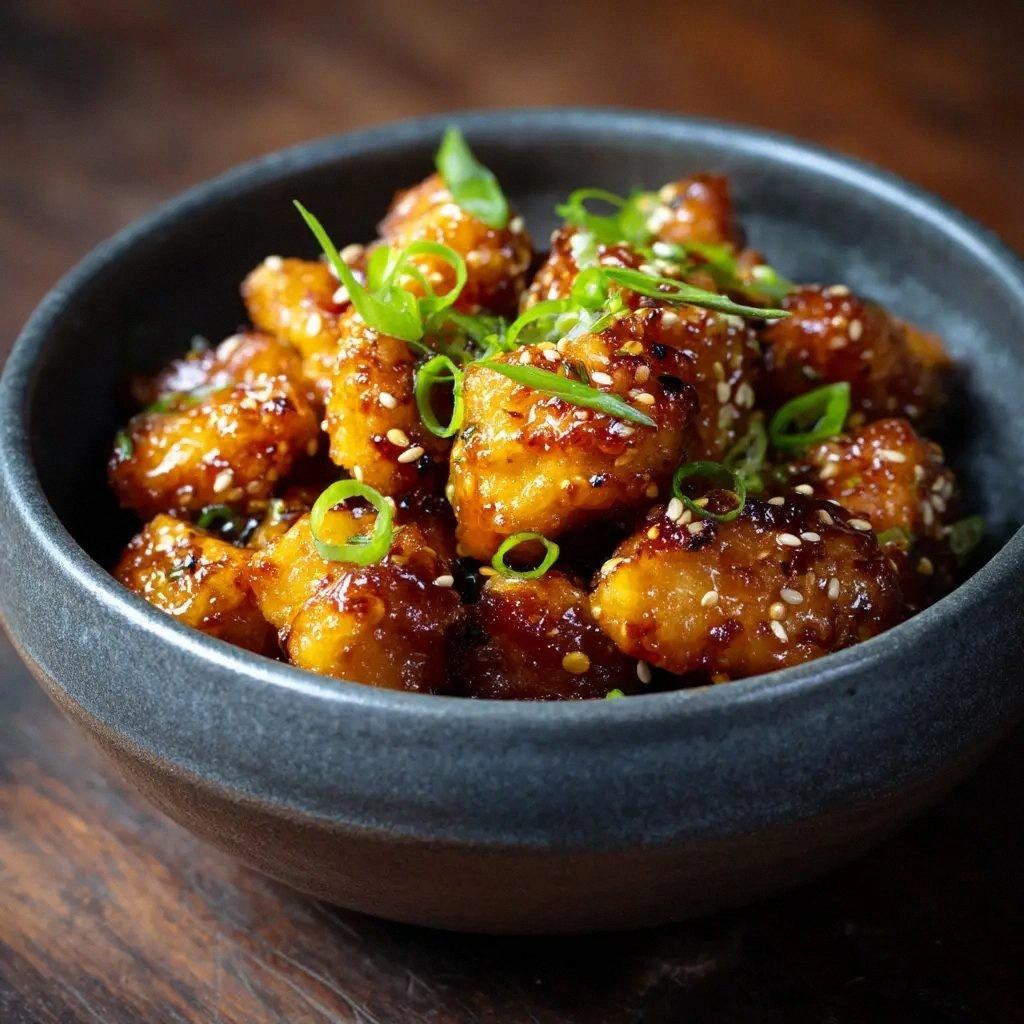
Picture the sizzling sound as the pan meets the first bite of chicken—an audible promise that something delicious is about to happen. The aroma that unfurls is a buttery, honeyed perfume that lingers in the air, making the kitchen feel like a secret bakery. The sight of golden edges cracking like thin ice gives you that instant satisfaction of a job well done. The taste is a sweet‑savory explosion that lingers on the tongue, and the texture—crispy on the outside, tender on the inside—creates a dance of contrasts. The feeling of holding a bite that melts in your mouth, while still crisp, is the kind of moment you want to share on social media.
What makes this version stand out is not just the flavor but the entire experience: a hand‑crafted coating that crisps up faster than any pre‑mixed batter, a sauce that coats the chicken like velvet, and a final pop of freshness from parsley that cuts through the richness. It’s the kind of dish that turns a regular weekday into a mini‑celebration, and the fact that it can be made in under 45 minutes means you’re not sacrificing quality for convenience. The recipe’s secret is a simple technique that turns ordinary chicken into a crowd‑pleaser without the need for a fancy kitchen gadget.
I’ll be honest—when I first tried this, I ate half the batch before anyone else even had a chance to taste it. The texture was so addictive that I kept reaching for more, and the honey‑butter glaze was so glossy it looked like liquid gold. The next time I made it, I dared myself to taste it and not go back for seconds, and I failed spectacularly. The moment the first bite hit my tongue, I knew I’d found the ultimate version of this dish. The next time you hear someone say they love chicken, you’ll know exactly what to say: “You’ve never had chicken until you’ve had honey butter chicken bites.”
Most recipes get this completely wrong. They either over‑bake the chicken, under‑season the coating, or forget the finishing touch that brings everything together. What actually works is a simple, foolproof method that lets the natural flavors shine while adding a caramelized, buttery finish. The difference is like comparing a bland soup to one that’s been simmered with love and a touch of honey. And that’s exactly what this recipe delivers: a dish that’s hands‑down the best version you’ll ever make at home.
Picture yourself pulling this out of the oven, the whole kitchen smelling incredible, and the first bite sending a wave of buttery, honeyed joy across your palate. The edges of the chicken will be crisp, the interior juicy, and the sauce will cling to every bite like a glossy coat. You’ll see the golden sheen, feel the slight crunch, hear the satisfying crackle as you take a bite, taste the sweet‑savory balance, and feel the warmth from the freshly cooked chicken. Let me walk you through every single step—by the end, you’ll wonder how you ever made it any other way.
What Makes This Version Stand Out
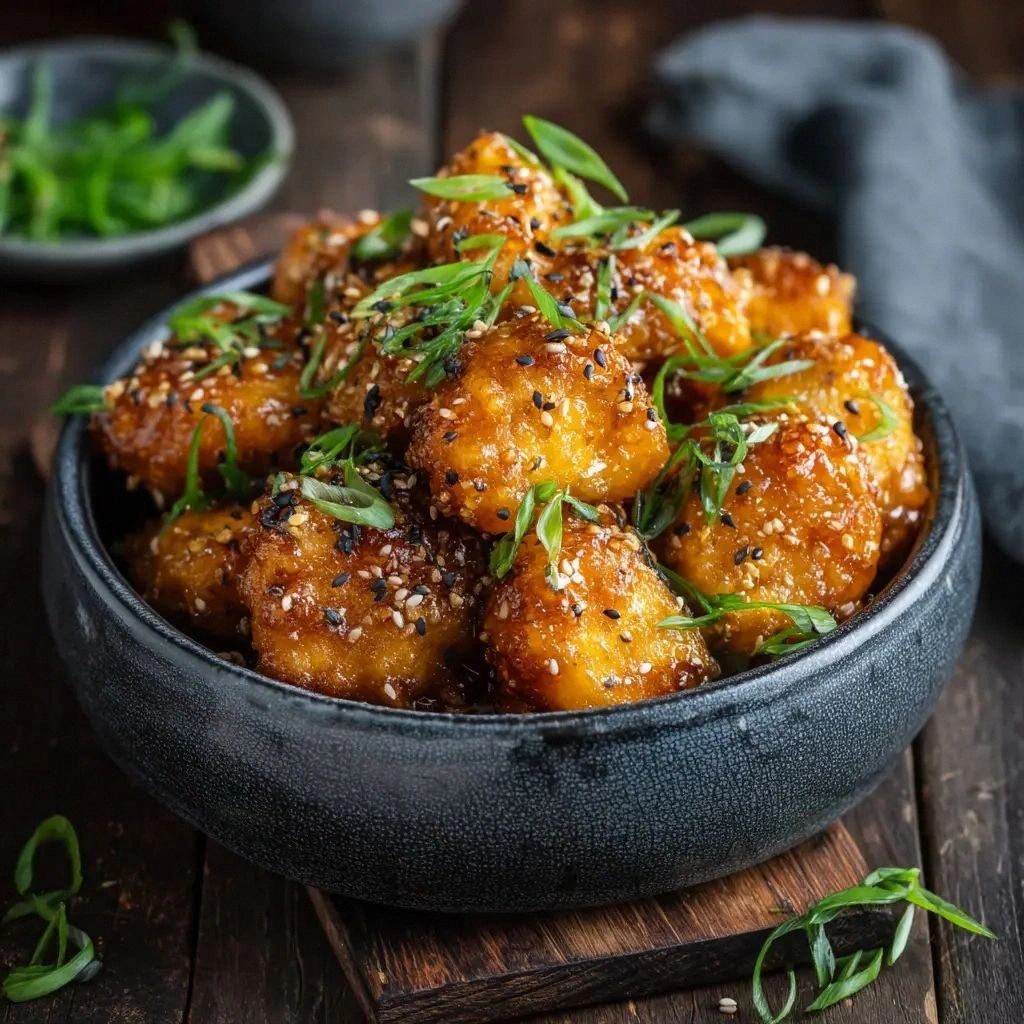
- Flavor: The honey‑butter glaze creates a sweet‑savory profile that elevates the chicken from ordinary to unforgettable. The glaze coats each bite like velvet, leaving a lingering sweetness that doesn’t overwhelm the savory base. The addition of garlic and soy sauce adds depth and umami, turning a simple bite into a flavor-packed experience. The final sprinkle of parsley introduces a fresh, herbaceous note that cuts through the richness.
- Texture: The cornstarch coating crisps to a golden crunch, while the inside remains tender and juicy. The coating’s thinness ensures the heat penetrates quickly, preventing over‑cooking. The buttery glaze adds a silky finish that balances the crunch. The result is a multi‑sensory bite that satisfies every palate.
- Simplicity: Only ten ingredients, all pantry staples, make this recipe a go‑to for busy nights. No special equipment or advanced techniques are required; a skillet, a whisk, and a few minutes of attention are all you need. The steps flow naturally, allowing you to multitask and keep the kitchen organized.
- Uniqueness: The combination of honey and butter in a quick pan‑fry is rare, giving this dish a distinctive flavor that sets it apart from typical chicken bites. The method of coating with cornstarch instead of flour yields a lighter crisp that’s hard to replicate. The sauce’s glossy finish is a visual treat that makes the dish Instagram‑ready.
- Crowd Reaction: Friends and family will rave about the caramelized glaze and the perfectly crisp edges. The dish is ideal for potlucks, game nights, or a quick dinner that feels special. It’s a conversation starter that invites compliments and requests for the recipe.
- Ingredient Quality: Using fresh, high‑quality chicken and real honey ensures the best flavor profile. The butter’s unsalted nature allows you to control the salt level, while the low‑sodium soy sauce keeps the dish balanced. The fresh parsley adds a pop of color and freshness.
- Cooking Method: The pan‑fry technique locks in juices, creating a tender interior while achieving a crisp exterior. The quick sear at high heat caramelizes the honey and butter, forming a glossy glaze. The method is forgiving, allowing even novice cooks to achieve professional results.
- Make‑Ahead Potential: The chicken can be marinated and coated ahead of time, then cooked just before serving. The glaze can be reheated gently, maintaining its glossy texture. This flexibility makes the dish ideal for meal prep or hosting a last‑minute gathering.
Alright, let's break down exactly what goes into this masterpiece. The next section will walk you through each ingredient, explaining its role and how it contributes to the overall flavor and texture. We’ll also explore potential swaps and alternative options for those with dietary preferences or limited pantry items. Understanding the purpose of each component will empower you to tweak the recipe to your exact taste.
Inside the Ingredient List
The Flavor Base
Honey is the star that brings a natural sweetness, caramelizing beautifully when heated with butter. It also acts as a binding agent, allowing the glaze to cling to the chicken. The low‑sodium soy sauce adds umami and a subtle saltiness that balances the sweetness. Together, they create a glaze that is both rich and bright, turning a simple bite into a flavor explosion.
The Texture Crew
Cornstarch is the secret to that perfect crisp. Unlike flour, cornstarch creates a thin, airy coating that crisps up quickly without absorbing too much oil. When you coat the chicken, the cornstarch also helps the glaze adhere, ensuring every bite is coated with that glossy honey‑butter finish. A light dusting of cornstarch also prevents the chicken from becoming soggy.
Vegetable oil is used for the initial sear; it has a high smoke point, allowing the chicken to brown without burning. The oil also helps the cornstarch coating set, creating a barrier that keeps the chicken juicy inside. If you’re looking for a healthier option, you can swap the oil for a splash of coconut oil for a subtle tropical hint.
The Unexpected Star
Fresh parsley is the finishing touch that adds color, freshness, and a mild herbal note. It’s the final step that elevates the dish from simply sweet to complex and balanced. Parsley also provides a pop of green that makes the dish visually appealing, encouraging diners to take that first bite. If parsley is not available, a sprinkle of chopped cilantro or basil will work well.
The Final Flourish
Garlic powder, paprika, salt, and black pepper are the seasoning backbone that grounds the dish. These spices add depth without overpowering the honey‑butter glaze. Garlic powder provides a subtle, consistent garlic flavor that permeates the coating, while paprika adds a gentle warmth and a hint of smokiness. Salt and pepper are essential for balancing the sweet glaze and enhancing the overall taste.
Everything's prepped? Good. Let's get into the real action. The method will guide you through each step, ensuring a crispy exterior, juicy interior, and a glaze that’s as beautiful as it is delicious.
The Method — Step by Step
- Step 1: Prep the Chicken — Start by cutting the boneless, skinless chicken breasts into bite‑sized cubes, about 1.5 inches each. Pat the pieces dry with a paper towel to ensure the coating sticks. This step is crucial for even cooking; moisture on the surface can prevent the cornstarch from adhering properly. While you’re at it, season the cubes lightly with a pinch of salt and pepper to taste. This early seasoning will infuse the meat with flavor before the coating sets.
- Step 2: Coat the Chicken — In a shallow dish, combine the cornstarch, garlic powder, paprika, salt, and black pepper. Toss each chicken cube in the mixture, ensuring an even coat. Shake off any excess cornstarch; too much can create a thick crust that doesn’t crisp up well. This coating not only provides crunch but also locks in the juices. The spices in the coating add a subtle depth that complements the honey‑butter glaze.
- Step 3: Heat the Pan — Place a large skillet over medium‑high heat and add the vegetable oil. Allow the oil to shimmer but not smoke; this ensures a gentle sear. The pan should be hot enough that the chicken sizzles immediately upon contact. This step is the first moment of transformation, turning raw chicken into a golden treasure. Keep the heat consistent to avoid uneven cooking.
- Step 4: Sear the Chicken — Add the coated chicken cubes to the skillet in a single layer, avoiding overcrowding. Let them cook untouched for 2–3 minutes until the underside turns golden and crisp. Flip the pieces to brown the other side; this usually takes another 2–3 minutes. The goal is a uniform golden crust that seals in the juices. Watch closely; the moment the edges start to pull away from the pan is the cue to flip.
- Step 5: Add Butter and Honey — Reduce the heat to medium, then add the butter and let it melt into the pan juices. Stir in the honey, ensuring it coats the chicken evenly. The butter and honey create a glossy, caramelized glaze that will cling to each bite. Allow the mixture to bubble gently for 30 seconds, letting the honey thicken slightly. This is the moment of truth where the flavors converge.
- Step 6: Finish the Sauce — Add the minced garlic and low‑sodium soy sauce to the pan. Stir quickly to combine, making sure the garlic doesn’t burn. The garlic releases its aroma, while the soy sauce adds umami and a touch of saltiness. Let the sauce simmer for another minute, allowing the flavors to meld. The sauce should be thick enough to coat the chicken without dripping.
- Step 7: Garnish — Sprinkle fresh parsley over the hot chicken bites, letting the heat wilt the herbs slightly. The parsley adds a fresh, herbal contrast to the sweet glaze, creating a balanced flavor profile. Toss gently to distribute the parsley evenly. This final touch transforms the dish into a visually stunning plate. The green pop of parsley invites the diner to dig in.
- Step 8: Serve Immediately — Transfer the honey‑butter chicken bites to a serving platter while they’re still hot. The glaze will be at its glossy peak, and the chicken will remain juicy. Serve with a side of steamed rice, a crisp salad, or your favorite dipping sauce. The dish is best enjoyed fresh, but leftovers can be reheated with a splash of water to maintain moisture. The aroma alone will convince you to reheat it right away.
That's it — you did it. But hold on, I've got a few more tricks that'll take this to another level. The next section will reveal insider tips that will help you avoid common pitfalls and elevate the dish to restaurant‑quality. These are the little details that separate a good recipe from a great one, and they’re all within your reach.
Insider Tricks for Flawless Results
The Temperature Rule Nobody Follows
The key to a perfect crust is maintaining the right pan temperature. If the skillet is too hot, the coating will burn before the chicken cooks through; too cool, and the chicken will steam instead of sear. Use a thermometer to keep the skillet at around 375°F (190°C). This ensures a crisp exterior and a juicy interior. Many cooks skip this step, leading to uneven results.
Why Your Nose Knows Best
Trust your nose to gauge doneness. The first time you cook this dish, you’ll notice a sweet, buttery scent that indicates the glaze has caramelized. If the aroma is too sweet or burnt, the honey is overcooked. Smell the sauce as it simmers; a pleasant, caramelized scent means it’s ready. This sensory cue saves you from overcooking the chicken.
The 5-Minute Rest That Changes Everything
After cooking, let the chicken rest for five minutes before serving. This allows the juices to redistribute, keeping the meat moist. The glaze will thicken slightly, creating a richer coating. Many people skip this step, resulting in dry chicken. The rest period is a simple, yet game‑changing step.
The Garlic Timing Trick
Adding garlic at the wrong time can ruin the dish. Minced garlic should be added after the butter has melted to avoid burning. If you add it too early, the garlic will become bitter. This subtle timing difference can mean the difference between a winning flavor and a failed attempt. The right timing ensures a smooth, aromatic finish.
The Sauce Consistency Check
The glaze should coat the chicken without dripping excessively. If it’s too runny, let it simmer a bit longer; if it’s too thick, add a splash of water to loosen it. Consistency is key to achieving that glossy, velvety finish. A balanced glaze is a hallmark of a well‑executed dish.
The Final Toss
A quick toss in the pan after adding the soy sauce ensures even coating. This step might seem trivial, but it guarantees that every bite has the same flavor profile. The toss also helps the glaze adhere better to the chicken. Skipping it can lead to uneven seasoning and texture.
These tricks are the secret sauce that turns a simple recipe into a culinary masterpiece. By paying attention to temperature, aroma, rest time, and timing, you’ll consistently produce perfect honey butter chicken bites every time. The result is a dish that’s not only delicious but also showcases your cooking prowess.
Creative Twists and Variations
This recipe is a playground. Here are some of my favorite ways to switch things up: swap the honey for maple syrup, use coconut milk for a creamy twist, or add a splash of sriracha for heat. Each variation opens a new flavor dimension while keeping the core of the dish intact. The key is to maintain the balance between sweetness, savory, and the crispy coating.
Maple‑Honey Fusion
Replace half the honey with pure maple syrup for a deeper, caramel flavor. The syrup adds a subtle molasses note that pairs well with the butter. Keep the rest of the glaze unchanged to preserve the glossy finish. This variation is great for autumn or winter gatherings. The maple undertone makes the dish feel cozy and festive.
Coconut‑Creamed Version
Add a splash of coconut milk to the glaze for a creamy, tropical twist. The coconut’s mild sweetness complements the honey, while the butter adds richness. This version is perfect for summer beach parties or a quick tropical escape. The coconut milk also softens the texture, creating a silky coating.
Sriracha Kick
Stir in a tablespoon of sriracha for a spicy, smoky finish. The heat balances the sweetness, creating a complex flavor profile. This variation is ideal for those who love a bit of heat in their dishes. The sriracha also adds a subtle red hue that makes the dish visually appealing.
Herb‑Infused Delight
Swap parsley for fresh thyme or rosemary for a different herbal note. The aromatic herbs pair wonderfully with the honey glaze, creating an earthy undertone. This variation is perfect for a Mediterranean vibe. The herbs also add a fragrant aroma that enhances the overall experience.
Spicy Chili Lime
Add a pinch of cayenne pepper and a squeeze of fresh lime juice. The lime’s acidity cuts through the sweetness, while the cayenne adds a subtle heat. This variation is a crowd‑pleaser for parties and game nights. The bright lime flavor makes the dish feel fresh and zesty.
Ginger‑Garlic Fusion
Incorporate grated fresh ginger into the glaze for a zesty kick. The ginger’s peppery warmth complements the garlic and honey. This variation is great for a quick Asian-inspired twist. The ginger adds a vibrant flavor that keeps the dish exciting.
No matter which variation you choose, the core technique remains the same, ensuring that each bite is as crisp, juicy, and flavorful as the original. Experimenting with these twists lets you tailor the dish to your mood and the season, keeping it fresh and exciting every time you cook.
Storing and Bringing It Back to Life
Fridge Storage
Store the cooked bites in an airtight container in the refrigerator for up to three days. Keep the glaze on the side to prevent it from soaking into the chicken. When reheating, add a splash of water or broth to keep the chicken moist. This method preserves the crispness and flavor while keeping the dish safe to eat. Use a paper towel to absorb excess moisture if needed.
Freezer Friendly
For longer storage, freeze the bites in a single layer on a baking sheet, then transfer to a freezer bag once solid. They can be kept for up to two months. Thaw overnight in the refrigerator before reheating. This technique ensures that the chicken retains its texture and flavor. The glaze may thicken slightly, so a quick stir before serving helps.
Best Reheating Method
Reheat in a skillet over medium heat, adding a splash of water or broth to create steam. The steam helps to re‑crisp the coating without drying out the chicken. Flip occasionally to ensure even heating. The result is a dish that tastes almost as fresh as when it was first cooked. The steam method also helps prevent the glaze from becoming too thick.
A quick trick to keep the glaze from drying out is to drizzle a small amount of honey or butter over the reheated bites before serving. This restores the glossy finish and adds a touch of richness. The reheated bites will be just as delightful as the freshly cooked ones, making them a perfect option for leftovers.
When reheating, avoid microwaving for long periods; the microwave tends to make the coating soggy and the chicken rubbery. Instead, use a skillet or oven at 350°F (175°C) for 5–7 minutes. This gentle heat ensures the chicken remains juicy while the coating crisps up again. The result is a dish that’s as enjoyable as the first time.
If you’re planning a potluck or a large gathering, consider cooking the bites in batches to maintain freshness. Store each batch separately and reheat only the portion you’ll serve at that moment. This approach keeps the dish at its peak flavor and texture, ensuring every guest gets a perfect bite.
In summary, proper storage and reheating techniques are essential to preserving the integrity of honey butter chicken bites. By following these simple steps, you can enjoy this dish anytime, whether it’s a quick weekday dinner or a weekend feast.
Final Thoughts
The honey butter chicken bites have become my go‑to comfort food for a reason. The combination of a crisp, flavorful coating and a glossy, sweet‑savory glaze creates a dish that’s both satisfying and shareable. Every bite feels like a small celebration, and the simplicity of the recipe makes it accessible to cooks of all skill levels.
I’ve spent countless evenings experimenting with this recipe, tweaking the spice ratios, and adding new flavors to keep it fresh. Whether you’re cooking for a family gathering or a quick weeknight dinner, this dish adapts effortlessly to your needs. The best part? It’s quick, it’s delicious, and it’s a conversation starter at the table.
If you’ve ever struggled with chicken that ends up dry or bland, this recipe is your rescue. The cornstarch coating locks in moisture, while the honey‑butter glaze adds a depth of flavor that will make you want to eat the entire batch. Don’t be shy—try it, taste it, and share the results with friends who will thank you for the new favorite.
Remember, cooking is an art, but it’s also a science. By following the steps, paying attention to temperature, and using the right ingredients, you’ll consistently achieve a dish that’s both crispy and succulent. The next time you’re in a hurry, reach for this recipe and let the honey‑butter chicken bites do the heavy lifting.
I’m excited to hear how you personalize this dish. Do you add a dash of cayenne for heat? Do you swap the parsley for cilantro? Share your tweaks in the comments, and let’s keep the conversation going. The kitchen is a place for experimentation, and this recipe is a perfect playground.
Thank you for joining me on this culinary adventure. I hope you enjoy making these honey butter chicken bites as much as I do. Keep cooking, keep sharing, and keep that fire of curiosity alive. Until next time, happy cooking!