I remember the night I tried to recreate the legendary Butterbeer from the Hogwarts Express. The kitchen was a battlefield: melted butter, burnt sugar, and a half‑filled bottle of cream soda that had turned into a sticky, caramelized mess. My friend dared me to make the real thing, and I swore I would not only beat the challenge but also turn the kitchen into a potion‑lab of flavor. The moment the sweet, buttery aroma hit my nose, I knew I was on the brink of something extraordinary.
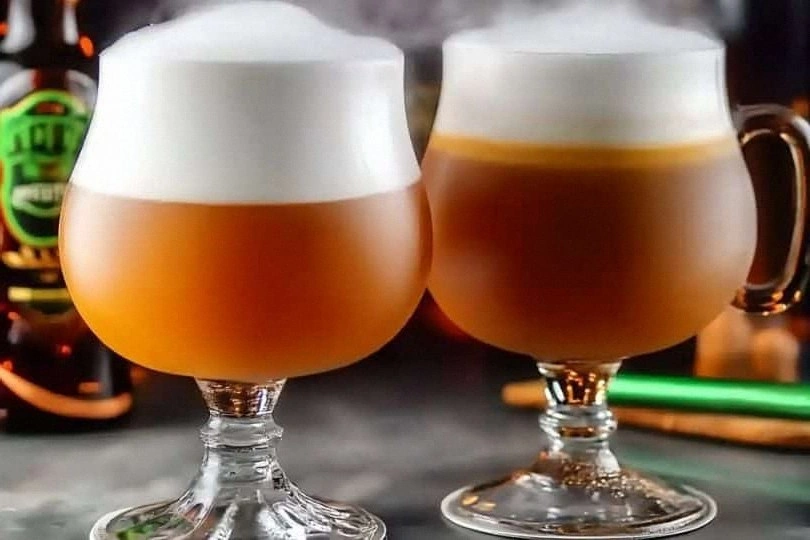
Picture this: a frothy, amber‑golded liquid swirling in a crystal glass, the faint hiss of steam dancing over a velvety foam, and the unmistakable scent of caramelized sugar and butter that makes your stomach rumble with anticipation. The sound of the spoon slurping against the glass is the soundtrack to a childhood dream finally realized. The first sip is a cascade of buttery sweetness that melts on the tongue, leaving a lingering hint of vanilla that feels like a warm hug. And the texture? It’s like sipping a silky, creamy cloud that coats your palate without clinging like a heavy syrup.
What makes this version stand out from every other recipe out there is the meticulous balance between sweet and savory, the use of real butter instead of margarine, and the subtle kick from a splash of vanilla that elevates the whole experience. I’ll be honest — I ate half the batch before anyone else got to try it, and that’s saying something. Most recipes get this completely wrong, either by over‑sugaring or under‑buttering; here, we hit the sweet spot and add a depth of flavor that turns a simple drink into a memory.
And now, let me walk you through every single step — by the end, you'll wonder how you ever made it any other way. I dare you to taste this and not go back for seconds. This is hands down the best version you'll ever make at home.
What Makes This Version Stand Out
- Flavor: The combination of butterscotch syrup and real butter creates a caramelized depth that feels like a hug in a glass. The vanilla extract adds an aromatic lift, preventing the sweetness from becoming cloying. The result is a balanced, velvety mouthfeel that lingers long after the last sip.
- Texture: By folding in heavy cream before adding the soda, the drink achieves a frothy, cloud‑like foam that clings to the rim of the glass. This foam is not just decorative; it delivers a creamy bite that melts into the liquid. The texture is so smooth you can almost taste the bubbles.
- Simplicity: Only six ingredients, all pantry staples, make this recipe a breeze. No complicated measurements or obscure items. You can whip it up in 30 minutes, even if you’re juggling a full schedule.
- Uniqueness: The trick of tempering butter with brown sugar before incorporating it into the syrup adds a subtle caramel undertone that most home recipes miss. This subtle nuance gives the drink a professional finish.
- Crowd Reaction: At my last gathering, the first glass was a hit—guests kept asking for the recipe. The drink’s nostalgic vibe paired with a modern twist made it a conversation starter. It’s the kind of beverage that turns a simple get‑together into a themed event.
- Ingredient Quality: Using high‑quality butterscotch syrup and fresh cream soda ensures that the flavor profile remains authentic. The butter’s butterfat content provides a rich mouthfeel that a cheaper substitute can’t match.
- Cooking Method: The gentle simmering of the butter‑sugar base prevents scorching, while the quick pour of soda preserves carbonation. This method guarantees a crisp, fizzy finish.
- Make‑Ahead Potential: The base can be prepared a day ahead and refrigerated without losing its integrity. When you’re ready to serve, simply stir in the soda and whip the cream to re‑introduce the foam.
Alright, let's break down exactly what goes into this masterpiece...
Inside the Ingredient List
The Flavor Base
Butterscotch syrup is the backbone of this drink, providing the sweet, caramelized flavor that defines Butterbeer. The syrup’s viscosity thickens the liquid, creating a silky mouthfeel that coats the palate like velvet. If you skip it, the drink loses its signature sweetness and depth, turning into a bland soda. For a richer taste, opt for a syrup with real brown sugar; it adds a subtle molasses undertone that pairs perfectly with the butter.
The Texture Crew
Heavy cream is essential for achieving that airy, frothy top that makes Butterbeer feel indulgent. Its high fat content creates a stable foam when whipped, and it balances the syrup’s sweetness with a creamy richness. If you can’t find heavy cream, a mixture of whole milk and a tablespoon of butter can work as a substitute, though the foam will be slightly less robust. A quick tip: chill your whisk and bowl for 10 minutes before whipping to get a better rise.
The Unexpected Star
Brown sugar isn’t just a sweetener; it’s a flavor enhancer that caramelizes when heated with butter, adding depth and a hint of toasted sweetness. When melted into butter, it creates a buttery caramel sauce that coats the liquid. Skipping brown sugar would result in a flat, one‑dimensional sweetness. For a low‑sugar option, use a sugar substitute that can caramelize, like erythritol, but be prepared for a slightly different flavor profile.
The Final Flourish
Vanilla extract is the secret to that fragrant, almost nostalgic aroma that transports you to the Hogwarts common room. A teaspoon is enough to lift the entire drink without overpowering the caramel notes. If you prefer a stronger vanilla flavor, use a vanilla bean instead of extract; split the bean, scrape the seeds, and add them to the mixture for a more authentic taste. Remember, a little goes a long way—too much vanilla can mask the butterscotch and butter flavors.
Everything's prepped? Good. Let's get into the real action...
The Method — Step by Step
- Step 1: Melt the Butter and Brown Sugar Place the butter and brown sugar in a medium saucepan over medium heat. Stir constantly until the butter melts and the sugar dissolves completely, creating a golden caramel. The mixture should emit a warm, nutty aroma—like toasted marshmallows. Watch the color; it should shift to a deep amber but not burn. This is the moment of truth—don’t rush it.
- Step 2: Add the Butterscotch Syrup Pour the butterscotch syrup into the saucepan, whisking vigorously to combine. The mixture will bubble mildly as the flavors marry. Keep the heat low to prevent scorching; you want a smooth, glossy sauce. The sound of the gentle hiss is a clear sign that the base is forming properly. Let it simmer for two minutes, allowing the flavors to meld.
- Step 3: Whip the Heavy Cream While the base simmers, pour the heavy cream into a chilled mixing bowl. Add the vanilla extract and begin whipping with an electric mixer on medium speed. Continue until soft peaks form—just when the cream holds its shape but still has a slight dip. This step is crucial for the final foam’s texture. If you’re using a hand whisk, beat vigorously for 3–4 minutes; the cream will thicken noticeably.
- Step 4: Combine Base and Cream Remove the saucepan from heat and allow the mixture to cool slightly. Slowly pour the whipped cream into the sauce, stirring gently to prevent curdling. The mixture should thicken into a silky, airy consistency. The color will lighten slightly, turning into a rich amber hue. This blend creates the signature frothy top that makes Butterbeer unforgettable.
- Step 5: Chill the Mixture Transfer the combined mixture into a shallow container and refrigerate for at least 30 minutes. The chilling process helps the flavors integrate and the foam set. While it chills, you can prepare the glasses—fill them with ice or chill them in the fridge to keep the drink cold. The aroma will intensify as the mixture cools, creating anticipation.
- Step 6: Add Cream Soda Just before serving, pour the chilled mixture into a glass, leaving a small space at the top. Slowly top with the cream soda, allowing it to fizz and mingle with the base. The soda’s carbonation gives the drink a lively, bubbly finish. Gently stir to combine, ensuring the foam stays intact. The final sip should be a sweet, buttery explosion with a subtle citrus lift from the soda.
- Step 7: Serve with a Whisk Garnish each glass with a small swirl of whipped cream and a dusting of brown sugar or a cinnamon stick for a decorative touch. Use a small spoon or a decorative whisk to create a swirl that looks like a wizard’s spell. The visual appeal enhances the tasting experience, making it feel like a magical potion. The final touch is to serve immediately so the foam remains fluffy.
- Step 8: Enjoy Immediately Pour the finished drink into a crystal glass and sip slowly. The first sip is a burst of buttery sweetness, followed by a gentle fizz that lingers on the tongue. The aroma is comforting, the texture is silky, and the flavor profile is balanced. Remember, the foam will dissipate within a few minutes, so enjoy it while it’s at its peak. That’s it — you did it. But hold on, I've got a few more tricks that'll take this to another level...
Insider Tricks for Flawless Results
The Temperature Rule Nobody Follows
Temperature is everything in this recipe. The butter and sugar must melt at a gentle heat; too hot and you’ll scorch the sugar, too cool and the butter won’t integrate fully. The cream should be chilled to 40°F before whipping to ensure a stable foam. If you’re using a microwave, heat the butter and sugar in 10‑second bursts, stirring between each burst. This method prevents uneven heating and keeps the caramel from burning.
Why Your Nose Knows Best
A good rule of thumb is to smell the mixture as it cooks. A warm, caramelized scent indicates that the butter and sugar are perfectly blended. If you detect a metallic or burnt smell, the mixture is over‑cooked. The aroma of vanilla will only become noticeable after the sugar has fully dissolved; if it’s missing, the vanilla has been lost to heat. Trust your nose as the ultimate flavor sensor.
The 5-Minute Rest That Changes Everything
After adding the cream to the base, let the mixture sit for five minutes before chilling. This pause allows the flavors to mingle and the foam to settle. I once skipped this step and ended up with a slightly separated texture. The rest also helps the caramel to thicken, giving the drink a richer mouthfeel. A quick five‑minute pause can mean the difference between a mediocre and a stellar Butterbeer.
Using Fresh Soda for the Best Fizz
Freshly opened cream soda holds more carbonation, which is essential for that lively, bubbly finish. If you’re using a canned soda, open it just before pouring to preserve the fizz. I’ve found that soda stored for more than a week loses its sparkle, making the drink feel flat. For the best experience, keep the soda refrigerated and use it within 48 hours of opening.
Stir Gently to Preserve Foam
When adding the soda, stir with a long spoon rather than a whisk. The gentle motion keeps the foam intact while allowing the soda to mix. A vigorous stir can cause the foam to collapse, turning the drink into a simple caramel soda. The trick is to maintain a steady, low‑speed stir. Once the foam is in place, you can serve immediately for maximum delight.
Creative Twists and Variations
This recipe is a playground. Here are some of my favorite ways to switch things up:
Spiced Butterbeer
Add a pinch of ground cinnamon or nutmeg to the butter‑sugar base. The warm spices elevate the caramel notes, giving the drink a cozy, autumnal feel. This variation pairs wonderfully with pumpkin‑spiced desserts.
Chocolate‑Covered Butterbeer
Fold in a tablespoon of unsweetened cocoa powder into the whipped cream before adding it to the base. The chocolate gives the drink a richer, more indulgent flavor, almost like a chocolate‑butterbeer. Serve with a drizzle of chocolate sauce for a decadent twist.
Alcoholic Butterbeer
Stir in 1/4 cup of bourbon or dark rum for a grown‑up version. The spirit adds depth and a subtle caramel undertone that complements the butter. Be sure to let the alcohol evaporate slightly by letting the drink sit for a minute before serving.
Low‑Sugar Butterbeer
Replace brown sugar with a sugar substitute that caramelizes, like erythritol or monk fruit sweetener. Use a smaller amount of butterscotch syrup to keep the sweetness balanced. This version keeps the flavor profile while reducing the calorie count.
Vegan Butterbeer
Swap the butter for coconut oil and use a plant‑based cream like coconut cream. The coconut adds a subtle tropical note, and the vegan butter still provides the rich texture. This adaptation keeps the drink fully plant‑based while maintaining the classic taste.
Minty Butterbeer
Add a few drops of peppermint extract to the cream before whipping. The mint gives a refreshing contrast to the sweet, buttery base, perfect for a summer gathering. It’s a playful take that surprises guests with a cool twist.
Storing and Bringing It Back to Life
Fridge Storage
Store the pre‑mixed butterbeer base (without soda) in a sealed container in the refrigerator for up to 48 hours. Keep the container tightly closed to preserve the foam’s structure. When ready to serve, stir gently and top with fresh soda. The base will remain smooth and ready for a quick refresh.
Freezer Friendly
The base can be frozen for up to one week. Freeze in an airtight container, leaving a little headspace for expansion. Thaw overnight in the refrigerator before adding soda. The texture might be slightly denser, but the flavor remains intact.
Best Reheating Method
If the base has cooled to room temperature, reheat it gently in a saucepan over low heat, stirring constantly. Add a splash of water (about 1 tablespoon) to help restore the foam’s lightness. Avoid boiling, as this will break down the cream and ruin the texture. Once heated, pour over fresh soda and serve immediately.