I was halfway through a week of bland, overcooked chicken when my phone buzzed with a message from my best friend: “I need a new chicken recipe that’s actually exciting.” I stared at my fridge, which was a sad collage of leftover rotisserie pieces and a single wilted basil leaf. The moment I saw the sun setting through the kitchen window, I decided to turn that desperation into a culinary triumph. That night, I pulled out a handful of pantry staples and a bottle of honey, and I vowed to create the most unforgettable grilled honey mustard chicken anyone has ever tasted.
Picture this: the grill lights up with a gentle amber glow, the air thick with the sweet scent of honey mingling with smoky paprika. You hear the sizzle as the chicken hits the hot grates, a sound that announces victory over blandness. The first bite delivers a burst of tangy mustard, the silky sweetness of honey, and a subtle peppery kick that dances across your palate. Every chew feels like a caramelized ribbon of flavor, and the tender meat practically melts in your mouth. That moment? Pure culinary bliss that you’ll want to replay on repeat.
I’ve tested countless variations of honey mustard chicken over the past year, and this version is the one that finally cracked the code. The secret lies in a balanced sauce that coats the chicken like velvet, a seasoning blend that gives depth without overpowering, and a grill technique that locks in juices while creating those coveted crispy edges that shatter like thin ice. I dare you to taste this and not go back for seconds—once you do, you’ll wonder how you ever survived the rest of your culinary life. The sauce doesn’t just coat; it transforms the chicken into a flavor bomb that explodes with each bite.
If you’re tired of the same old grilled chicken, this recipe is your ticket out of the rut. I’ll walk you through every single step, from the moment you preheat the grill to the final garnish that adds a pop of color and freshness. By the end, you’ll wonder how you ever made it any other way. Let’s dive into the details and turn an ordinary meal into an extraordinary experience.
What Makes This Version Stand Out
- Flavor: The honey and Dijon create a sweet‑savory profile that’s balanced by a hint of smoky paprika.
- Texture: Grilling gives a charred crust while the glaze keeps the meat moist, resulting in a juiciness that’s hard to beat.
- Simplicity: All you need are pantry staples; no exotic ingredients or elaborate prep.
- Uniqueness: The combination of honey, mustard, and a touch of whole grain mustard gives a depth that most recipes miss.
- Crowd‑Pleaser: It’s a crowd‑satisfying dish that works for casual week‑night dinners and special occasions alike.
- Ingredient Quality: Using fresh, high‑quality chicken and real honey makes all the difference.
- Cooking Method: Grilling is quick and imparts a smoky flavor that’s impossible to replicate on a stovetop.
- Make‑Ahead Potential: The glaze can be pre‑made and stored, saving you time on busy nights.
Inside the Ingredient List
The Flavor Base
Honey is the star that provides a natural sweetness and a glossy finish. Its high fructose content caramelizes beautifully on the grill, creating a caramelized crust that locks in moisture. If you’re looking for a richer flavor, replace 1/4 cup honey with a mixture of honey and a tablespoon of maple syrup; the maple adds depth without overpowering the dish.
Dijon mustard offers a sharp, tangy bite that cuts through the sweetness of honey. It also acts as an emulsifier, helping the glaze coat the chicken evenly. If you can’t find Dijon, a whole‑grain mustard can replace it, giving a slightly grainier texture but maintaining the sharpness.
The Texture Crew
Olive oil is essential for creating a protective layer that prevents sticking and promotes even grilling. Choose a light, fruity olive oil to avoid overpowering the delicate flavors. A splash of extra‑virgin olive oil before serving can add a bright, silky finish that elevates the dish.
Smoked paprika adds a subtle smokiness that complements the grill char. It also imparts a vibrant color that makes the dish visually appealing. If you prefer a milder taste, substitute with regular paprika and add a pinch of cayenne for heat.
The Unexpected Star
Lemon juice brightens the glaze and balances the sweetness of honey. The acidity also helps tenderize the chicken, ensuring a juicy interior. If you’re allergic to citrus, a splash of apple cider vinegar will provide a similar acidic punch.
Fresh thyme adds herbal depth and a subtle earthiness that rounds out the flavor profile. You can use dried thyme as a substitute, but fresh thyme yields a more pronounced aroma. A pinch of fresh rosemary can replace thyme for a different herbal note.
Everything’s prepped? Good. Let’s get into the real action and see how these ingredients come together on the grill.
The Method — Step by Step
- Prep the glaze: In a small bowl, whisk together honey, Dijon mustard, whole grain mustard, olive oil, minced garlic, smoked paprika, dried thyme, lemon juice, salt, and pepper until smooth. The mixture should be glossy and slightly thick. This glaze will serve as both a marinating sauce and a finishing basting sauce.
- Marinate the chicken: Pat the chicken breasts dry with paper towels and place them in a shallow dish. Pour half of the glaze over the chicken, turning to coat each piece evenly. Cover with plastic wrap and refrigerate for at least 30 minutes; the longer you marinate, the deeper the flavor.
- Preheat the grill: Light your grill and set it to medium‑high, about 400°F (200°C). Clean the grates with a wire brush and oil them lightly with a paper towel dipped in oil to prevent sticking.
- Season the grill: Brush the grates with a little olive oil, then sprinkle a pinch of salt and pepper on the grill surface. This extra seasoning layer adds a subtle depth that complements the glaze.
- Grill the chicken: Place the marinated chicken breasts on the grill. Close the lid and cook for 5 minutes on one side, then flip and grill for another 5 minutes. The chicken should develop a golden char and the glaze should caramelize into a sticky coating.
- Check for doneness: Use a meat thermometer to ensure the internal temperature reaches 165°F (74°C). The edges should pull away from the grill and the juices should run clear. If the chicken is still undercooked, continue grilling for a few more minutes.
- Baste with remaining glaze: While the chicken is resting, brush the remaining glaze over each breast. This final glaze layer locks in moisture and adds a glossy finish that makes the dish look restaurant‑quality.
- Rest the chicken: Transfer the chicken to a cutting board and let it rest for 5 minutes. Resting allows the juices to redistribute, ensuring every bite stays moist and flavorful. While resting, you can finish any side dishes or assemble the salad.
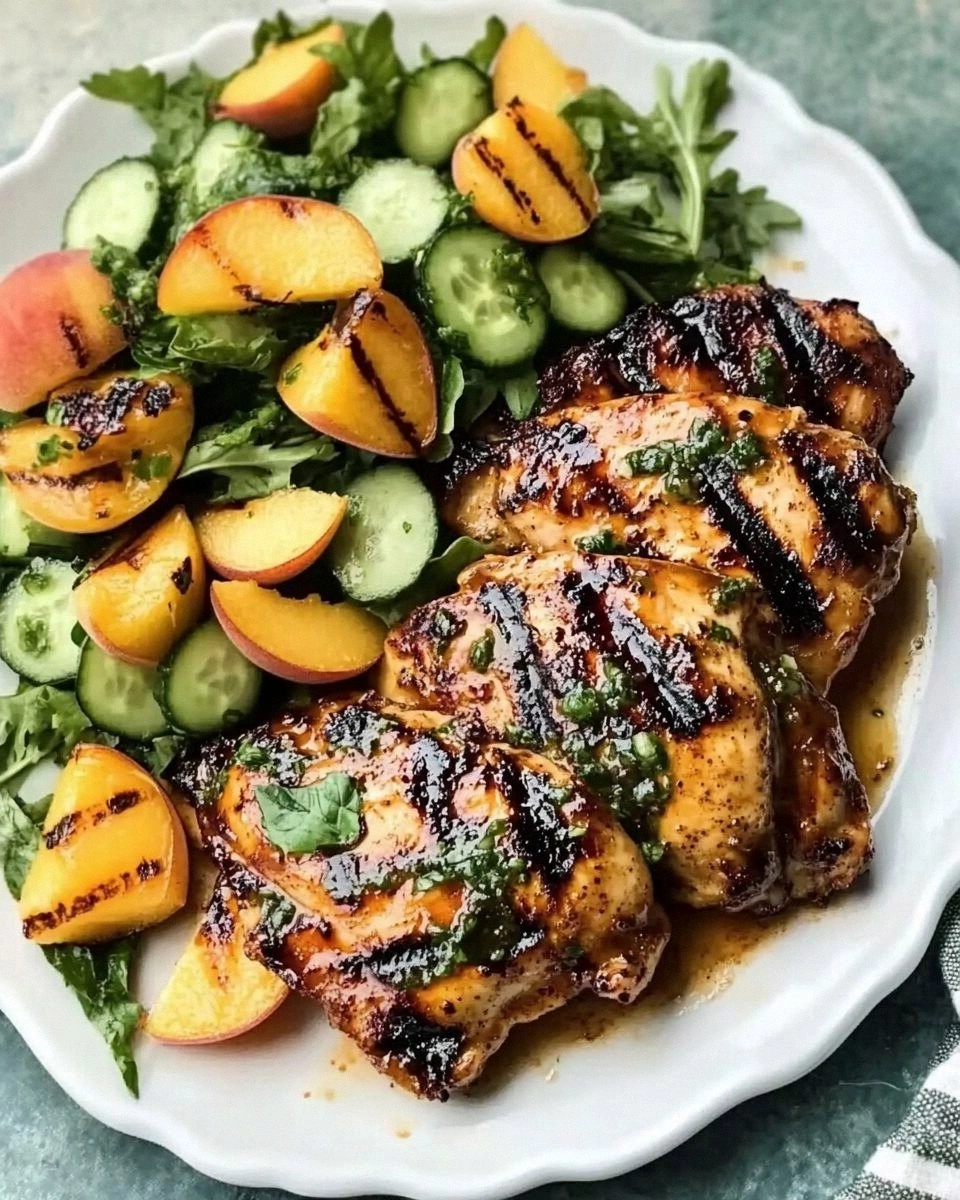
- Serve and enjoy: Slice the chicken against the grain into thin strips, drizzle any remaining glaze, and garnish with fresh parsley. Pair with a light peach salad or your favorite side, and watch the compliments pour in.
That’s it—you did it. But hold on, I’ve got a few more tricks that will elevate this dish from great to unforgettable. Keep reading for insider tips that will help you master the grill and create restaurant‑quality results every time.
Insider Tricks for Flawless Results
The Temperature Rule Nobody Follows
Many grillers think a high heat is always better, but the sweet glaze will burn if the grill is too hot. Aim for a steady medium‑high temperature, about 400°F (200°C). If the grill gets too hot, lower the flame or move the chicken to a cooler part of the grill to finish cooking gently.
Why Your Nose Knows Best
Before you flip the chicken, pause and sniff the grill. A pleasant, caramelized aroma signals that the glaze is ready to set. If the scent is metallic or overly smoky, give it a few more minutes and adjust the heat accordingly.
The 5‑Minute Rest That Changes Everything
Resting the chicken isn’t just a formality; it’s the secret to juicy bites. While the meat rests, the muscle fibers relax, allowing the juices to redistribute. Skipping this step often leaves the chicken dry and unappetizing.
Use a Brush, Not a Spoon
When basting, a silicone brush spreads the glaze evenly and prevents clumps that can burn. A spoon may deposit uneven amounts, leading to a sticky mess. A brush also helps you control how much glaze you apply, preventing over‑basting.
Keep the Grates Clean
Food residue can cause flare‑ups that burn the glaze. Clean the grill between batches with a wire brush, and consider using a grill mat for extra protection. A clean grill ensures consistent heat distribution and a flawless finish.
Creative Twists and Variations
This recipe is a playground. Here are some of my favorite ways to switch things up:
Spicy Sriracha Honey
Add a tablespoon of sriracha to the glaze for a fiery kick that balances the sweetness. The heat pairs wonderfully with the smoky paprika, creating a multi‑layered flavor profile that’s perfect for spice lovers.
Pineapple Glaze
Replace half the honey with crushed pineapple and add a splash of coconut milk. This tropical twist gives the chicken a juicy, caramelized coating that’s reminiscent of Hawaiian barbecue.
Herb‑Infused Olive Oil
Infuse the olive oil in the glaze with rosemary, sage, and thyme before brushing it on the chicken. The herbaceous aroma elevates the dish, making it feel like a gourmet dinner.
Balsamic Reduction
Finish the chicken with a drizzle of balsamic reduction for a tangy, slightly sweet contrast. The reduction’s acidity brightens the honey‑mustard flavor and adds a glossy, restaurant‑style finish.
Cheese‑Stuffed Chicken
Create a small pocket in each breast and fill it with a mixture of goat cheese and chopped spinach. The cheese melts into the chicken, adding creaminess that pairs beautifully with the glaze.
Smoky Chipotle
Add a teaspoon of chipotle powder to the glaze for a smoky depth that complements the grill char. This variation is ideal for those who love a smoky, slightly peppery flavor profile.
Storing and Bringing It Back to Life
Fridge Storage
Store leftover chicken in an airtight container for up to three days in the refrigerator. The glaze will thicken slightly, but a quick reheating will restore its glossy sheen. Keep the chicken separate from the glaze to avoid sogginess.
Freezer Friendly
Freeze the chicken in a freezer‑safe bag or container for up to two months. Thaw overnight in the refrigerator before reheating. If you’re short on time, use the defrost setting on your microwave.
Best Reheating Method
Reheat the chicken in a preheated oven at 350°F (175°C) for 10 minutes, or until heated through. Add a splash of water or chicken broth to keep the meat moist, then finish with a quick glaze brush for that fresh, glossy finish.