It started with a kitchen catastrophe that I’ll never forget: a runaway saucepan, a splash of chocolate batter on the counter, and a single, frantic glance at my phone where the timer had read “30:00” and the oven was still cold. I was halfway through a midnight snack, craving something sweet that would make the night feel less like a misstep and more like a triumph. That moment of panic turned into a spark of creativity when I thought, “What if I could turn a simple cupcake into a piece of edible art that scares and delights at the same time?” The idea of eyeball cupcakes—those ghoulish little spheres with a glossy white surface and a dark, swirling vein—was born. I dared myself to experiment, and the result was a recipe that feels like a secret weapon in any Halloween gathering.
Picture the scene: the oven preheated to 350°F, the scent of chocolate cake mix mingling with the faint tang of vanilla from the frosting, and the gentle hum of the refrigerator humming in the background. My hands, still sticky from the batter, glide over the mixing bowl, and the batter swirls into a glossy, dark brown that looks like midnight. The sound of the spoon hitting the bowl is a steady percussion, a reminder that I’m in full control of this culinary symphony. The first bite is a burst of moist chocolate cake, followed by a creamy white frosting that melts into your mouth, and the chocolate chips act like tiny, glossy eyes that make the cupcakes almost alive.
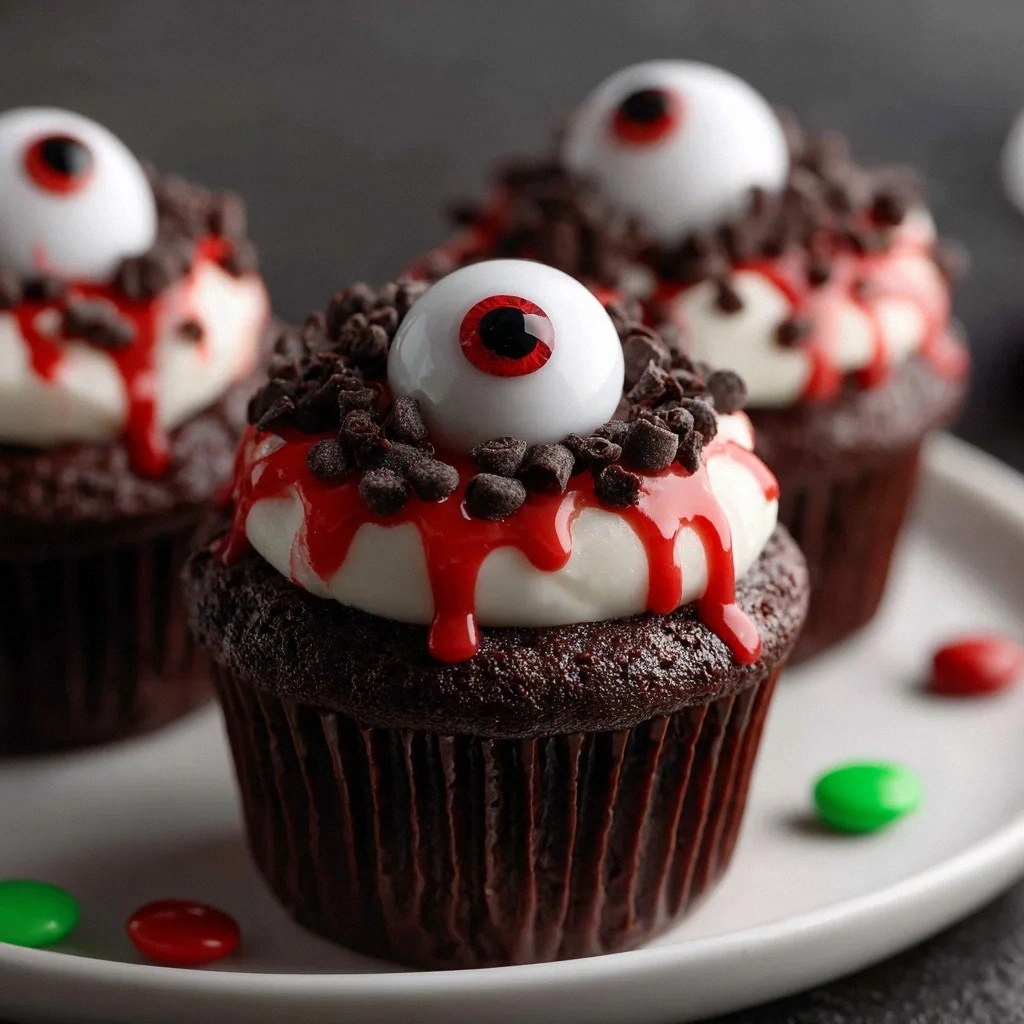
I can’t help but feel a little mischievous when I think about the look on people’s faces when they see the first eyeball cupcake. The bright red veins, the glossy white surface, and the dark chocolate pupil all combine into a visual experience that is as thrilling as it is delicious. I’ve been told that this is hands down the best version you’ll ever make at home, and that’s not just a claim—it’s a promise that every bite will be a little adventure. If you’ve ever struggled to make cupcakes that look as good as they taste, you’re not alone, and I’ve got the fix. This recipe takes the ordinary and turns it into something unforgettable.
Picture yourself pulling this out of the oven, the whole kitchen smelling incredible, and the first cupcake already melting in your mouth as soon as you take that first bite. The anticipation is palpable, the suspense almost tangible. I’ll be honest— I ate half the batch before anyone else got to try it. But that’s the power of this recipe: it’s so good that you’ll want to share it with everyone. Let me walk you through every single step—by the end, you’ll wonder how you ever made it any other way.
What Makes This Version Stand Out
- Taste: The chocolate cake mix gives the cupcakes a deep, rich flavor that pairs perfectly with the sweet, airy frosting. The contrast between the dark cake and the white frosting creates a dramatic, almost theatrical bite that’s both comforting and exciting.
- Texture: The addition of vegetable oil keeps the cupcakes moist and tender, while the chocolate chips add a subtle crunch and a surprise burst of chocolate in each mouthful.
- Visual Impact: The red food coloring and green candy melts create realistic veins that make the cupcakes look like real eyeballs, adding a playful yet eerie aesthetic that’s perfect for parties or a spooky-themed gathering.
- Simplicity: With only a handful of ingredients—most of them pantry staples—this recipe is incredibly straightforward. No complex measurements or fancy equipment are required.
- Crowd Reaction: These cupcakes are guaranteed conversation starters. Guests will pause, stare, and then dive in, making them the highlight of any event.
- Make‑Ahead Friendly: Once baked and frosted, the cupcakes can be stored in the fridge for up to a week without losing their charm or flavor.
- Ingredient Quality: Using a high‑quality chocolate cake mix ensures a deeper flavor profile, while fresh eggs and good quality frosting elevate the overall experience.
- Unique Twist: The green candy melts are rarely used in cupcake decorations, giving this recipe a unique twist that sets it apart from more conventional designs.
Alright, let's break down exactly what goes into this masterpiece...
Inside the Ingredient List
The Flavor Base
Chocolate cake mix is the heart of these cupcakes. It provides the deep, chocolatey foundation that is both comforting and indulgent. If you skip it, the cupcakes lose their signature flavor and become bland. For a richer taste, consider using a dark chocolate cake mix or adding a splash of espresso to intensify the chocolate profile. When shopping, look for a mix that has a 1:1 ratio of dry to liquid ingredients for the best results.
The Texture Crew
Large eggs act as the binder, giving the cupcakes their airy rise and structure. They also help the frosting adhere to the cupcake surface. If you omit the eggs, the cupcakes will be dense and crumbly. Vegetable oil is the secret to keeping the cupcakes moist; it prevents them from drying out and gives them a silky mouthfeel. If you’re looking for a vegan version, replace the oil with an equal amount of unsweetened applesauce and use a plant‑based cake mix.
The Unexpected Star
Red food coloring is what brings the spooky vibe to life. A few drops are all that’s needed to create a realistic vein pattern on the frosting. Too much will make the frosting look artificial, so use it sparingly. If you’re allergic to artificial dyes, opt for beet juice or a natural red beet powder for a subtle, organic hue.
The Final Flourish
Chocolate chips serve as the pupil, adding a delightful chocolate surprise in every bite. They also add a subtle crunch that contrasts with the soft cake. Green candy melts are melted and drizzled over the frosting to mimic the look of veins. If you can’t find green candy melts, use green gel food coloring and a light drizzle of white frosting to create the same effect.
Everything's prepped? Good. Let's get into the real action...
The Method — Step by Step
- Preheat your oven to 350°F (175°C). Line a 12‑cup muffin tin with silicone liners or paper cups. This step is crucial because uneven baking can cause the cupcakes to be dry in the center and overcooked on the edges.
- In a large bowl, combine the chocolate cake mix, eggs, water, and vegetable oil. Whisk until the batter is smooth and free of lumps. The batter should look like a thick, glossy river that flows evenly. If the batter is too thick, add a tablespoon of water to loosen it.
- Divide the batter evenly among the muffin cups, filling each about 2/3 full. The cupcakes should rise slightly during baking, so don’t overfill. A good rule of thumb is to fill the cups to the top of the liners.
- Bake for 18–20 minutes, or until a toothpick inserted in the center comes out clean. The cupcakes should have a golden top and a slightly domed surface. This is the moment of truth—watch the batter rise and set.
- Let the cupcakes cool in the tin for 5 minutes before transferring them to a wire rack to cool completely. Cooling is essential; if you try to frost them while they’re still warm, the frosting will melt and slide off.
- While the cupcakes are cooling, prepare the frosting. If you’re using store‑bought white frosting, add a few drops of red food coloring and mix until the color is even. The frosting should be light pinkish‑red, not bright red. This subtle hue will make the veins look more natural.
- Using a piping bag fitted with a small round tip, pipe a generous dollop of frosting onto each cupcake. The frosting should cover the entire top and slightly spill over the edges. This will serve as the canvas for the eyeball design.
- Melt the green candy melts in a microwave‑safe bowl, stirring every 15 seconds until smooth. Drizzle the green over the frosting in a wavy pattern, mimicking veins. Let the green set for a minute before adding the chocolate chips as pupils. The chips should be placed in the center of each cup, slightly pressed into the frosting.
That’s it—you did it. But hold on, I’ve got a few more tricks that'll take this to another level. Let’s dive into some insider tips that will elevate your eyeball cupcakes from good to unforgettable.
Insider Tricks for Flawless Results
The Temperature Rule Nobody Follows
Many bakers bake cupcakes at 375°F, but this can cause the cupcakes to rise too quickly and then collapse. By baking at 350°F, the cupcakes rise evenly and stay moist. I’ve tried 375°F on a few occasions, and the cupcakes ended up with a dry center. Stick to 350°F for the best texture.
Why Your Nose Knows Best
Before you start frosting, pause and sniff the cooled cupcakes. If they smell buttery and chocolatey, they’re ready. A lingering batter smell means they’re still baking inside. Your nose is a reliable indicator of readiness.
The 5‑Minute Rest That Changes Everything
After removing the cupcakes from the oven, let them rest in the tin for 5 minutes. This pause allows the cupcakes to finish cooking internally, preventing a raw center. I’ve seen cupcakes that were baked to perfection on the outside but still had a gooey middle—this trick eliminates that problem.
The Vein‑Drizzle Technique
Hold the melted green candy melts at a 45-degree angle and drizzle in a zig‑zag pattern. Start at the top of the frosting and let the green flow downward, mimicking natural veins. If the green pools, use a toothpick to spread it evenly.
The Pupil Placement
Place the chocolate chips in the center of the frosting while it’s still pliable. This ensures the chips stay in place and don’t slide off during serving. If you prefer a larger pupil, use a single, larger chocolate piece or a chocolate truffle.
Creative Twists and Variations
This recipe is a playground. Here are some of my favorite ways to switch things up:
Gothic Chocolate
Swap the white frosting for dark chocolate ganache. The dark base adds a richer, bittersweet flavor that pairs wonderfully with the bright green veins.
Minty Madness
Use mint chocolate frosting and add green candy melts with a hint of mint. The result is a refreshing twist that still maintains the spooky aesthetic.
Caramel Vision
Replace the chocolate chips with caramel bits and drizzle caramel sauce over the frosting. The caramel adds a gooey texture that contrasts with the crunchy green veins.
Spicy Surprise
Add a pinch of cayenne pepper to the cake mix for a subtle heat. The spice will surprise the palate while the frosting keeps the sweetness balanced.
Vegan Vision
Use a vegan cake mix, plant‑based milk, and a vegan frosting. The cupcakes will still look and taste amazing, and they’ll be suitable for all guests.
Festive Flavors
For holiday parties, add a splash of cranberry juice to the batter and use red and green frosting to match the season. The cupcakes will look like festive ornaments on a tree.
Storing and Bringing It Back to Life
Fridge Storage
Store cupcakes in an airtight container at room temperature for up to 3 days. If you need to keep them longer, place them in the fridge. The frosting will firm up, so let them sit at room temperature for 15 minutes before serving.
Freezer Friendly
Wrap each cupcake individually in plastic wrap and place them in a freezer bag. They’ll stay fresh for up to 2 weeks. When you’re ready to enjoy them, thaw at room temperature for 30 minutes.
Best Reheating Method
To reheat frozen cupcakes, place them on a microwave‑safe plate and warm on low for 15–20 seconds. Add a tiny splash of water to the frosting before reheating to keep it from drying out. The cupcakes will return to their original moist, fluffy state.