I was standing in my kitchen on a rainy Tuesday, staring at a bag of frozen mixed berries that had been screaming for attention from the freezer door. My roommate had just declared, “If you can turn those icy little things into something edible, I’ll buy you a latte forever.” I laughed, but the dare hung in the air like the scent of fresh coffee. I grabbed the berries, tossed a tablespoon of sugar over them, and set them on the counter, wondering if I could conjure a dessert that would make even the most skeptical palate swoon. That night, I learned that a simple cobbler can become a show‑stopper, and I’m still hearing the echo of that latte promise every time I bite into the buttery crust.
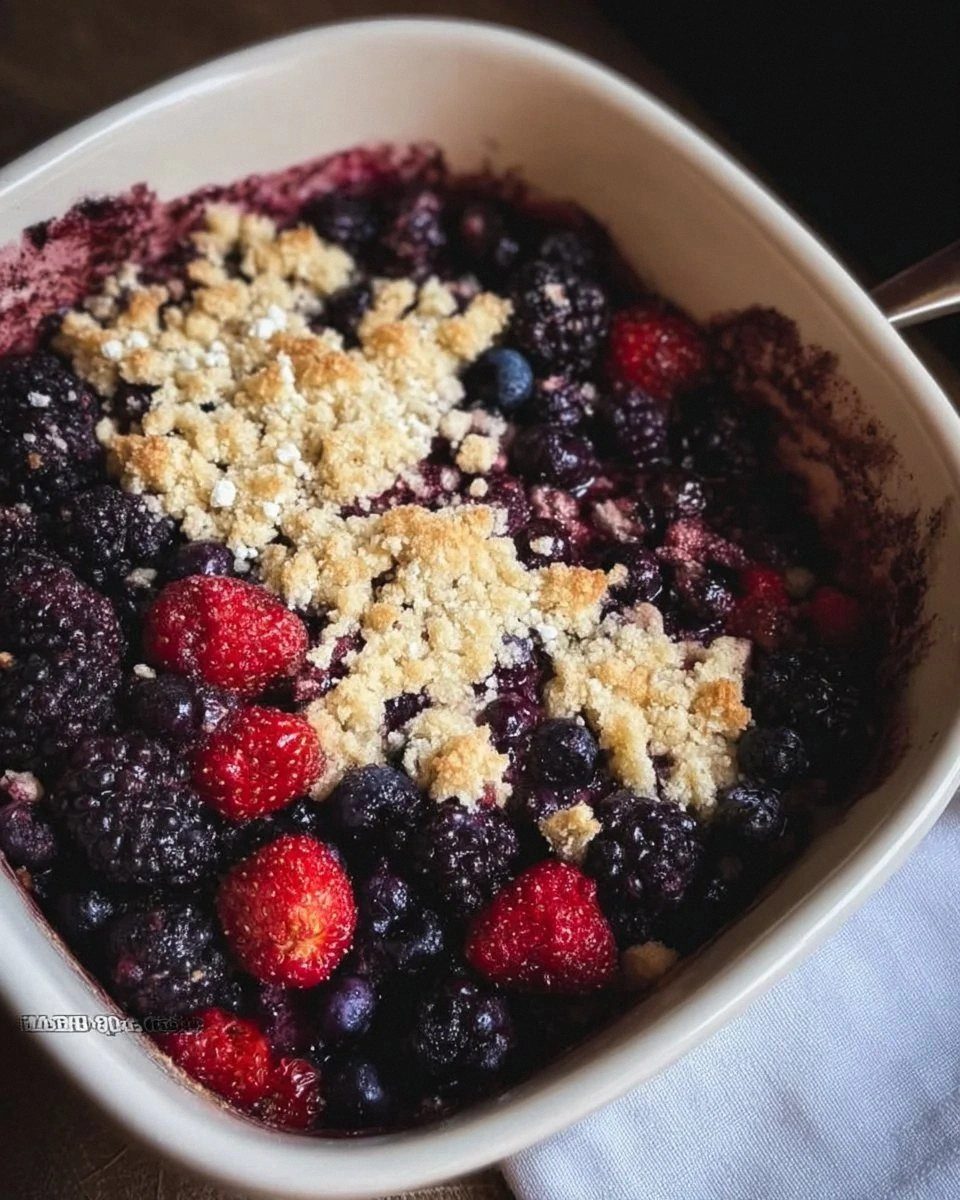
Picture this: the oven door opens and a golden‑brown blanket of biscuit‑like topping rises, its edges crisped to a perfect caramel hue while the interior stays soft and pillowy. The berries underneath are bubbling, releasing a fragrant perfume that reminds you of a summer garden after a sudden downpour—sweet, tart, and a little wild. You hear the faint crackle as the butter melts into the flour, and you can feel the heat radiating from the pan, promising a warm hug for your taste buds. The first forkful delivers a contrast so delightful that the berries’ natural acidity is balanced by the buttery, slightly sweet topping, creating a texture that’s both crunchy and melt‑in‑your‑mouth.
Most cobbler recipes either drown in a sea of sugar or leave you with a soggy, undercooked topping. This version flips the script by using frozen berries—yes, frozen!—which retain their shape and release just enough juice to keep the crumble moist without turning it into a soupy mess. The secret? A splash of vanilla that weaves through the batter like a hidden thread, and a precise ratio of butter to flour that yields a crust that’s airy yet sturdy enough to scoop up every last droplet of berry sauce. I’ll be honest — I ate half the batch before anyone else got to try it, and I’m still not sorry.
Okay, ready for the game‑changer? I’m about to walk you through every single step, from thawing the berries (hint: you don’t have to) to achieving that perfect golden top that shatters like thin ice when you cut into it. By the end, you’ll wonder how you ever made cobbler any other way, and I dare you to taste this and not go back for seconds.
What Makes This Version Stand Out
- Taste: The vanilla‑infused batter adds a subtle depth that turns a simple fruit dessert into a layered experience.
- Texture: A crisp, buttery crust that flakes like pastry while the berries stay juicy but not mushy.
- Simplicity: Only nine ingredients, all pantry staples, and no need to thaw the berries.
- Uniqueness: Using frozen berries locks in flavor and color, giving you a vibrant cobbler any time of year.
- Crowd Reaction: Even the most stubborn dessert skeptics end up begging for the recipe.
- Ingredient Quality: Unsalted butter and pure vanilla extract make the difference between “good” and “wow.”
- Cooking Method: Baked at a high temperature first, then lowered, creating that signature crust‑to‑soft interior.
- Make‑Ahead Potential: Assemble ahead, refrigerate, and pop it in the oven when guests arrive.
Inside the Ingredient List
The Flavor Base
The frozen mixed berries are the heart of this cobbler. Because they’re frozen at peak ripeness, they retain a concentrated sweetness and a vivid hue that fresh berries sometimes lack. If you skip the berries, you lose the entire reason for making a cobbler, so don’t even think about it. A good tip is to choose a blend that includes blueberries, raspberries, and strawberries; the different textures create a symphony of pops when you bite. Swap idea: If you’re allergic to berries, try frozen cherries or a mix of diced peaches and plums for a summer‑twist.
The Sweetening Touch
We use two separate sugar measurements: a tablespoon for the berries and a third‑cup for the topping. The first tablespoon gently awakens the fruit without making it overly sweet, while the larger amount in the batter ensures the crust has a caramelized edge. If you prefer less sugar, reduce the topping sugar to a tablespoon and add a pinch of cinnamon for warmth. Remember, the sugar in the topping also helps the crust brown beautifully, so don’t eliminate it entirely.
The Texture Crew
All‑purpose flour, baking powder, and salt form the backbone of the biscuit‑like topping. The flour provides structure, the baking powder gives lift, and the salt amplifies every flavor note. Skipping the baking powder will leave you with a dense, pancake‑like top, and omitting the salt makes the whole dish taste flat. For gluten‑free fans, substitute a 1‑to‑1 gluten‑free flour blend and add a teaspoon of xanthan gum to keep the crumb tender.
The Unexpected Star
Melted unsalted butter is the secret sauce that turns this cobbler into a buttery masterpiece. When the butter cools just enough before being folded into the dry ingredients, it creates little pockets of steam that expand during baking, giving you that coveted flaky texture. If you use salted butter, cut the added salt in half to avoid an overly salty finish. A quick tip: melt the butter in the microwave for 20‑seconds, then let it sit for a minute so it’s warm but not hot.
The Final Flourish
Milk and vanilla extract bring moisture and aromatic depth. The milk hydrates the flour, creating a batter that spreads evenly, while the vanilla adds a sweet perfume that lingers after the cobbler cools. If you’re dairy‑free, swap the milk for almond or oat milk; the flavor will shift slightly, but the texture remains delightful. A splash of orange zest can also elevate the vanilla, giving the dish a citrusy brightness that pairs perfectly with the berries.
Everything's prepped? Good. Let's get into the real action...
The Method — Step by Step
Preheat your oven to 425°F (220°C). While the oven heats, grab a 9‑inch square baking dish and give it a light spray of non‑stick cooking spray. This high‑heat start is the first secret to that golden crust; the heat creates an immediate “sizzle” that locks in moisture. Pro tip: If you like a deeper flavor, pop a small piece of butter on the bottom of the dish before adding the berries.
Throw the frozen berries into a large mixing bowl, sprinkle the tablespoon of granulated sugar over them, and toss gently. The sugar will begin to melt the berries as they sit, creating a light syrup. Let them sit for about five minutes—this is the moment where the berries start to “wake up” from their icy slumber. Watch Out: Do not over‑mix; you want the berries to stay whole, not turn into a puree.
In a separate bowl, whisk together the flour, baking powder, and salt. This ensures the leavening agent is evenly distributed, preventing pockets of flat crust. Once combined, set the dry mix aside while you handle the wet ingredients.
Kitchen Hack: Use a fine‑mesh sieve to aerate the flour before measuring; it prevents clumps and gives a lighter topping.Now, combine the milk, melted butter, vanilla extract, and the remaining ⅓ cup of sugar in a measuring cup. Whisk until the sugar dissolves and the mixture looks glossy. This liquid will coat the flour, creating a batter that spreads like a dream. If you notice any butter solidifying, give it a quick stir—don’t let it re‑solidify before it meets the flour.
Make a well in the center of the dry ingredients and pour the wet mixture in. Using a wooden spoon, fold gently until just combined; you’ll see a few streaks of flour—this is perfect. Over‑mixing will develop gluten and make the topping tough, which is the last thing you want. The batter should be slightly lumpy, resembling a thick pancake batter.
Spread the sugared berries evenly across the bottom of the prepared baking dish. Then, using a spatula, dollop the batter over the berries in random blobs. The batter will naturally flow into the gaps, creating a beautiful marbled effect as it bakes. Power transition: This next part? Pure magic.
Slide the dish into the preheated oven and bake for 15 minutes at 425°F. You’ll hear a faint crackle as the edges begin to brown—listen for that sound, it’s your cue that the crust is forming. After 15 minutes, reduce the heat to 350°F (175°C) and continue baking for another 20‑25 minutes. The top should turn a deep golden amber, and the berries will be bubbling around the edges.
When the cobbler is done, remove it from the oven and let it rest for 5‑10 minutes. This short rest lets the juices thicken slightly, preventing a runny bottom. Serve warm, perhaps with a scoop of vanilla ice cream or a dollop of whipped cream. That moment when you cut into the cobbler and the crust shatters like thin ice? Absolute perfection.
Insider Tricks for Flawless Results
The Temperature Rule Nobody Follows
Most home bakers bake cobbler at a single temperature, but the two‑stage method (high heat then moderate) creates a crust that’s both crisp and tender. The initial blast of 425°F forces the butter to steam, forming those coveted flaky layers. Then, dropping to 350°F lets the interior cook through without burning the top. I once tried a single 375°F bake and ended up with a soggy center—lesson learned.
Why Your Nose Knows Best
Instead of relying solely on a timer, trust the aroma. When the butter and sugar start to caramelize, you’ll notice a nutty, toasty scent wafting from the oven. That’s the signal that the crust is nearing perfection. If you smell a faint burnt sugar note, pull the cobbler out a minute early; you can always pop it back in for a quick finish.
The 5‑Minute Rest That Changes Everything
Allowing the cobbler to sit for five minutes after baking lets the juices redistribute. Skipping this rest results in a runny sauce that slides off the plate. The rest also gives the crust a chance to firm up just enough to hold its shape when you cut it. I used to serve it straight from the oven, and the mess was real—now I never skip the rest.
The Butter‑Milk Ratio Miracle
A half‑cup of melted butter to one cup of milk is the sweet spot. Too much butter makes the topping greasy; too little yields a dry crumb. If you’re using low‑fat milk, consider adding an extra tablespoon of butter to keep the richness. This ratio is the reason the cobbler feels indulgent without being over‑the‑top.
Freeze‑Ahead, Bake‑Later
You can assemble the cobbler a day ahead, cover tightly, and refrigerate. The batter will sit, allowing the flour to fully hydrate, which actually improves texture. When you’re ready to serve, just add an extra 5 minutes to the bake time to account for the colder starting temperature. I’ve done this for holiday gatherings and it’s a lifesaver.
Creative Twists and Variations
This recipe is a playground. Here are some of my favorite ways to switch things up:
Tropical Breeze
Swap the mixed berries for a blend of frozen mango, pineapple, and shredded coconut. Add a teaspoon of lime zest to the batter for a zingy contrast. This version screams beach party and pairs wonderfully with coconut whipped cream.
Chocolate‑Cherry Delight
Replace half of the berries with frozen cherries and stir in 2 tablespoons of cocoa powder into the dry mix. The chocolate‑infused crust adds depth, while the cherries keep the tartness alive. Serve with a drizzle of dark chocolate sauce for extra drama.
Spiced Autumn
Add a teaspoon each of ground cinnamon, nutmeg, and a pinch of allspice to the batter. Use frozen apples and pears instead of berries, and finish with a sprinkle of brown sugar on top before baking. This variation feels like a warm hug on a chilly evening.
Nutty Crunch
Fold a quarter‑cup of chopped toasted almonds or pecans into the batter just before spreading it over the fruit. The nuts toast further during baking, giving the crust an extra crunch that contrasts beautifully with the soft berries.
Savory Sweet
For a daring twist, add a pinch of smoked paprika and a tablespoon of balsamic reduction to the berry mixture. The savory notes elevate the fruit, making this cobbler a surprising side dish for pork or roasted chicken. It’s a conversation starter on any dinner table.
Storing and Bringing It Back to Life
Fridge Storage
Let the cobbler cool completely, then cover it loosely with foil or a reusable silicone lid. Store in the refrigerator for up to 3 days. When you’re ready to eat, reheat a slice in a pre‑heated 350°F oven for 10‑12 minutes, or microwave for 30‑seconds if you’re in a hurry.
Freezer Friendly
Portion the cobbler into individual servings, wrap each tightly in plastic wrap, then place them in a freezer‑safe bag. It will keep for up to 2 months. To revive, thaw overnight in the fridge, then bake at 350°F for 12‑15 minutes. Adding a tiny splash of milk or water before reheating restores the crumb’s moisture.
Best Reheating Method
For the crispiest crust, reheat in a conventional oven rather than a microwave. The oven’s dry heat revives the buttery edges, while the interior becomes warm and gooey. If you must use a microwave, place a paper towel underneath the slice to absorb excess steam.