I was standing in my kitchen on a Tuesday night, the kind of night where the fridge is whispering sweet nothings and the pantry is glaring back with a half‑empty bag of onions that have been lingering since last weekend’s taco night. I had a sudden craving for something that could double as a snack, a side, and a conversation starter, and the only thing that kept popping into my head was the memory of those greasy, soggy onion rings I once ordered at a fast‑food joint that left my taste buds feeling betrayed. I tossed a daring challenge at my roommate: “I dare you to taste this and not go back for seconds,” and the moment she accepted, I knew I was on a mission to create the ultimate, no‑guilt, cheesy onion rings that would make even the most skeptical food snob nod in reverent approval. The kitchen filled with the sound of onions being sliced, a rhythmic thump that felt like a drumroll before the main act, and the air grew thick with the sweet, sharp perfume of fresh onion layers waiting to be transformed.
I tried a few different versions over the past year—some that called for batter, some that relied on a heavy hand of cheese, and a few that tried to be “healthier” by baking instead of frying. Most of those attempts ended up either soggy, overly greasy, or simply missing that magical snap that makes you want to shout “Encore!” from the stovetop. Then, while scrolling through a forum of fellow onion‑ring enthusiasts, I stumbled upon a tiny comment about adding shredded mozzarella right into the breadcrumb coating, which supposedly creates a cheese‑crusted shell that stays molten inside while staying crisp outside. I was skeptical, but the idea of a cheese‑infused crunch was too tantalizing to ignore, so I grabbed a block of mozzarella, a bag of panko, and set out to test the theory. The result? A golden‑brown ring that cracked like a fresh snow crust, releasing a warm, gooey cheese river that made my kitchen smell like a carnival of comfort food.
What makes this version truly stand out is the marriage of simplicity and indulgence. The recipe uses only pantry staples—flour, eggs, breadcrumbs, and a few spices—yet the addition of mozzarella elevates the whole experience to something that feels both home‑cooked and restaurant‑worthy. I’m not talking about a flimsy coating that falls apart after the first bite; I’m talking about a crust that shatters with the delicate precision of thin ice, revealing a soft, sweet onion heart that’s been coaxed into caramelized perfection. Most recipes get this completely wrong by either drowning the onion in batter or neglecting the cheese entirely, but here the cheese is the star, forming a bridge between the crunchy exterior and the tender interior. Picture yourself pulling these rings out of the pan, the whole kitchen smelling incredible, the steam rising like a buttery cloud, and the first bite delivering a symphony of textures that dance on your palate.
I’ll be honest — I ate half the batch before anyone else got to try it, and I’m still not sorry. The secret weapon? A quick flash‑fry that locks in the moisture, followed by a short rest that lets the coating set, ensuring every bite stays crisp even after you’ve let them cool on a rack. I’m also going to throw in a surprise technique that involves a light dusting of flour mixed with a pinch of paprika, which adds a subtle smoky depth you never expected from a simple onion ring. Let me walk you through every single step — by the end, you’ll wonder how you ever made it any other way.
What Makes This Version Stand Out
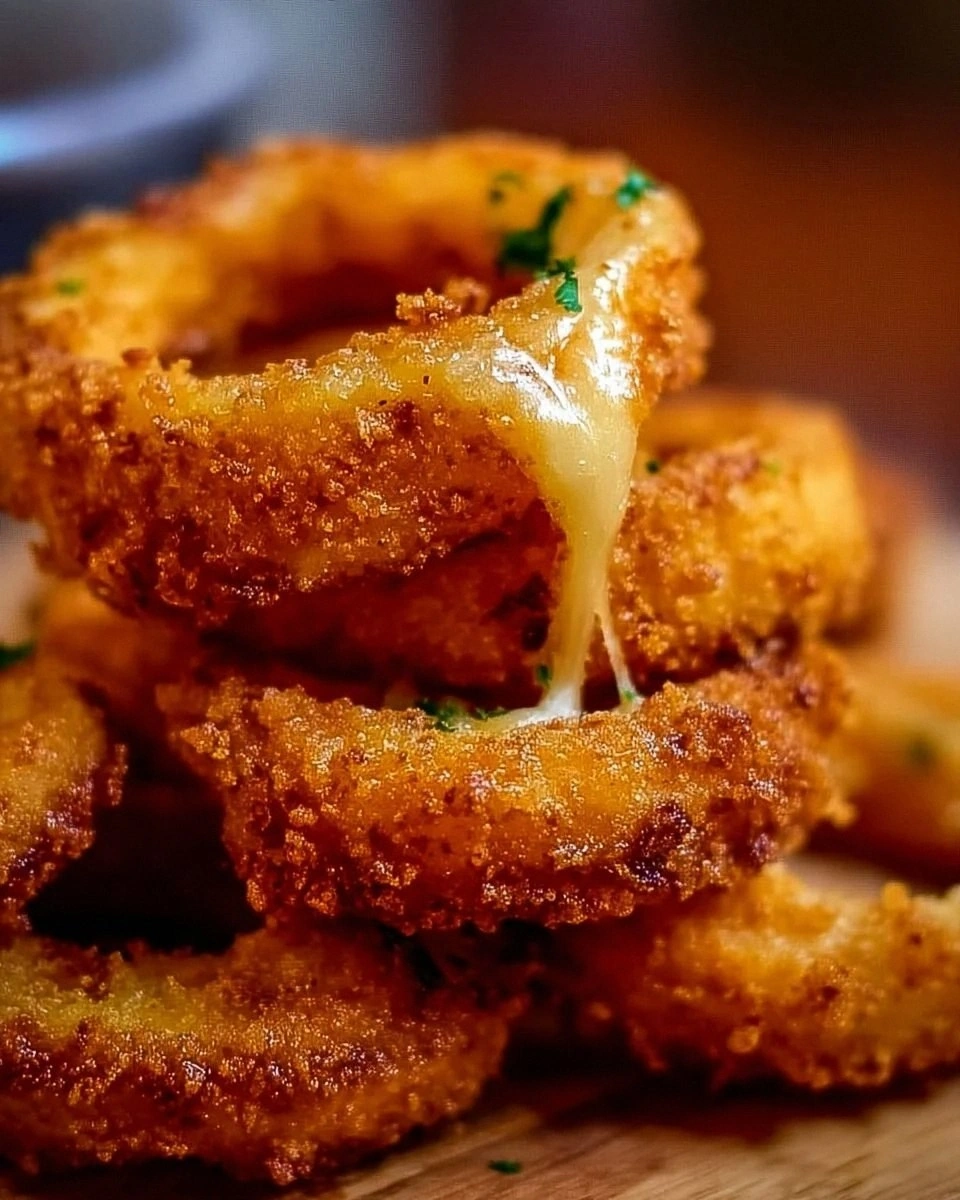
- Cheesy Crunch: The mozzarella blended into the breadcrumb coating melts just enough to create a stretchy, golden crust that stays crisp, delivering a surprise cheese pull with every bite.
- Onion Sweetness: By slicing the onions into thick rings and letting them sit briefly in a light salt bath, the natural sugars caramelize during frying, giving you that sweet‑on‑savory balance.
- Simple Pantry Staples: No exotic spices or hard‑to‑find ingredients—just flour, eggs, breadcrumbs, and a couple of everyday seasonings, making it accessible for any home cook.
- Speedy Prep: The entire process from slicing to plating takes under an hour, perfect for a quick snack or a party appetizer that doesn’t require a full‑blown cooking marathon.
- Universal Appeal: Whether you’re feeding picky kids, impressing a date, or feeding a game‑day crowd, these rings get unanimous applause and often disappear before you can count the leftovers.
- Make‑Ahead Friendly: You can prep the coated rings ahead of time, freeze them, and fry them straight from the freezer for a crisp treat any time the craving hits.
- Customizable Flavor: The base seasoning is adaptable—add a pinch of cayenne for heat or a dash of smoked paprika for depth, and you’ll have a new twist without reworking the whole recipe.
- Low‑Mess Cleanup: Using a deep skillet or a small Dutch oven limits splatter, and the oil can be strained and reused for future fry sessions, keeping waste to a minimum.
Inside the Ingredient List
The Flavor Base
The first hero in our lineup is the all‑purpose flour, a humble powder that does more than just thicken. When you dredge the onion rings in flour, you create a dry surface that clings to the egg wash like a magnet, ensuring the breadcrumb and cheese mixture adheres uniformly. Skipping the flour step would be like trying to stick a sticker on a wet window—nothing holds, and the coating slides off into the oil, leaving you with a sad, uneven ring. For best results, use a fine‑ground flour and give it a quick whisk with a pinch of salt and pepper to season the base layer from the inside out.
The Texture Crew
Eggs are the binding agents that turn a collection of dry ingredients into a cohesive, glossy coat. Beating two large eggs with a splash of water creates a slightly thinner wash that penetrates the flour layer, allowing the breadcrumbs and cheese to lock in place. If you use whole eggs without a little dilution, the coating can become too thick and gummy, making the rings heavy and soggy. A pro tip: add a pinch of garlic powder to the eggs for an extra layer of aromatic depth that subtly infuses the onion rings as they fry.
Breadcrumbs bring the crunch factor, but not just any breadcrumbs will do. I prefer a mix of panko and regular breadcrumbs because the larger, airy panko pieces create a light, airy crunch while the finer crumbs help seal the cheese inside. If you’re feeling adventurous, toast the breadcrumbs lightly in a dry pan with a drizzle of oil and a dash of paprika; this extra step adds a smoky note that elevates the flavor profile dramatically. Skipping the toast would still work, but you’d miss out on that golden‑brown depth that makes each bite unforgettable.
Shredded mozzarella is the secret weapon that transforms a simple fry into a cheese‑laden masterpiece. The mozzarella melts quickly, coating the breadcrumb shell with a stretchy, gooey layer that stays molten even after the ring cools slightly. If you substitute a low‑moisture cheese like cheddar, you’ll lose the silky melt and risk a dry, grainy texture. When buying mozzarella, look for a block that you can grate yourself; pre‑shredded varieties often contain anti‑caking agents that can affect the crispness of the crust.
The Unexpected Star
Garlic powder and paprika may seem like background players, but they are the subtle conductors of our flavor orchestra. Garlic powder adds a mellow, sweet onion‑like undertone that doesn’t overpower the fresh onion flavor, while paprika contributes a gentle smokiness and a beautiful reddish hue that makes the rings visually appealing. If you’re a fan of heat, swap half the paprika for smoked chipotle powder, and you’ll get a pleasant kick that pairs wonderfully with the cheese. Forgetting these spices would result in a bland crust that fails to excite the palate.
The Final Flourish
Salt and pepper are the universal finishers that bring balance to every dish, and in this recipe, they are added at two stages: first in the flour dusting, then again in the breadcrumb mix. This double seasoning ensures every bite is perfectly seasoned from the core to the crust. As for the oil, choose a high‑smoke‑point oil like canola, peanut, or vegetable oil; these oils can handle the 350°F–375°F frying temperature without breaking down, keeping the flavor clean and the rings crisp. Using olive oil would introduce a bitter aftertaste and cause the oil to smoke, ruining the delicate cheese crust.
Everything's prepped? Good. Let’s get into the real action…
The Method — Step by Step
Start by peeling the onions and slicing them into rings about ½‑inch thick; this thickness ensures the interior stays tender while the exterior crisps up. As you slice, you’ll hear that satisfying “thwack” of the knife against the board, a reminder that you’re about to create something truly special. Place the rings in a large bowl of cold water with a pinch of salt and let them sit for 5 minutes; this quick brine draws out excess moisture and reduces any harsh bite. After the soak, pat the rings dry with a clean kitchen towel, because any lingering water will cause the oil to splatter like fireworks.
In a shallow dish, combine 1 cup of all‑purpose flour with a generous pinch of salt and freshly ground black pepper; whisk until the mixture is uniform. This seasoned flour will be the first barrier that keeps the egg wash from sliding off. Dredge each onion ring in the flour, shaking off any excess, and set them aside on a wire rack. The flour should cling lightly, creating a matte surface that will later absorb the egg’s moisture.
Crack 2 large eggs into a separate bowl, add a splash of water (about 1 tablespoon), and whisk vigorously until the mixture is frothy and pale. Add 1 teaspoon of garlic powder to the egg wash, which will infuse a subtle aromatic note into every bite. Dip each flour‑coated onion ring into the egg, turning to ensure an even coating; you’ll notice the egg clinging like a silky veil, ready to capture the breadcrumb‑cheese mixture.
In a third shallow dish, combine 1 cup of bread crumbs, 1 cup of shredded mozzarella, and 1 teaspoon of paprika; toss everything together until the cheese is evenly distributed among the crumbs. The paprika not only adds color but also a gentle smokiness that deepens the flavor profile. Press each egg‑washed ring into the breadcrumb‑cheese mixture, ensuring the coating sticks on all sides. For an extra‑crunchy edge, gently pat the coating with your fingers to compress it, which helps the cheese melt into a cohesive crust during frying.
Heat a deep skillet or Dutch oven over medium‑high heat and pour in enough oil to reach a depth of about 1‑inch; you’ll know it’s ready when a small breadcrumb sizzles and turns golden within 20 seconds. The ideal oil temperature is between 350°F and 375°F; a kitchen thermometer is your best friend here, but if you don’t have one, test with a single ring—if it bubbles vigorously and rises to the surface within a few seconds, you’re good to go. Carefully lower a handful of coated rings into the oil, making sure not to overcrowd the pan; overcrowding drops the temperature and leads to soggy rings.
Fry the rings for 2‑3 minutes per side, or until they achieve a deep golden‑brown hue and the cheese bubbles through the breadcrumb crust. You’ll hear a gentle crackle that signals the perfect crunch forming—listen for that, and you’ll know you’re on the right track. Use a slotted spoon to flip the rings gently, allowing any excess oil to drain back into the pan. Once both sides are beautifully browned, transfer the rings to a wire rack set over a baking sheet; this lets excess oil drip away and prevents the rings from sitting in their own grease.
While the rings rest, sprinkle a final pinch of salt and a dash of fresh cracked pepper over them; the residual heat will help the seasoning adhere without making the crust soggy. If you love a bit of heat, now is the perfect moment to dust them with a light sprinkle of cayenne or a drizzle of hot sauce. Let the rings sit for another 2‑3 minutes; this short rest allows the interior onion to finish cooking via residual heat and the cheese to set just enough that it won’t ooze out when you bite.
Serve the onion rings immediately, paired with your favorite dipping sauce—whether it’s classic ketchup, a tangy aioli, or a spicy sriracha mayo. The moment you bite in, the crust should shatter like thin ice, revealing a warm, sweet onion center and a molten cheese river that stretches just enough to make you smile. And now the fun part: watch your guests dive in, their eyes widening as they realize they’ve just discovered the best version of onion rings they’ll ever make at home. This next part? Pure magic.
Insider Tricks for Flawless Results
The Temperature Rule Nobody Follows
Maintaining a steady oil temperature is the linchpin of a perfect fry. If the oil is too cool, the coating absorbs excess oil, turning soggy; if it’s too hot, the exterior burns before the interior cooks. I keep a candy thermometer on the stove and adjust the burner in small increments, aiming for that sweet spot of 360°F. A pro tip: after the first batch, the oil temperature will dip; give it a minute to climb back before adding the next batch. This ensures each ring gets that consistent, golden crunch.
Why Your Nose Knows Best
Even if you don’t have a thermometer, your sense of smell is a reliable guide. When the oil reaches the right temperature, it emits a faint, nutty aroma—nothing burnt, just a gentle toasted scent. If you catch a whiff of bitterness, the oil is overheating. Trust that nose; it will save you from a batch of burnt cheese and soggy onions.
The 5‑Minute Rest That Changes Everything
After frying, let the rings rest on a wire rack for at least five minutes. This short pause allows the steam to escape, preventing the crust from becoming soggy, and gives the cheese a chance to set just enough that it won’t ooze out when you bite. Skipping this step is the most common mistake I see; people serve immediately and wonder why the rings get soggy within minutes. Trust me, those five minutes are worth the wait.
Seasoning Layers for Maximum Flavor
Season both the flour and the breadcrumb mixture. The flour seasoning penetrates the onion, while the breadcrumb seasoning creates a flavor-packed crust. If you only season one layer, the final bite can feel flat. I like to add a pinch of smoked paprika to the breadcrumbs and a dash of garlic powder to the flour—this dual approach builds depth without overwhelming the palate.
The Double‑Dip Technique for Extra Crunch
For those who crave an ultra‑crunchy exterior, give the rings a quick second dip. After the first coating, let the rings sit for a minute, then dip them again in the egg wash and breadcrumb‑cheese mix. This creates a thicker shell that shatters delightfully on the first bite, while still keeping the interior onion tender. Just be mindful not to over‑coat, or the rings may become too heavy to fry evenly.
Creative Twists and Variations
This recipe is a playground. Here are some of my favorite ways to switch things up:
Spicy Jalapeño Burst
Finely chop 1‑2 jalapeños and fold them into the breadcrumb‑cheese mixture. The heat will mingle with the mozzarella, creating pockets of fiery surprise that contrast beautifully with the sweet onion.
Herb‑Infused Delight
Add 1 tablespoon of dried Italian herbs (oregano, basil, thyme) to the flour and breadcrumb mixes. The herbaceous notes lend a Mediterranean flair, perfect for serving alongside a tzatziki dip.
Bacon‑Wrapped Crunch
Wrap each onion ring with half a slice of partially cooked bacon before the final coating. The bacon adds smoky richness and an extra layer of crispness that turns the rings into a decadent bite.
Cheddar‑Cheese Swap
Replace half of the mozzarella with sharp cheddar for a tangier, more robust cheese flavor. The cheddar’s lower melt point creates a slightly stretchier pull, while still keeping that golden crust.
Sweet‑And‑Savory Glaze
After frying, drizzle a thin glaze made from honey, a splash of soy sauce, and a pinch of chili flakes over the rings. The glaze adds a glossy finish and a sweet‑savory balance that makes the rings perfect for a brunch board.
Vegan Friendly Version
Swap the eggs for a mixture of aquafaba (chickpea water) and a teaspoon of mustard, and use dairy‑free shredded cheese. The result is a plant‑based ring that still delivers that satisfying crunch and melt.
Storing and Bringing It Back to Life
Fridge Storage
Place cooled onion rings in an airtight container lined with a paper towel to absorb excess moisture. They’ll stay crisp for up to 2 days, though the crust may lose some of its initial snap. Reheat in a preheated oven at 375°F for 5‑7 minutes to revive the crunch.
Freezer Friendly
Arrange the fully coated (but unfried) rings on a parchment‑lined tray and freeze until solid, then transfer to a zip‑top freezer bag. They’ll keep for up to 3 months. When ready, fry straight from frozen, adding an extra minute to the cooking time to ensure the interior cooks through.
Best Reheating Method
To bring leftovers back to life, avoid the microwave—it makes the crust soggy. Instead, spread the rings on a baking sheet, spritz lightly with oil, and bake at 400°F for 8‑10 minutes. Adding a tiny splash of water to the pan before reheating creates a little steam that helps the cheese melt without drying out.