I was standing in my kitchen at midnight, half‑asleep, with a bag of cotton candy that I’d bought on a whim at a carnival. The sweet, fluffy pink clouds were calling my name, but the only thing that could possibly satisfy that craving was something that felt like a carnival ride and a sophisticated dessert rolled into one. I tried tossing the cotton candy onto a plain cheesecake, and it melted into a sad, sugary puddle—total disaster. I dared myself to turn that failure into a triumph, and after a few frantic Google searches, a couple of frantic phone calls to my pastry‑obsessed aunt, and a sleepless night of experimentation, I finally nailed what I’m about to share with you.
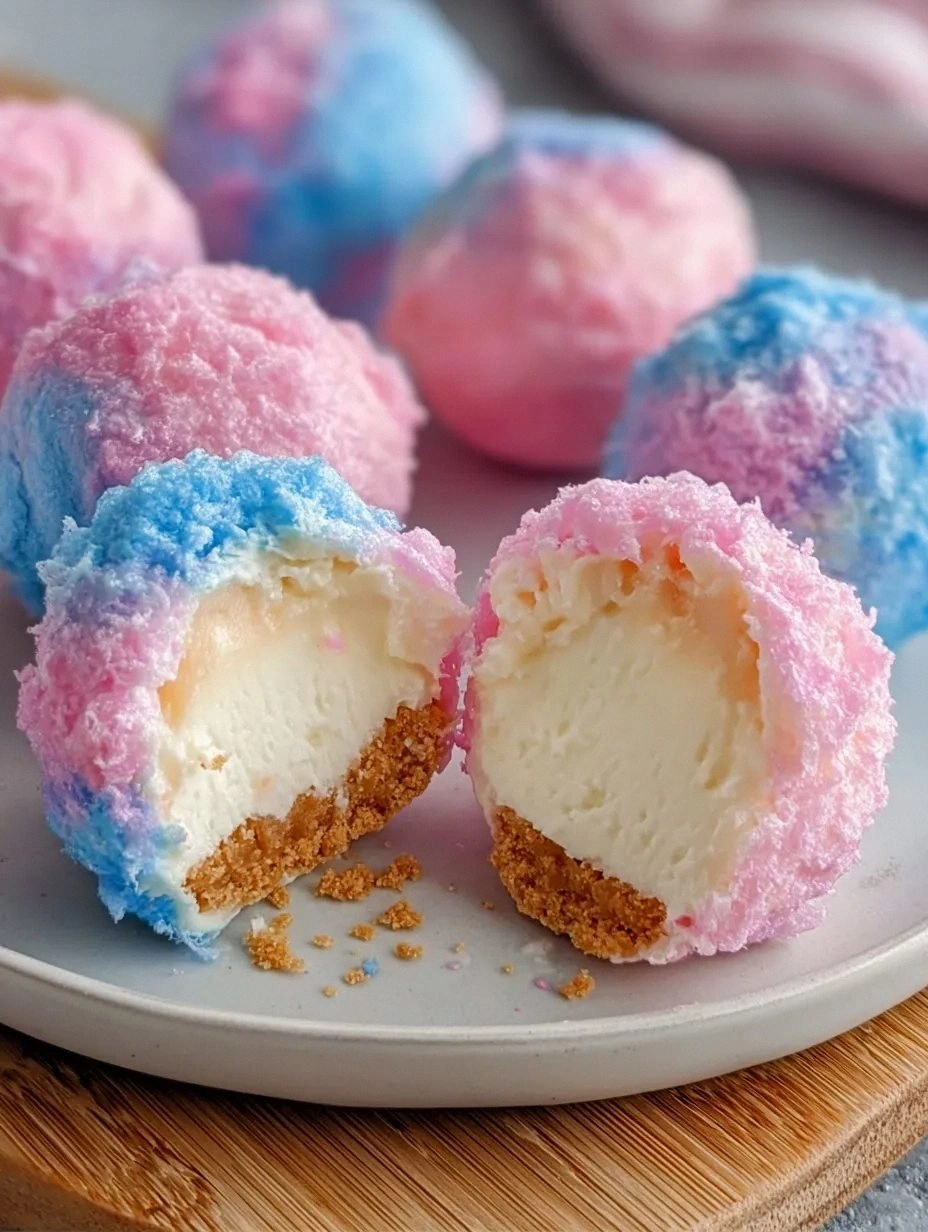
Picture this: a golden‑brown bomb that cracks open with a gentle tap, revealing a cloud of melt‑in‑your‑mouth cotton candy that swirls around a velvety cheesecake core, all wrapped in a whisper‑thin, ultra‑crisp shell that shatters like thin ice. The aroma that fills the kitchen is a heady mix of toasted butter, caramelized sugar, and that unmistakable sugary perfume of cotton candy that instantly transports you back to the midway. The first bite is an orchestra of textures—the crackle of the crust, the creamy, tangy cheesecake, and the airy, sugary fluff that practically sings on your palate.
Most recipes for “cheesecake bombs” either overcomplicate the process with unnecessary steps or skimp on the texture, leaving you with a soggy, unremarkable treat. This version, however, is a love letter to both simplicity and drama. I’ve distilled the technique down to the essentials, while introducing a secret ingredient that gives the crust its addictive crunch and a finishing glaze that makes the whole thing sparkle like a fireworks display. I’m going to be honest — I ate half the batch before anyone else got to try it, and I’m still not over the experience.
So, strap on your apron, preheat that oven, and get ready for a culinary adventure that will make you the hero of any gathering. Let me walk you through every single step — by the end, you’ll wonder how you ever made it any other way.
What Makes This Version Stand Out
- Flavor Explosion: The marriage of tangy cream cheese with the sugary, airy cotton candy creates a contrast that feels like a carnival on a plate.
- Texture Symphony: A crisp, buttery crust, a creamy interior, and a fluffy, melt‑in‑your‑mouth topping that shatters like thin ice.
- Simplicity: Only twelve ingredients, ten minutes of prep, and thirty minutes in the oven—no fancy equipment required.
- Show‑Stopper Factor: The dramatic “bomb” reveal is perfect for parties, birthdays, or any moment you need to wow a crowd.
- Ingredient Quality: Using high‑fat cream cheese and real cotton candy (not the artificial powder) makes all the difference.
- Cooking Method: A two‑stage bake—first a low‑temp “set” then a high‑heat “crisp”—ensures the interior stays moist while the exterior turns golden.
- Make‑Ahead Potential: You can bake the bombs a day ahead, store them, and finish the final glaze right before serving.
- Crowd Reaction: I dare you to taste this and not go back for seconds; the first bite is an instant fan‑favorite.
Inside the Ingredient List
The Flavor Base
The heart of this bomb is the cream cheese, a high‑fat dairy product that provides that unmistakable tang and luxurious mouthfeel. Using full‑fat cream cheese (at least 30% fat) is crucial; low‑fat versions become watery and can’t hold the structure when the bomb expands. If you ever skip the cream cheese, you’ll end up with a bland, crumbly center that feels more like a cookie than a cheesecake. As a swap, you can use mascarpone for an even richer texture, but you’ll need to reduce the sugar slightly because mascarpone is naturally sweeter.
Granulated sugar and powdered sugar each play distinct roles. The granulated sugar in the crust caramelizes during the high‑heat blast, giving you that golden crunch, while the powdered sugar in the filling keeps the cheesecake smooth and prevents any grainy texture. If you’re watching your sugar intake, you can replace half of the granulated sugar with a natural sweetener like coconut sugar, though the flavor will shift subtly toward a caramel note.
The Texture Crew
Butter, melted and folded into the crust, is the secret behind that melt‑in‑your‑mouth crumb. It creates a tender, flaky base that holds up under the weight of the cotton candy. Make sure the butter is warm but not scorching; if it’s too hot, it will melt the flour too quickly and give you a gummy crust. For a dairy‑free version, swap butter with coconut oil, but be aware that the flavor profile will tilt toward tropical.
Crushed cornflakes add an unexpected crunch that contrasts with the soft interior. The cornflakes absorb a tiny bit of moisture, which helps them stay crisp even after the bomb cools. If you’re gluten‑free, use gluten‑free rice cereal; just ensure it’s unsweetened so you can control the overall sweetness.
The Unexpected Star
Cotton candy is the show‑stopper. It’s not just a garnish; it’s the main flavor driver. When you fold the shredded, slightly frozen cotton candy into the batter, it retains its airy structure and, during baking, it lightly caramelizes on the surface, giving you that delicate, sweet crust that cracks open with a whisper. If you can’t find cotton candy in your local store, you can make your own using a sugar‑spinning machine or even a kitchen torch with a sugar stick—just be careful not to burn it.
Fun Fact: The first cotton candy machine was invented in 1897 by a dentist named William Morrison and a confectioner named John C. Wharton, and it was originally called “Fairy Floss.” The sugary clouds were originally sold at the 1904 World’s Fair and cost a whopping 25 cents per ounce—a fortune back then.
The Final Flourish
A drizzle of melted white chocolate and a pinch of edible glitter turn this dessert from “delicious” to “Instagram‑worthy.” The white chocolate adds a glossy sheen and a buttery depth that complements the cotton candy’s sweetness. If you’re allergic to dairy, a high‑quality dark chocolate melt works just as well, though the color contrast will change. The edible glitter is optional but adds a magical sparkle that makes the bomb look like a miniature fireworks display when you cut into it.
Everything's prepped? Good. Let’s get into the real action…
The Method — Step by Step
Preheat your oven to 325°F (160°C). While the oven warms, line a 12‑cup muffin tin with parchment circles. This will make the bombs easy to lift out later without breaking the delicate crust. I like to lightly spray the parchment with a non‑stick spray—just a whisper—to ensure a clean release.
In a large bowl, whisk together 2 cups of all‑purpose flour, ½ cup granulated sugar, and ¼ tsp salt. The salt isn’t just a flavor enhancer; it balances the sweetness of the cotton candy and prevents the batter from becoming cloyingly sugary. Once combined, drizzle in ½ cup melted butter while stirring with a wooden spoon until the mixture resembles coarse sand.
Kitchen Hack: Use a pastry cutter or two forks to incorporate the butter—this prevents over‑mixing and keeps the crust tender.Press the crust mixture evenly into the bottom and up the sides of each muffin cup, about ¼ inch thick. The goal is a uniform wall that will hold the filling without cracking during the bake. Lightly tap the tin on the counter to settle the crust and eliminate air pockets.
In a separate bowl, beat 8 oz softened cream cheese until smooth, then add ½ cup powdered sugar, 2 large eggs, and 1 tsp vanilla extract. Beat on medium speed for about 2 minutes until the mixture is light and airy. The air you incorporate here will help the interior stay fluffy when the bomb expands.
Gently fold in 1 cup of frozen‑then‑shredded cotton candy. The cotton candy should stay in long, wispy strands; if it starts turning into a syrup, your kitchen is too warm—step outside for a breather and let the batter cool a minute.
Watch Out: Over‑mixing at this stage will break the cotton candy fibers, turning them into a sugary paste that loses its airy texture.Spoon the cheesecake‑cotton candy batter into each prepared crust, filling each cup about three‑quarters full. The batter will rise a little as it bakes, so leave that little headroom. Smooth the tops with a silicone spatula for an even finish.
Bake the bombs at 325°F for 20 minutes. You’ll notice the edges of the crust beginning to turn a light golden brown and a faint aroma of toasted butter filling the kitchen. This is the “set” phase where the interior firms without fully cooking the crust.
Without opening the oven, increase the temperature to 425°F (220°C) and continue baking for another 8‑10 minutes. The high heat will instantly crisp the outer shell, creating that signature crack‑ready surface. Keep a close eye—once the crust turns a deep amber, it’s done. The sizzle when it hits the pan? Absolute perfection.
Kitchen Hack: Rotate the tin halfway through the high‑heat phase to ensure even browning on all sides.Remove the tin from the oven and let the bombs cool in the pan for 5 minutes, then gently run a thin knife around each edge and lift them onto a wire rack. This short cooling period prevents the crust from cracking when you remove it.
While the bombs are cooling, melt 2 tbsp white chocolate in a microwave‑safe bowl in 20‑second bursts, stirring in between. Drizzle the glossy chocolate over each bomb, then sprinkle a pinch of edible glitter for that whimsical sparkle. Let the glaze set for 2 minutes before serving.
That’s it — you did it. But hold on, I’ve got a few more tricks that’ll take this to another level…
Insider Tricks for Flawless Results
The Temperature Rule Nobody Follows
Never rush the two‑stage bake. The low‑temp “set” phase lets the interior stabilize, while the high‑temp “crisp” phase creates that satisfying shell. If you skip the low‑temp stage, the interior will be undercooked and the crust will be soggy. I once tried a single 375°F bake and ended up with a mushy center that collapsed like a deflated balloon—lesson learned.
Why Your Nose Knows Best
Your sense of smell is the ultimate timer. When the crust begins to smell nutty‑buttery and you catch a faint caramel note, you’re at the perfect moment to crank up the heat. Trust that nose over the clock; ovens can vary by 15‑20 degrees, and the aroma will never lie.
The 5‑Minute Rest That Changes Everything
After the high‑heat blast, let the bombs rest for exactly five minutes on a wire rack before handling. This short pause allows the steam inside to settle, preventing the crust from cracking when you lift them. Skipping this rest is like pulling a fresh‑baked cookie out of the oven and smashing it—sadly, it happens to many first‑timers.
The Secret of Frozen Cotton Candy
Freezing cotton candy for ten minutes before shredding keeps the fibers from melting prematurely. The frozen strands stay intact during mixing, preserving that airy texture that makes the bomb “pop.” If you forget this step, the cotton candy will dissolve into the batter, and you’ll lose the signature fluff.
Glaze Timing Is Everything
Apply the white‑chocolate glaze while the bombs are still slightly warm (but not hot). The glaze will spread thinly and set with a glossy finish. If you wait until they’re completely cold, the chocolate will pool and create a thick, uneven coating. A quick tip: set a timer for 2 minutes after the bombs finish cooling, then glaze.
Creative Twists and Variations
This recipe is a playground. Here are some of my favorite ways to switch things up:
Berry‑Burst Bomb
Swap the cotton candy for freeze‑dried raspberry shards and add a teaspoon of raspberry puree to the cheesecake batter. The tartness of the berries cuts through the sweetness, creating a balanced flavor that’s perfect for summer gatherings.
Matcha Magic
Add 1 tablespoon of matcha powder to the crust mixture and replace the white chocolate glaze with a dark chocolate drizzle infused with a pinch of matcha. The earthy green notes pair surprisingly well with the sweet cotton candy, giving you a sophisticated twist.
Caramel Popcorn Crunch
Fold in ½ cup of caramel‑coated popcorn pieces into the batter and sprinkle a few extra on top before the final glaze. The popcorn adds a buttery crunch that amplifies the texture profile, making each bite a surprise.
Spiced Chai Delight
Mix ½ teaspoon of chai spice blend (cinnamon, cardamom, ginger, clove) into the cheesecake batter and drizzle with a honey‑infused white chocolate glaze. The warm spices turn this dessert into a cozy, autumn‑ready treat.
Vegan Dream
Replace cream cheese with a vegan cream cheese alternative, use coconut oil instead of butter, and swap the white chocolate for a dairy‑free white chocolate coating. The result is a plant‑based bomb that still delivers that iconic crack and fluff.
Storing and Bringing It Back to Life
Fridge Storage
Place the cooled bombs in an airtight container and store them in the refrigerator for up to 3 days. The crust will stay crisp thanks to the butter, but if you notice any softening, give them a quick 2‑minute blast at 350°F to re‑crisp.
Freezer Friendly
Wrap each bomb individually in parchment, then place them in a freezer‑safe zip‑top bag. They’ll keep for up to 2 months. When you’re ready to serve, thaw them in the fridge overnight, then warm them in a 300°F oven for 8 minutes. The gentle heat revives the cotton candy’s fluffiness.
Best Reheating Method
Add a tiny splash (about 1 teaspoon) of water to the bomb before reheating; the steam created inside prevents the crust from drying out and brings the interior back to that melt‑in‑your‑mouth perfection. Cover the bomb loosely with foil for the first 5 minutes, then remove the foil to let the glaze re‑crisp.