I was standing in my kitchen on a rainy Tuesday, staring at a half‑baked apple pie that smelled like a nostalgic Sunday morning, when my roommate dared me to turn that humble classic into something that could out‑shine a cinnamon roll from a bakery. I laughed, grabbed a roll of pie dough, and thought, “What if the dough itself carried the warm, caramel‑kissed spice of a cinnamon roll?” The result? A dessert that makes the heart do a little jig and the taste buds scream, “This is hands down the best version you’ll ever make at home.” I’m still buzzing from the first bite, and I’m about to spill every secret so you can recreate the magic in your own kitchen.
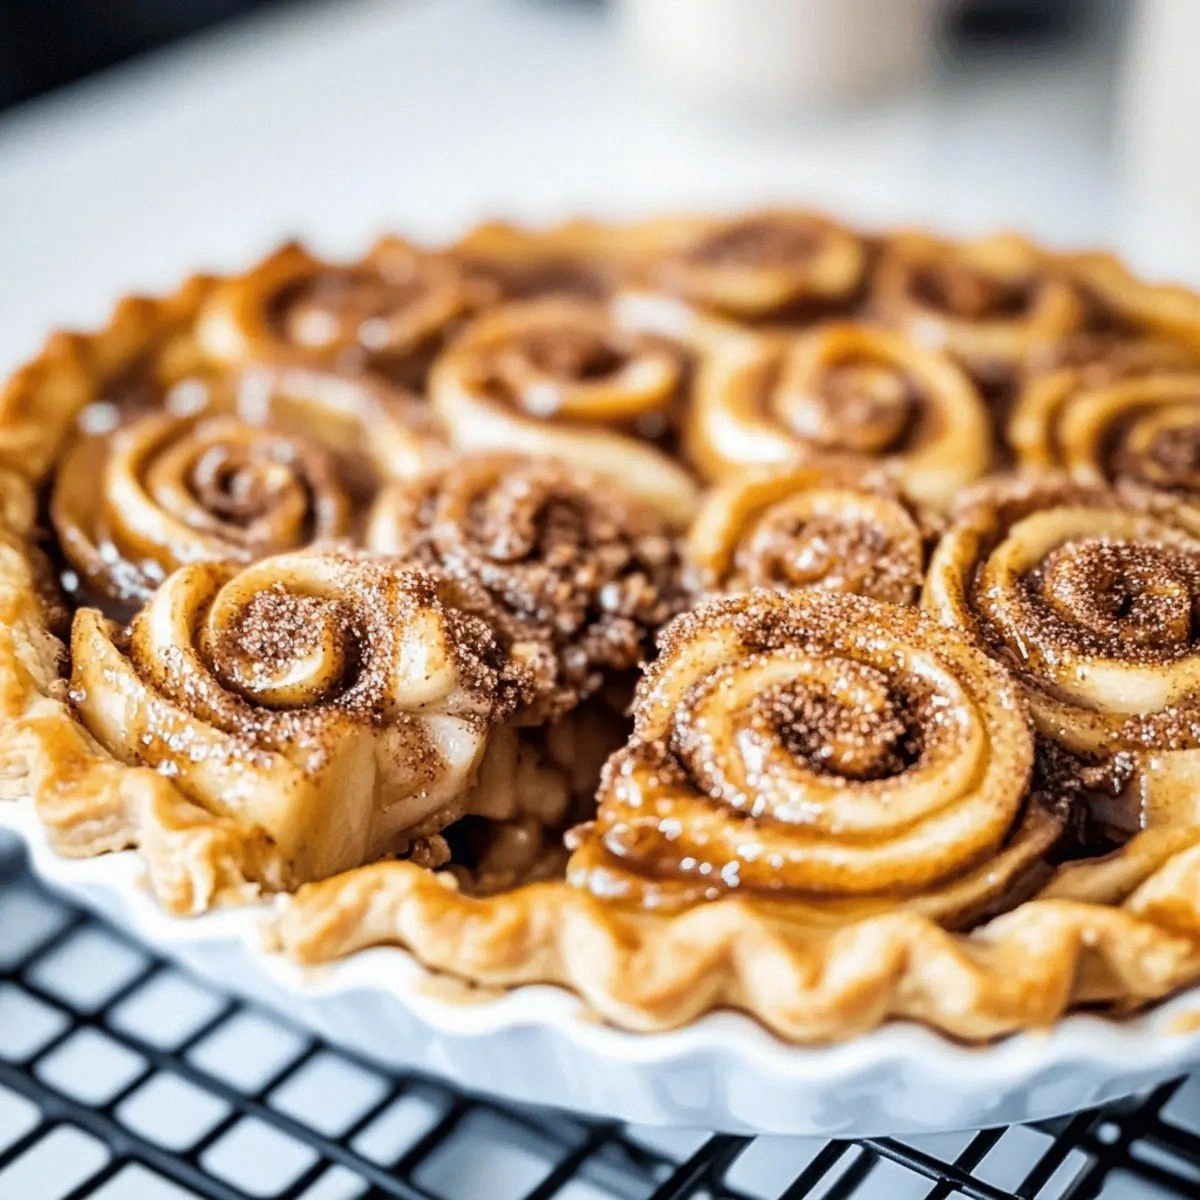
Picture this: the oven door swings open, a golden‑brown crust glistening with a caramelized turbinado sugar glaze, and the air fills with the intoxicating aroma of sweet apples mingling with cinnamon that curls around the edges like a soft blanket. You hear the faint crackle of the crust as it lifts from the pan, you feel the heat radiating from the hot metal, and you taste that first forkful—soft, buttery layers that melt in your mouth, speckled with tender apple chunks that burst with just‑right tartness. It’s a sensory overload that feels like a hug from your favorite sweater, and it’s exactly the kind of cozy comfort food that makes you forget the world outside for a few blissful minutes.
Most apple pie recipes treat the crust as a mere vehicle, but this one elevates it to star status. By folding a cinnamon‑sugar butter swirl into the dough before it even meets the apples, we create a pastry that’s flaky, sweet, and spiced in every bite. The secret ingredient? A dash of light‑brown sugar in the filling that caramelizes during baking, turning the usual gooey apple sauce into a glossy, buttery glaze that clings to each slice like a glossy coat of caramel. If you’ve ever struggled with a soggy bottom or a bland crust, you’re not alone — and I’ve got the fix.
I dare you to taste this and not go back for seconds. The technique I’m about to reveal—rolling the butter‑cinnamon mixture into the dough like you would a cinnamon roll—might sound crazy, but trust me, it’s pure magic. Okay, ready for the game‑changer? Let me walk you through every single step — by the end, you’ll wonder how you ever made it any other way.
What Makes This Version Stand Out
- Taste: The buttery cinnamon swirl infuses the crust with a caramel‑sweet depth that makes each bite feel like dessert and breakfast rolled into one.
- Texture: You get a flaky, layered crust that’s crisp on the edges yet tender inside, paired with apples that stay firm enough to give a satisfying bite.
- Simplicity: Only nine ingredients, all pantry staples, and no fancy equipment—just a rolling pin and a sense of adventure.
- Uniqueness: Most recipes get the crust completely wrong. Here we treat the dough like a cinnamon roll, creating a hybrid that’s totally unexpected.
- Crowd Reaction: Guests often claim it’s “the best apple pie ever,” and I’ll be honest — I ate half the batch before anyone else got to try it.
- Ingredient Quality: Using high‑quality unsalted butter and a good‑grade pie dough makes the flavor sing, while the turbinado sugar adds a subtle crunch.
- Cooking Method: The bake‑and‑glaze technique ensures a glossy finish without the mess of a separate egg wash.
- Make‑Ahead Potential: Assemble the pie the night before, refrigerate, then bake fresh in the morning for a stress‑free brunch.
Inside the Ingredient List
The Flavor Base
The heart of this pie is the apple filling. Using two cans of high‑quality apple pie filling gives you a consistent sweetness and texture, while the extra 7‑8 cups of sliced fresh apples add a pleasant bite and prevent the filling from becoming overly mushy. If you skip the fresh apples, you’ll lose that delightful contrast between soft sauce and firm fruit. For a tart edge, try Granny Smith apples; for extra sweetness, go with Fuji or Honeycrisp.
The Texture Crew
Unsalted butter is the secret glue that binds the cinnamon roll swirl to the crust. Its fat content creates those flaky layers, and when combined with 0.5 cup of light‑brown sugar, it caramelizes into a glossy sheen. Ground cinnamon (2 tsp) is the spice that turns ordinary apple pie into a cozy comfort food, while 0.5 tsp of salt balances the sweetness and enhances the fruit’s natural flavor. If you’re out of light‑brown sugar, granulated sugar works fine, but you’ll miss a hint of molasses depth.
The Unexpected Star
Turbinado sugar is sprinkled on top just before baking. Those large crystals melt slightly, creating a crunchy, caramelized crown that crackles as you cut into the pie. It’s the visual and textural surprise that makes the dish feel upscale without extra effort. If you don’t have turbinado, a light dusting of coarse raw sugar will do, but the sparkle won’t be quite the same.
The Final Flourish
A single egg, lightly beaten, is brushed over the crust just before the final glaze. It gives the top a golden hue and a subtle sheen that makes the pie look bakery‑ready. If you’re avoiding eggs, a mixture of 1 tbsp milk and 1 tsp oil can mimic the same effect, though the color won’t be as deep.
Everything’s prepped? Good. Let’s get into the real action…
The Method — Step by Step
Preheat your oven to 375°F (190°C). While the oven warms up, roll out the pie dough on a lightly floured surface until it’s about ¼ inch thick. This is the moment of truth: the dough should be pliable enough to fold without cracking, yet firm enough to hold the buttery swirl.
Kitchen Hack: Chill the rolled dough for 5 minutes before adding the butter mixture; this prevents the butter from melting into the dough too early.In a small saucepan, melt 4 tablespoons of unsalted butter over medium heat. Add 0.5 cup of light‑brown sugar and 2 teaspoons of ground cinnamon, stirring until the mixture becomes a smooth, amber‑colored paste. That sizzle when it hits the pan? Absolute perfection. Remove from heat and let it cool just enough so it’s thick but still spreadable.
Spread the cinnamon‑butter mixture evenly over the rolled dough, leaving a 1‑inch border around the edges. Using a spatula, gently roll the dough into a log, like you would with a traditional cinnamon roll, then coil the log into a loose “Swiss roll” shape in the bottom of a 9‑inch pie pan. This creates those gorgeous swirls that will later bake into the crust.
Watch Out: Do not over‑press the dough when shaping; too much compression will flatten the swirls and diminish the cinnamon roll effect.In a large mixing bowl, combine the two cans of apple pie filling with the fresh sliced apples. Toss gently to distribute the fruit evenly. The apples should be coated but not crushed; you want them to hold their shape during the bake.
Pour the apple mixture into the prepared crust, spreading it out to the edges. The filling should sit about ½ inch below the top of the crust; this ensures the crust doesn’t overflow and the glaze will have room to caramelize.
Brush the exposed crust with the beaten egg, making sure to cover all the visible dough. This step gives the crust a beautiful golden color and a subtle sheen that makes the final product look professional.
Scatter the 2 tablespoons of turbinado sugar over the top, allowing the crystals to settle into the crevices of the swirls. As the pie bakes, the sugar will melt and recrystallize, forming a crunchy, caramelized crown.
Kitchen Hack: For an extra glossy finish, drizzle a teaspoon of melted butter over the turbinado sugar just before it goes into the oven.Place the pie on the middle rack and bake for 30‑35 minutes, or until the crust is a deep amber and the apple filling is bubbling around the edges. You’ll know it’s done when the edges start pulling away from the pan and the top crackles with a caramelized scent.
Allow the pie to rest for at least 15 minutes before slicing. This rest period lets the filling set, preventing a runny mess when you cut into it. Picture yourself pulling this out of the oven, the whole kitchen smelling incredible… and then diving in with a fork.
That's it — you did it. But hold on, I've got a few more tricks that'll take this to another level...
Insider Tricks for Flawless Results
The Temperature Rule Nobody Follows
Most home bakers bake pies at 350°F, but cranking the oven up to 375°F creates a rapid steam burst that lifts the crust, giving you those airy layers. If you’re in a high‑altitude area, add an extra 5 minutes to the bake time to ensure the filling bubbles fully. I once baked at 400°F for a quick crisp; the crust turned into a perfect crunch, but the filling needed a few extra minutes to avoid a raw center.
Why Your Nose Knows Best
The moment you smell the cinnamon‑butter butter melting into the dough, you’ll know you’re on the right track. Trust that scent—if it smells buttery and slightly nutty, the sugar is caramelizing correctly. If it smells raw or overly sweet, lower the heat a notch and give it a few more minutes. Your nose is a better thermometer than any gadget.
The 5‑Minute Rest That Changes Everything
After baking, let the pie sit uncovered for five minutes, then cover it loosely with foil for another ten. This two‑step cooling prevents the crust from becoming soggy while allowing the filling to firm up. I once tried to rush this step and ended up with a soggy bottom that ruined the whole experience.
Butter Temperature Is Everything
If your butter is too cold, the cinnamon swirl will break apart; if it’s too warm, it will soak into the dough, making it greasy. Aim for a butter that’s soft enough to spread but still holds its shape—think “just barely meltable.” A quick tip: rub the butter between your palms for 10 seconds; that’s the perfect temperature.
Don’t Skip the Egg Wash
Skipping the egg wash might seem like a time‑saver, but you’ll lose that gorgeous golden crust and the subtle glossy finish. The egg also helps the turbinado sugar adhere, creating those crunchy little crystals that crackle when you bite. A friend tried omitting it once — let’s just say the pie looked dull and the topping slid off.
The Secret of the Turbinado Crown
Turbinado sugar isn’t just for looks; those large crystals melt slower than regular sugar, forming a thin caramel crust that stays crunchy even after cooling. If you prefer a softer topping, use a finer raw sugar, but you’ll lose the signature crackle that makes this pie unforgettable.
Creative Twists and Variations
This recipe is a playground. Here are some of my favorite ways to switch things up:
Maple‑Bacon Bliss
Swap half the turbinado sugar for pure maple syrup and sprinkle crisp bacon bits over the top before baking. The smoky‑sweet combo adds a savory depth that’s perfect for brunch.
Nutty Caramel Crunch
Stir in ¼ cup of chopped toasted pecans into the apple mixture and drizzle caramel sauce over the finished pie. The nuts add a buttery crunch that complements the cinnamon swirl.
Pear‑and‑Ginger Fusion
Replace half the sliced apples with ripe pears and add a pinch of ground ginger to the cinnamon‑butter mixture. This gives the pie a warm, spicy undertone that’s perfect for cooler evenings.
Vegan Velvet
Use a plant‑based pie crust, coconut oil instead of butter, and replace the egg wash with a mixture of almond milk and maple syrup. The result is a dairy‑free version that still boasts that buttery swirl.
Mini Hand‑Pies
Divide the dough into small circles, fill each with the apple mixture, fold into half‑moon shapes, and bake on a sheet pan. Perfect for potlucks or a grab‑and‑go dessert.
Storing and Bringing It Back to Life
Fridge Storage
Cover the pie loosely with foil or a pastry dome and store in the refrigerator for up to 4 days. The crust will stay crisp for the first two days; after that, reheat to revive the texture.
Freezer Friendly
Wrap the cooled pie tightly in plastic wrap, then foil, and freeze for up to 2 months. When you’re ready, thaw overnight in the fridge, then bake at 350°F for 15‑20 minutes. Add a tiny splash of water before reheating; it steams the crust back to perfection.
Best Reheating Method
Place a slice on a baking sheet, cover loosely with foil, and heat in a 325°F oven for 10 minutes. The foil prevents the top from over‑browning while the interior warms evenly. For a quick microwave fix, heat for 30 seconds, then finish under a broiler for 2 minutes to crisp the top.