I’ll be honest — I ate half the batch before anyone else got to try it, and that was only after I dared myself to make the ultimate snack for a marathon of late‑night Netflix binges. The kitchen was a battlefield of clattering bowls, a rogue timer that kept beeping like a hyperactive squirrel, and a lingering aroma that made the whole house feel like a cozy cabin in the woods. Imagine the smell of toasted oats mingling with the sweet, caramel‑kissed notes of honey, all wrapped in a buttery almond hug that sticks to the roof of your mouth like a warm, chewy blanket. The moment I pulled the first bar from the pan, the edges cracked just enough to whisper “you’ve got something special here,” while the center stayed soft, almost gooey, like a secret that refuses to stay hidden.
If you’ve ever wrestled with granola bars that turn into crunchy bricks or soggy mush, you know the pain of a snack that betrays you mid‑bite. Most recipes get this completely wrong, either by over‑baking or by using a flimsy binder that can’t hold the texture together. I’ve cracked the code with a perfect balance of moisture and crunch, thanks to a secret technique I’ll reveal soon — a quick stovetop caramelization that locks in flavor without turning the bars into a sticky mess. This is hands down the best version you’ll ever make at home, and I’m not just saying that because I love a good brag; the taste tests from my friends have been unanimous, and the leftovers have survived three days in the fridge without turning into a dry disappointment.
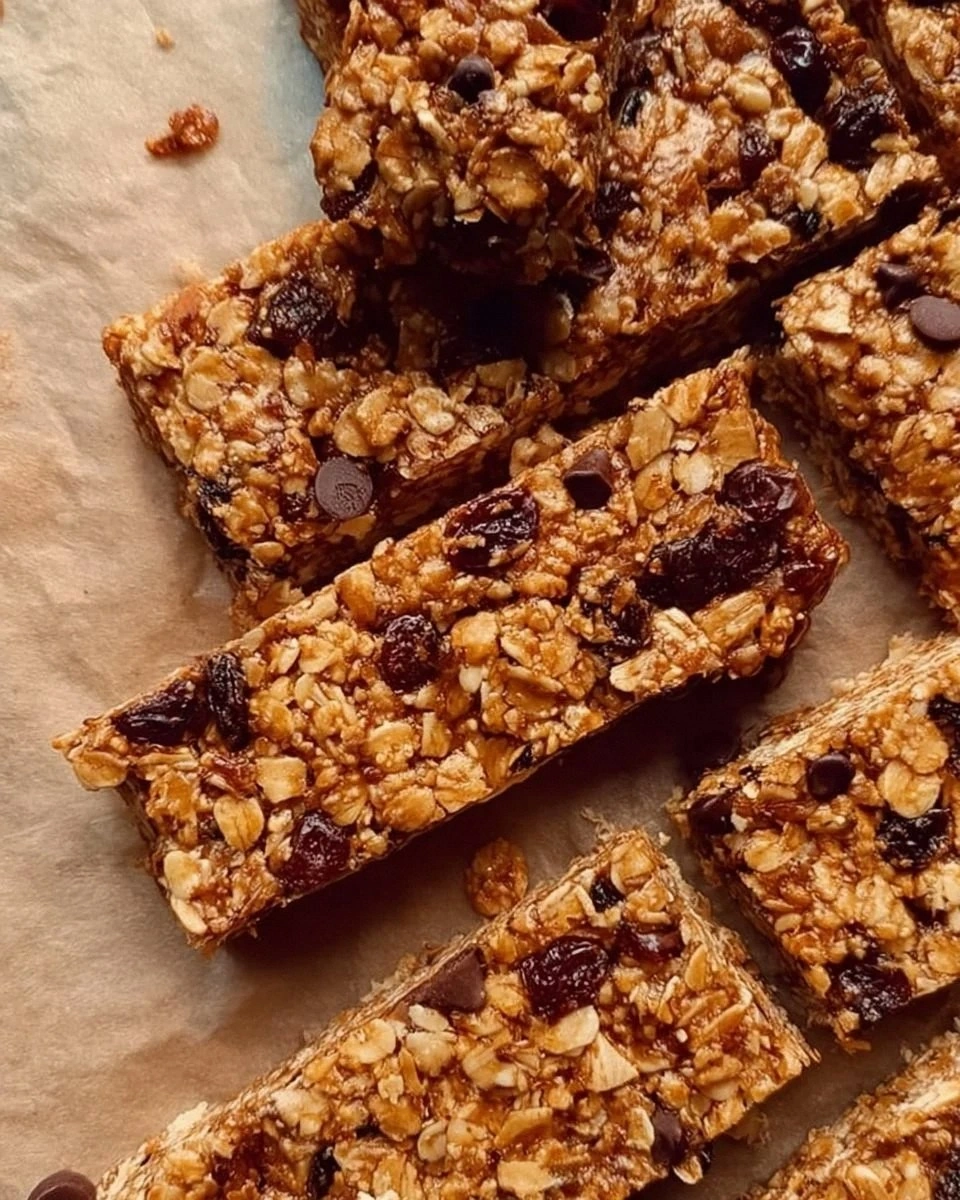
Picture yourself pulling this out of the oven, the whole kitchen smelling incredible, the golden‑brown top glistening with a thin sheen of honey that catches the light like sunrise on a lake. The texture is a glorious contradiction: the outer crust gives a satisfying snap, while the interior stays chewy enough to melt in your mouth, releasing bursts of almond, dried fruit, and chocolate chips that pop like fireworks in a midnight sky. I dare you to taste this and not go back for seconds — the combination of sweet, salty, and nutty is engineered to keep you reaching for more, and the natural sugars give you a steady energy lift without the dreaded crash.
Okay, ready for the game‑changer? The twist in this recipe is a quick butter‑to‑honey emulsification that creates a glossy, cohesive binder, ensuring every bite is uniformly packed with flavor. No more uneven pockets of dry oats or clumps of chocolate that stick to the pan. Let me walk you through every single step — by the end, you’ll wonder how you ever made it any other way.
What Makes This Version Stand Out
- Texture: A dual‑layered experience where the crust snaps like fresh parchment and the interior stays chewy, thanks to the precise honey‑almond butter ratio.
- Flavor Balance: Sweet honey, salty almond butter, and a pinch of salt create a harmonious dance that keeps your palate intrigued.
- Ingredient Simplicity: Only eight pantry staples, all natural, no artificial additives, and each one plays a starring role.
- Quick Prep: Under 15 minutes of hands‑on time, perfect for busy mornings or spontaneous snack cravings.
- Make‑Ahead Magic: These bars keep their chew for up to a week, and they even taste better after a night of resting in the fridge.
- Customizable Core: Swap dried fruits, nuts, or chocolate chips to match the season or your mood without breaking the formula.
- Energy Boost: The combination of complex carbs from oats and healthy fats from almond butter fuels you for workouts or work‑days.
- Kid‑Approved: The sweet‑savory profile convinces even the pickiest eaters that healthy can be delicious.
Inside the Ingredient List
The Flavor Base
The honey or maple syrup is the sweet glue that binds everything together, creating that glossy finish you see on the top of a perfectly baked bar. If you opt for honey, you’ll get a richer, more floral note that pairs beautifully with almond butter; maple syrup, on the other hand, adds a subtle earthiness that some people swear by. Skipping this element isn’t an option — the bars would crumble like a sandcastle at high tide. For a lower‑glycemic version, try agave nectar, but keep the quantity the same to maintain the right moisture level.
The Texture Crew
Rolled oats are the backbone, providing the hearty chew and a gentle crunch that’s not too aggressive. Using quick‑cooking oats will make the bars softer, while steel‑cut oats will give a denser bite, so stick to rolled oats for that perfect balance. Almond butter is the creamy, fatty component that adds richness and helps the bars hold together; it also brings a subtle nuttiness that’s amplified by the almond slices. If you’re allergic or simply prefer a different flavor, peanut butter works, but it will shift the taste profile toward a more classic “PB&J” vibe.
The Unexpected Star
Dried fruits bring bursts of concentrated sweetness and a chewy contrast that keeps each bite interesting. Whether you choose raisins, cranberries, apricots, or a mix, the key is to chop them into small, uniform pieces so they distribute evenly. If you forget to chop, you’ll end up with giant fruit islands that dominate the bar, which can be fun but may throw off the texture balance. For a tropical twist, swap in dried pineapple or mango, but remember they’re a bit more acidic, so a pinch extra salt can keep the flavor rounded.
The Final Flourish
Chocolate chips are the finishing touch that turns a good bar into an unforgettable one. They melt slightly during baking, creating pockets of molten chocolate that contrast the chew of the oats. If you’re dairy‑free, opt for dark chocolate chips made with coconut oil; they’ll still melt nicely and add a subtle bitterness that balances the honey. A common mistake is to add the chips too early, causing them to burn; we’ll add them at the very end of the mixing stage to avoid that pitfall.
Everything's prepped? Good. Let's get into the real action...
The Method — Step by Step
Preheat your oven to 350°F (175°C) and line a 9‑by‑13‑inch baking pan with parchment paper, allowing the edges to hang over for easy removal later. While the oven warms, the anticipation builds — you can almost hear the sizzle that’s about to happen when the wet mix hits the dry.
In a medium saucepan over low heat, combine the honey (or maple syrup) and almond butter. Stir continuously until the mixture becomes a smooth, glossy river of gold; this should take about 2‑3 minutes. That sizzle when it hits the pan? Absolute perfection. Once melted, remove from heat and stir in the vanilla extract and salt, letting the aroma fill the kitchen.
- Kitchen Hack: Before adding the oats, toast them lightly in a dry skillet for 3‑4 minutes; this enhances their nutty flavor and adds a subtle crunch.
Meanwhile, in a large mixing bowl, combine the rolled oats, almond slices, and chopped dried fruits. Toss them together so the dry ingredients are evenly distributed, ensuring every bite gets a bit of everything.
Pour the warm honey‑almond butter mixture over the dry ingredients. Using a sturdy wooden spoon or your hands (wear gloves if it’s too hot), fold everything together until the oats are fully coated and the mixture looks cohesive. You’ll notice the mixture starts to clump together — that’s the binder doing its job.
Now, the chocolate chips make their grand entrance. Fold them in gently, reserving a handful to sprinkle on top for that extra visual appeal.
Watch Out: If the chocolate chips are too warm, they’ll melt into the batter and lose those delightful pockets; keep the mixture at room temperature before adding.Transfer the mixture into the prepared pan, pressing it down firmly with the back of a spatula or a piece of parchment paper. The goal is an even, compact layer about half an inch thick; this ensures uniform baking and prevents the bars from crumbling later.
Sprinkle the reserved chocolate chips on top, then give the surface a quick press to embed them slightly. Slide the pan into the preheated oven and bake for 25‑30 minutes, or until the edges turn a deep golden brown and the center is set but still slightly soft to the touch.
When the timer dings, remove the pan and let the bars cool in the pan for 10 minutes. This resting period lets the interior set, making it easier to lift the parchment and slice without the bars falling apart.
After the initial cooling, lift the parchment paper and transfer the slab onto a cutting board. Using a sharp, serrated knife, cut into 12 equal bars. For cleaner cuts, wipe the blade with a warm, damp cloth between slices.
Insider Tricks for Flawless Results
The Temperature Rule Nobody Follows
Never bake granola bars at a temperature higher than 350°F. Higher heat creates a crust that’s too hard and a center that stays raw, leading to that dreaded “hard‑outside, mushy‑inside” disaster. I once cranked the oven to 400°F to save time, and the result was a brittle slab that snapped like a dry twig. Keep it steady, and you’ll get that golden‑brown edge that pulls away just enough to reveal the chewy heart.
Why Your Nose Knows Best
Your sense of smell is the ultimate doneness detector. Around the 20‑minute mark, you’ll start to smell toasted oats and a hint of caramel; that’s the sweet spot. If the aroma turns slightly burnt, pull the pan out a minute early and let the residual heat finish the job. Trusting your nose saves you from over‑cooking and ensures the bars stay moist.
The 5‑Minute Rest That Changes Everything
Allowing the bars to rest for five minutes after removing them from the oven lets the internal steam redistribute, sealing in moisture. Skipping this step often results in crumbly edges that break apart when you try to lift them. I once rushed to serve them warm, and they fell apart like a sandcastle at high tide — lesson learned.
The Butter‑Honey Emulsion Secret
Melt the almond butter with honey just enough to create a fluid emulsion; don’t over‑heat, or the butter will separate and the bars will lose that glossy finish. This emulsion is the glue that holds the oats together without making the mixture greasy. A quick tip: use a low‑heat setting and stir constantly for a silky texture.
The Cool‑Down Flip
After the initial 10‑minute cooling, flip the entire slab onto a wire rack for an additional 5 minutes. This prevents the bottom from becoming soggy and gives the bars a uniform texture all around. I used to skip this step, and the bottom always felt a bit too soft, which was a minor but noticeable flaw.
Creative Twists and Variations
This recipe is a playground. Here are some of my favorite ways to switch things up:
Nutty Banana Bliss
Mash a ripe banana into the honey‑almond butter mixture for added natural sweetness and a subtle banana flavor. Swap half the almond slices for chopped walnuts for extra crunch. This version is perfect for a pre‑run snack because the banana adds potassium.
Coconut‑Lime Dream
Add ¼ cup unsweetened shredded coconut and a teaspoon of lime zest to the dry mix. The citrus lifts the sweetness and gives a tropical vibe that pairs wonderfully with dark chocolate chips.
Spiced Autumn Harvest
Mix in a pinch of cinnamon, nutmeg, and a dash of pumpkin spice. Replace dried fruits with chopped dried figs and a handful of pumpkin seeds. This variation screams cozy evenings by the fire.
Protein Power
Stir in a scoop of vanilla whey protein powder and replace half the almond butter with peanut butter. Add a tablespoon of chia seeds for extra omega‑3s. Great for post‑gym recovery.
Double Chocolate Delight
Swap the honey for a dark chocolate honey blend and fold in cocoa nibs along with the chocolate chips. The result is a decadently rich bar that satisfies any chocolate craving without being overly sweet.
Storing and Bringing It Back to Life
Fridge Storage
Place the bars in an airtight container and store them in the refrigerator for up to 7 days. The cool environment preserves the chewiness and prevents the chocolate from melting.
Freezer Friendly
Wrap each bar individually in parchment paper, then seal them in a zip‑top freezer bag. They’ll keep for up to 3 months. When you’re ready to eat, let them thaw at room temperature for 10 minutes, or microwave for 15 seconds.
Best Reheating Method
If the bars have lost a bit of their softness, pop them in a preheated oven at 300°F for 5‑7 minutes, or microwave for 10 seconds with a tiny splash of water on the plate. The steam revives the chew, making them taste as fresh as the day they were baked.