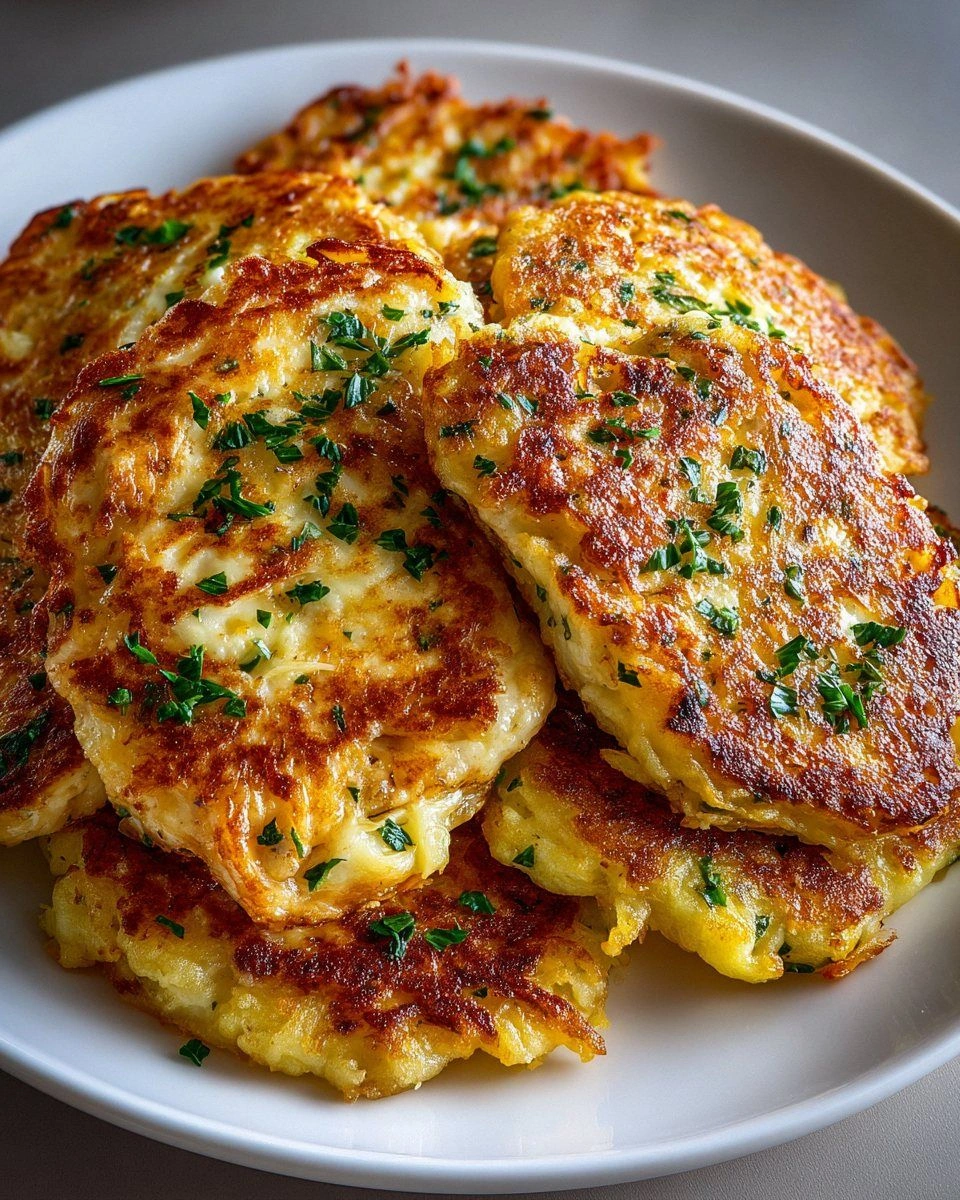
I still remember the day I ruined dinner so spectacularly that I accidentally created these cheesy potato pancakes. There I was, attempting to make a fancy chicken cordon bleu on a Tuesday night because apparently I thought I was auditioning for a cooking show. The chicken was dry, the cheese had oozed out like a molten lava disaster, and my potatoes were overcooked to the point of no return. In my frustration, I started mashing everything together with the fury of a woman scorned by a recipe that promised greatness but delivered mediocrity. But then something magical happened — the mixture hit the hot skillet and that unmistakable sizzle filled my kitchen like a symphony of second chances. The aroma was intoxicating, a heady blend of crispy potatoes, melting mozzarella, and the savory essence of chicken that had somehow been redeemed from its previous dry existence.
That first bite was nothing short of revelatory. The exterior shattered like thin ice under my fork, giving way to an interior so creamy and cheesy that I actually closed my eyes and let out an involuntary moan. My husband rushed in thinking I'd injured myself, only to find me standing over the stove, pancake in hand, eyes glazed with pure food euphoria. I had inadvertently created something better than the original recipe I was attempting, and I've been perfecting this accidental masterpiece ever since. The combination of textures alone — crispy, golden edges giving way to a molten core of cheese and tender chicken wrapped in the comfort of well-seasoned potatoes — makes these pancakes worthy of their own food group.
What makes this version stand miles apart from any potato pancake you've tried before is the intentional layering of flavors and textures that my kitchen disaster accidentally revealed. Most recipes get this completely wrong by treating potato pancakes like a simple starch delivery system. They forget that we're here for an experience, not just a side dish. These pancakes are the main event, the showstopper, the reason you'll find yourself making extra batches "just in case" while secretly knowing you're going to eat them all standing at the counter before anyone else gets home. The secret lies in the ratio of potato to cheese to chicken, the temperature of your oil, and one technique that will change your pancake game forever.
Picture yourself pulling these golden discs of deliciousness from the skillet, the cheese creating these incredible stretchy bridges as you transfer them to the plate. The sound of that first bite — that crunch that echoes through your kitchen like applause — followed by the moment when the melted mozzarella and tender chicken mingle with the crispy potato exterior. Stay with me here, because this next part is pure magic, and by the end of this recipe, you'll wonder how you ever made potato pancakes any other way. Let me walk you through every single step, from the ingredient selection to the final flip, because these aren't just pancakes — they're a revelation wrapped in a crispy, cheesy package.
What Makes This Version Stand Out
Texture Revolution: These pancakes achieve what most recipes only dream of — a shatteringly crisp exterior that gives way to an almost cloud-like interior. The secret lies in the dual cooking method and the specific ratio of starchy to waxy potatoes that creates layers of texture rather than a homogeneous mash.
Cheese Strategy: We're not just throwing cheese in here — we're engineering a molten core that stays creamy even after cooling. The combination of low-moisture mozzarella for stretch and a touch of aged cheddar for depth creates a cheese pull that would make a food stylist weep with joy.
Chicken Integration: Most recipes treat chicken as an afterthought, but here it's woven throughout every bite. The chicken is poached in seasoned broth, then shredded while warm to create tender strands that meld seamlessly with the potato mixture rather than sitting in rubbery chunks.
Flavor Layering: Every component gets seasoned individually — the potatoes, the chicken, even the binding mixture. This isn't about throwing everything in a bowl and hoping for the best. Each element carries its own weight in the flavor profile, creating a complexity that belies the humble ingredients.
Make-Ahead Magic: The mixture actually improves after a few hours in the fridge, allowing the starches to hydrate and the flavors to meld. You can prep this on Sunday and have incredible pancakes all week long, making morning meals feel like a weekend treat even on your busiest days.
Crowd Psychology: I dare you to serve these at a party and watch what happens. People who claim they're "not really into potato pancakes" will suddenly become territorial over the serving platter. I've seen grown adults use their bodies to block others from the last pancake. It's both hilarious and slightly concerning.
Technique Elevation: The method I'm about to share isn't just mixing and frying. We're talking about a specific way of handling the potatoes that prevents them from turning gummy, a resting period that allows the starches to work their binding magic, and a frying temperature that creates maximum crisp without burning the exterior before the interior heats through.
Alright, let's break down exactly what goes into this masterpiece, because understanding your ingredients is what separates the okay cooks from the ones who make people cancel dinner plans just to come over for these pancakes.
Inside the Ingredient List
The Foundation Builders
The potato selection here isn't just about grabbing whatever's on sale. You need a combination of russets for their fluffy texture and waxy potatoes like Yukon Golds for their ability to hold shape. The russets break down slightly during cooking, creating that creamy interior we want, while the Yukons maintain enough structure to give you discernible potato pieces in every bite. Skip the all-russet version and you'll have potato mush; go all-waxy and you'll have dense hockey pucks. Trust me, I've made both mistakes so you don't have to.
The chicken needs to be boneless, skinless thighs — not breasts. Thighs have enough fat and connective tissue to stay juicy even when mixed with potatoes and fried. Breast meat dries out faster than a conversation about cryptocurrency at a dinner party. Poach the thighs gently in chicken broth with aromatics, then let them cool just enough to handle before shredding. The warm chicken absorbs flavors better than cold, and the shredding process creates those perfect stringy bits that distribute throughout every pancake.
The Cheese Dream Team
Mozzarella gets top billing here, but not the fresh stuff floating in water. You want the low-moisture, block mozzarella that you grate yourself. Pre-shredded cheese is coated in cellulose that prevents it from melting smoothly, creating a greasy separation that will break your heart and your pancakes. The block stuff melts into stretchy, cohesive rivers of cheese that bind everything together while maintaining that Instagram-worthy cheese pull. Add just a touch of sharp white cheddar for complexity — it melts into the background but adds a nutty depth that makes people ask "what's that amazing flavor I can't quite place?"
Parmesan plays a supporting role, adding umami and saltiness that amplifies the chicken flavor. Use the real stuff, aged at least 24 months. The pre-grated shaker container has its place, but it's not here. Freshly grated Parmesan melts into the mixture, creating little pockets of intense savory flavor that contrast beautifully with the mild mozzarella. It's like having a secret weapon that nobody can identify but everyone recognizes makes things taste better.
The Binding Agents
Eggs do more than just hold things together here. They create a custard-like base that helps the pancakes stay tender even after they've cooled. Room temperature eggs mix more easily and cook more evenly, preventing those unpleasant scrambled egg bits that can happen when cold eggs hit warm ingredients. One whole egg plus one extra yolk gives you the perfect balance of binding power and richness without making the mixture too eggy. The yolk adds fat and emulsifiers that help create a smoother texture in the final pancake.
Flour might seem counterintuitive in a potato pancake, but we're using just enough to help with structure without making them taste like batter. Cake flour works better than all-purpose here because it has less protein, so it doesn't develop gluten and make the pancakes tough. You want just enough to absorb excess moisture and help the exterior crisp up properly. Too much flour and you're making savory doughnuts, too little and your pancakes fall apart in the pan like my willpower in a bakery.
The Flavor Enhancers
Fresh herbs make all the difference here, but we're strategic about which ones and how we add them. Chives provide a gentle onion flavor without the harshness of raw onions, and they stay bright and green even after cooking. Flat-leaf parsley adds freshness and a slight peppery note that cuts through the richness of the cheese and potatoes. Both herbs get added at the very end of mixing to prevent them from bruising and turning that unappetizing gray-green color that wilted herbs can create.
Garlic powder rather than fresh garlic prevents those harsh raw garlic bites that can overpower the delicate balance of flavors. Fresh garlic would need to be cooked first, adding another step and the risk of burning. Garlic powder disperses evenly throughout the mixture, providing that savory backbone that makes everything taste more complex. Sweet paprika adds color and a subtle warmth without heat, making the pancakes look as golden and tempting as they taste. A touch of nutmeg might seem odd, but it enhances the dairy flavors and adds a whisper of warmth that makes these feel like comfort food from a fancy restaurant.
Everything's prepped? Good. Let's get into the real action, because what happens next is where good intentions either become legendary pancakes or sad, soggy disappointments.
The Method — Step by Step
- Start by grating your potatoes using the large holes of a box grater, working quickly to prevent oxidation. As you grate, immediately submerge the potato shreds in a large bowl of ice water — this isn't just for show, it's stopping the starches from turning gray and gummy. Let them sit for exactly five minutes while you prep your other ingredients, then drain and squeeze the living daylights out of them using a clean kitchen towel. You want them as dry as possible because excess moisture is the enemy of crispy edges. Think of it as wringing out a wet sweater, except this sweater will become delicious pancakes instead of a stretched-out mess.
- While your potatoes are taking their ice bath, poach the chicken thighs in barely simmering chicken broth with a bay leaf, a few peppercorns, and a smashed garlic clove. Keep the temperature low — you want gentle bubbles, not a rolling boil that will turn your chicken into sawdust. After about 15 minutes, the chicken should register 165°F in the thickest part. Remove it to a plate and let it rest for five minutes — this isn't just resting, it's allowing the proteins to relax so they'll shred into tender pieces rather than stringy, dry bits that feel like eating a sweater.
- In a large bowl, beat your room temperature eggs with the flour, garlic powder, paprika, nutmeg, salt, and white pepper until you have a smooth, thick batter. This is your binding foundation, and getting it smooth now prevents flour lumps that will explode in hot oil later like tiny culinary landmines. The mixture should coat the back of a spoon but still flow — think heavy cream rather than paste. If it's too thick, add a tablespoon of milk; too thin, add another teaspoon of flour. This is where most recipes go wrong by being too casual about consistency.
- Shred the warm chicken using two forks, pulling apart with the grain to create long, tender strands rather than short, choppy bits. The warm chicken shreds more easily and absorbs flavors better than cold chicken, plus it helps melt the cheese slightly when we add it to the mixture. Aim for pieces about the size of your thumb joint — big enough to provide texture but small enough to distribute evenly throughout the pancakes. Season the shredded chicken with a pinch of salt and pepper while it's still warm so the seasoning adheres properly.
- Now comes the moment of truth — add your squeezed-dry potatoes to the egg mixture along with the shredded chicken, grated mozzarella, cheddar, Parmesan, chives, and parsley. Fold everything together gently using a rubber spatula, being careful not to overmix. You want to maintain some of the potato texture rather than creating potato paste. The mixture should hold together when you squeeze a handful, but it shouldn't be so wet that it oozes through your fingers like a sad, cheesy handshake.
- Heat a large heavy skillet over medium heat and add enough oil to come halfway up the sides of your pancakes — about a quarter inch deep. The oil temperature is crucial here: too cool and your pancakes absorb oil like sponges, too hot and the outside burns before the inside warms. Test the oil by dropping a tiny bit of the mixture in — it should sizzle immediately but not violently. You're looking for a gentle, steady sizzle that sounds like applause from a polite but appreciative audience.
- Form the mixture into patties about the size of your palm and three-quarters of an inch thick — any thinner and they dry out, any thicker and the center stays cold. Compress them just enough to hold together, but don't squeeze out all the air that keeps them light. Carefully slide them into the hot oil and resist the urge to move them around. Let them develop that golden crust undisturbed for about 4 minutes. When the edges start to turn golden and the bottoms release easily from the pan, you're ready to flip.
- Use a thin, flexible spatula to flip each pancake in one confident motion — hesitation leads to broken pancakes and hot oil splatters that will make you dance in ways you never intended. Cook the second side for about 3 minutes, then stand them on their edges to crisp the sides for another minute. This creates that all-over golden color that makes them look professionally done. Transfer to a wire rack set over a baking sheet and keep warm in a 200°F oven while you cook the remaining batches.
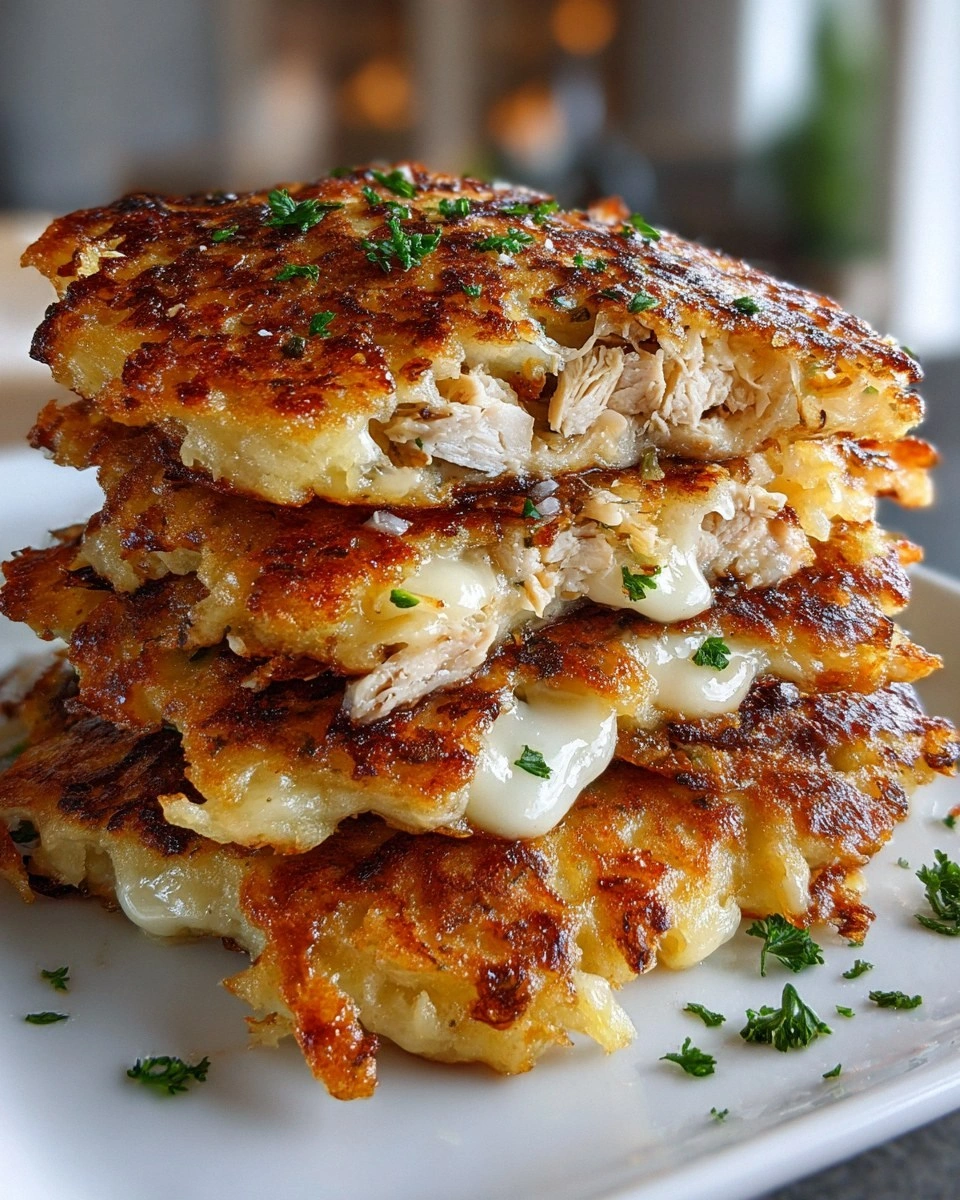
- The final step is crucial and often skipped — let them rest for five minutes before serving. This isn't just about preventing burned tongues; it allows the cheese to set slightly so your pancakes don't collapse when you cut into them. Plus, the flavors actually intensify as they cool slightly, like how soup tastes better the next day. Serve them hot but not molten, with a dollop of sour cream mixed with fresh chives or a simple green salad to cut through the richness. That first bite, when the crispy exterior gives way to the molten cheese and tender chicken, is what food dreams are made of.
That's it — you did it. But hold on, I've got a few more tricks that'll take this from incredible to absolutely legendary, secrets that come from making these pancakes probably more times than is medically advisable.
Insider Tricks for Flawless Results
The Temperature Rule Nobody Follows
Room temperature ingredients aren't just a suggestion from persnickety bakers — they're the difference between pancakes that hold together and ones that fall apart like a bad relationship. Cold eggs hitting warm chicken and potatoes create temperature shock that makes the mixture seize up, leading to dense, heavy pancakes that cook unevenly. Take everything out of the fridge 30 minutes before you start cooking, and your mixture will come together smoothly like it went to finishing school. The same goes for your oil temperature — use a thermometer if you have one, aiming for 325°F to 350°F. Too cool and your pancakes absorb oil like they've been wandering through a desert; too hot and you get that disappointing raw interior with a burnt exterior that makes you question all your life choices.
Why Your Nose Knows Best
That moment when the aroma shifts from "raw potato and cheese" to "something magical is happening" is your cue that it's time to flip. The Maillard reaction creates hundreds of new aromatic compounds, and your nose is better than any timer at detecting when they're ready. If you catch yourself thinking "wow, that smells incredible," it's probably time to check the bottoms. This isn't mystical kitchen wisdom — it's chemistry that you can smell. Most people rely too heavily on visual cues and end up flipping too early, leaving half their crust stuck to the pan like culinary roadkill.
The 5-Minute Rest That Changes Everything
After mixing your ingredients, cover the bowl with plastic wrap and let it sit on the counter for exactly five minutes. This isn't just you being lazy — it's allowing the flour to hydrate and the starches to swell, creating a mixture that binds together naturally without becoming gummy. During this rest, the salt is also drawing moisture out of the potatoes and onions, seasoning everything evenly. A friend tried skipping this step once and ended up with pancakes that fell apart faster than my resolve during sample day at Costco. The mixture should feel cohesive but not stiff, like it wants to be pancakes when it grows up.
The Cheese Temperature Sweet Spot
Your mozzarella should be cold when you grate it — cold cheese grates more cleanly and doesn't clump together like it's trying to form a union. But once it's grated, let it sit out for about ten minutes before mixing. This slight temperature rise allows it to incorporate more evenly into the mixture rather than staying in little cold pockets that don't melt properly during cooking. The difference is subtle but noticeable — properly tempered cheese creates those Instagram-worthy cheese pulls instead of just melting into greasy puddles that separate from the potato mixture like an awkward divorce.
The Flip Confidence Factor
Here's the thing about flipping these pancakes — hesitation is your enemy. A tentative flip results in broken pancakes, oil splashes, and the kind of kitchen disasters that make you order takeout in frustration. Commit to the flip like you're making a statement: slide your spatula under, lift slightly to check the color, then flip in one smooth motion. If you're nervous, practice with a small test pancake first. The worst thing that happens is you have delicious broken bits to snack on while you cook the rest. Confidence comes from knowing your oil is the right temperature and your mixture has the proper consistency — both of which we've covered, so you've got this.
Creative Twists and Variations
This recipe is a playground. Here are some of my favorite ways to switch things up, each one tested more times than my family cares to remember:
The Spanish Invasion
Swap the chicken for chorizo that you've removed from its casing and crumbled, cooking it until the edges caramelize and the paprika-scented oil perfumes your kitchen. Add some manchego cheese alongside the mozzarella, and throw in a handful of chopped piquillo peppers for their sweet-smoky flavor. The chorizo's fat infuses everything with a deep, smoky flavor that transforms these from comforting to exciting. Serve with a garlic aioli instead of sour cream, and suddenly you're having tapas night instead of just potato pancakes. This version pairs beautifully with a cold beer and good friends who appreciate when dinner takes an unexpected turn toward delicious.
The Breakfast Club Edition
Add some crumbled breakfast sausage and swap the mozzarella for smoked gouda, creating pancakes that taste like the best parts of a country breakfast rolled into one incredible package. Throw in some caramelized onions that you've cooked until they're jammy and sweet, and suddenly these become acceptable breakfast food that'll make you cancel your weekend brunch reservations. The smoky gouda melts into something ethereal, while the sausage provides little pockets of savory flavor that make each bite interesting. Top with a fried egg and you've got breakfast for dinner that'll make you question why you ever ate cereal for the evening meal.
The Mediterranean Makeover
Replace the chicken with chopped rotisserie lamb or beef, and swap the mozzarella for a combination of feta and halloumi. The halloumi gives you that satisfying cheese pull while the feta adds tangy, salty punches throughout. Add some chopped fresh oregano and mint, plus a handful of sun-dried tomatoes for their concentrated umami flavor. These taste like a Greek island vacation wrapped in a crispy potato package. Serve with a cucumber yogurt sauce spiked with lemon and garlic, and suddenly you're transported to a seaside taverna where the biggest worry is whether to have another pancake or save room for baklava.
The Green Goddess Version
For the vegetable lovers, keep the chicken but add a cup of finely chopped spinach that's been squeezed completely dry, plus some crumbled goat cheese for tang. The spinach adds nutrients and a beautiful color marbling without affecting the texture, while the goat cheese creates little pockets of creamy tang that cut through the richness. Add some fresh dill and chives, and serve with a green goddess dressing made with Greek yogurt for a version that feels almost virtuous while still being completely indulgent. Even my vegetable-skeptical nephew devoured these, claiming they tasted like "superhero food."
The Firecracker Style
Add some minced jalapeños and a dash of hot sauce to the mixture, plus pepper jack cheese instead of mozzarella for a version that brings the heat in the most addictive way. The key is balance — enough heat to make things interesting but not so much that you can't taste the other flavors. Add some chopped cilantro and serve with a cooling avocado crema that tames the fire just enough to keep you coming back for more. These are perfect for game day or any time you want food that excites rather than just satisfies. The heat builds slowly, so by your third pancake you're reaching for your drink and already planning when you can make them again.
Storing and Bringing It Back to Life
Fridge Storage
These pancakes store beautifully in the fridge for up to four days, but the key is in the container choice. Use an airtight container lined with paper towels to absorb excess moisture, and separate layers with parchment paper to prevent them from becoming a single, sad potato pancake brick. Let them cool completely before storing — warm pancakes create condensation that leads to soggy bottoms nobody wants. The flavors actually meld and improve after a day in the fridge, making leftovers something to anticipate rather than tolerate. Store any remaining pancakes separately from sauces or they'll absorb moisture and become limp shadows of their former crispy selves.
Freezer Friendly
These freeze like champions, making them perfect for meal prep or those nights when cooking feels as likely as winning the lottery. Flash freeze them on a baking sheet first, then transfer to freezer bags with parchment paper between layers. They'll keep for up to three months without significant quality loss, though I dare you to keep them around that long. The key is to freeze them after the initial frying but before they're completely cooked through — this prevents them from becoming dry and overcooked when you reheat them. Label the bags with the date and contents, unless you enjoy playing "mystery freezer food" six months from now.
Best Reheating Method
The oven is your friend here — 400°F for about 10 minutes on a wire rack set over a baking sheet. This allows hot air to circulate around the entire pancake, crisping up the bottom while heating through evenly. Skip the microwave unless you enjoy soggy disappointment; it steams rather than crisps, turning your beautiful pancakes into sad, flabby versions of their former glory. If you're in a hurry, a dry skillet over medium heat works well too — just 3-4 minutes per side until they're heated through and crispy again. Add a tiny splash of water to the pan and cover for 30 seconds to create steam that helps heat the interior without drying out the exterior.