Introduction
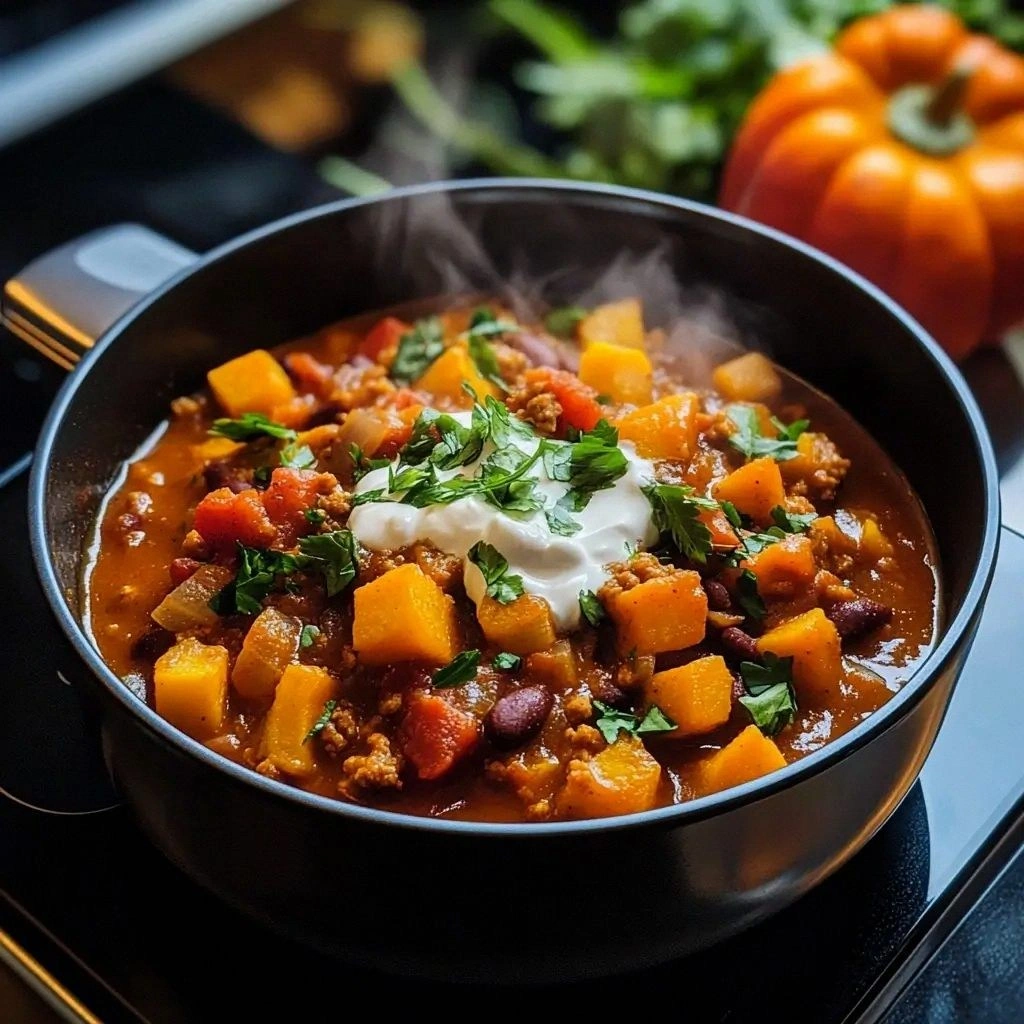
Picture this: I was scrambling to salvage a dinner that had gone disastrously wrong—a half‑cooked pot of beans, an over‑seasoned broth, and a kitchen that smelled like burnt onions. I stared at the mess, thinking, “I could have done better.” Then I remembered a forgotten pantry staple: butternut squash. That single ingredient turned a culinary catastrophe into a comforting triumph, and I was suddenly convinced that this was the best butternut squash chili anyone could ever make at home.
As soon as the squash hit the pan, the sweet aroma of caramelized orange flesh filled the room, turning the kitchen into a fragrant autumnal sanctuary. The sound of the sauté was a gentle hiss, a promise of depth and richness. The first bite was a burst of velvety sweetness, balanced by a subtle heat from smoked paprika and a whisper of cayenne. The texture—soft yet firm—was a delightful contrast to the crunchy beans. The flavor profile was layered, each component adding its own voice to the chorus.
What makes this version stand out is that it refuses to be ordinary. It’s not just another chili; it’s a dish that invites you to taste the season, to feel the warmth of the stove, and to savor the moment. I dared you to taste this and not go back for seconds, and I’m confident you will. If you’ve ever struggled to find the right balance in a chili, you’re not alone—this recipe has the fix.
And there’s a twist that most people overlook: roasting the squash before adding it to the pot. That small step transforms the sweetness into a caramelized glaze that coats the chili like velvet. Picture yourself pulling this out of the oven, the whole kitchen smelling incredible, and knowing you’ve created something truly special. Let me walk you through every single step — by the end, you’ll wonder how you ever made it any other way.
What Makes This Version Stand Out
- Taste: The combination of roasted butternut squash, smoky paprika, and a touch of maple syrup creates a sweet‑savory profile that is both comforting and complex. Each bite delivers a cascade of flavors that linger on the palate.
- Texture: The squash remains tender yet slightly firm, providing a pleasant bite against the smoothness of the tomato base and the hearty beans. The result is a chili that feels substantial without being cloying.
- Simplicity: With just a handful of pantry staples and a few fresh ingredients, this recipe stays approachable for weeknight dinners while still delivering restaurant‑quality flavor.
- Uniqueness: Roasting the squash first caramelizes its natural sugars, adding depth that most stovetop‑only recipes lack. The subtle maple syrup brightens the dish without overpowering.
- Crowd Reaction: Friends who are skeptical of sweet chili always come away craving more. The dish is a conversation starter and a crowd‑pleaser at potlucks.
- Ingredient Quality: Using organic beans and locally sourced squash elevates the overall taste and supports sustainable farming practices.
- Cooking Method: The two‑stage cooking—roasting then simmering—ensures every component is cooked to perfection while preserving its individual character.
- Make‑Ahead Potential: This chili tastes even better the next day, as the flavors meld. It freezes well, making it ideal for meal prep.
Alright, let's break down exactly what goes into this masterpiece...
Inside the Ingredient List
The Flavor Base
At the heart of this chili is a robust flavor base that starts with a splash of olive oil. The oil not only prevents sticking but also carries the aromatic compounds of onions and garlic. Sautéing these aromatics until they turn translucent releases their natural sweetness, setting the stage for the rest of the dish.
Ground cumin is the unsung hero of many chili recipes. It brings a warm, earthy tone that grounds the sweetness of the squash. Smoked paprika adds a subtle smokiness that mimics the flavor of a wood‑smoked grill, while chili powder provides the necessary heat without overwhelming the palate. A pinch of cayenne pepper can be added for those who enjoy a sharper kick.
Tomato paste thickens the sauce, giving it body and a deeper red hue. The acidity from the diced tomatoes balances the richness of the squash and beans. A tablespoon of maple syrup is optional but recommended; it enhances the natural sweetness of the squash, creating a harmonious contrast with the spices.
Seasoning with salt and pepper is essential, but remember that beans often contain sodium, so taste as you go. Fresh thyme leaves add a herby brightness that lifts the overall flavor profile.
The Texture Crew
Butternut squash is the star of the show. Its creamy flesh turns into a silky texture when roasted, providing a luxurious mouthfeel that coats the chili like velvet. Choosing a medium‑size squash ensures even cooking and optimal sweetness.
Black beans and kidney beans contribute a hearty, fibrous texture that balances the silky squash. Drain and rinse the beans thoroughly to remove excess sodium and reduce the risk of a slimy texture. The beans should be soft enough to break apart slightly but still hold their shape to add body to each bite.
Vegetable broth is the liquid backbone of the chili. Opt for a low‑sodium, flavorful broth to avoid over‑salting the dish. The broth also helps the spices and tomatoes meld together, creating a cohesive sauce.
Optional toppings like shredded cheddar cheese, avocado slices, and fresh cilantro add contrasting textures—crisp, creamy, and crunchy—that elevate the overall eating experience.
The Unexpected Star
Maple syrup is the unexpected star that brightens the dish. It is not a traditional chili ingredient, yet it works wonders in balancing the natural sweetness of the squash with the heat from the spices. If you’re avoiding sweeteners, a splash of honey or agave syrup can serve as a suitable alternative.
Lime juice, added at the end, provides a bright, citrusy finish that cuts through the richness. The acidity also helps to brighten the overall flavor, making each spoonful feel fresh and lively.
Fresh cilantro offers a burst of herbal freshness that complements the earthy tones. It also adds a subtle peppery note that ties the dish together.
The Final Flourish
Optional toppings are the final flourish that transforms the chili from a simple bowl to a personalized masterpiece. A sprinkle of shredded cheddar cheese adds a creamy, melty contrast. Avocado slices introduce a buttery texture that balances the heat. A drizzle of lime juice or a squeeze of fresh lime adds a zesty kick.
Everything’s prepped? Good. Let's get into the real action...
The Method — Step by Step
- Preheat your oven to 425°F (220°C). Toss the cubed butternut squash with 1 tablespoon of olive oil, a pinch of salt, and pepper. Spread the squash on a baking sheet in a single layer. Roast for 20–25 minutes, stirring halfway through, until the edges are caramelized and the interior is tender. The aroma will fill your kitchen, and the squash will be ready to add a sweet, smoky depth to the chili.
- While the squash roasts, heat 2 tablespoons of olive oil in a large pot over medium heat. Add the diced onion and cook until translucent, about 5 minutes. The onions should soften and release a sweet fragrance, preparing the base for the spices.
- Add the minced garlic, ground cumin, smoked paprika, chili powder, and cayenne pepper to the pot. Stir constantly for 1–2 minutes until the spices become fragrant. This is the moment of truth—if the spices don’t bloom, the chili will feel flat. Keep the heat moderate to avoid burning the garlic.
- Stir in the tomato paste, allowing it to coat the onions and spices for 2 minutes. This step thickens the sauce and deepens the color. The paste should caramelize slightly, adding a rich umami undertone to the chili.
-
Pour in the diced tomatoes and vegetable broth, stirring to combine. Let the mixture come to a gentle simmer, allowing the flavors to integrate fully. The liquid should reduce slightly, concentrating the taste.Watch Out: When adding the diced tomatoes and vegetable broth, do so slowly and stir continuously. The mixture can bubble up quickly, leading to splattering. Keep the pot covered for the first 5 minutes to allow the flavors to meld without losing too much liquid.
-
Add the drained black beans, kidney beans, and roasted butternut squash. Stir in the maple syrup (if using) and fresh thyme leaves. Reduce the heat to low, cover, and let the chili simmer for 25–30 minutes. The beans should absorb the sauce, and the squash should be fully integrated.Kitchen Hack: If you’re using canned beans, add a splash of the bean liquid to the pot for extra flavor. It’s a simple trick that boosts depth without adding extra sodium.
- Taste the chili and season with salt and pepper to your liking. If you prefer a slightly tangier profile, stir in the lime juice now. The acidity will brighten the dish, making each bite feel lively.
-
Serve hot, topped with shredded cheddar, avocado slices, cilantro, and a drizzle of lime. The contrast of textures and flavors will leave you craving another spoonful. That sizzle when it hits the pan? Absolute perfection.Kitchen Hack: For a silky finish, use an immersion blender to partially puree the chili. This step is optional but adds a luxurious mouthfeel without turning it into soup.
That's it — you did it. But hold on, I've got a few more tricks that'll take this to another level...
Insider Tricks for Flawless Results
The Temperature Rule Nobody Follows
Many people think high heat is the key to a good chili, but that can actually burn the spices and squash. Cooking on a low, steady simmer allows the flavors to develop fully and the squash to soften without losing its shape. I once tried a high‑heat method and ended up with a bitter, over‑roasted squash that clung to the bottom of the pot. Keep the heat moderate, and you’ll get a silky, well‑balanced dish.
Why Your Nose Knows Best
Before you taste the chili, give it a good sniff. The aroma should be rich, with hints of caramelized squash, smoky paprika, and fresh herbs. If it smells flat, it needs more seasoning. Trust your nose; it’s the first judge of flavor before your tongue even takes a bite.
The 5-Minute Rest That Changes Everything
Let the chili rest for five minutes after removing it from the heat. The residual heat will continue to soften the beans and allow the flavors to meld further. This short rest also makes the chili easier to stir, preventing it from sticking to the bottom of the pot.
Use Fresh Beans When Possible
Freshly cooked beans retain a firmer texture and a cleaner flavor compared to canned. If you have the time, cook your own beans from dry; it’s a small investment that pays off in taste and texture.
Top It Off With a Splash of Cream
A dollop of coconut milk or a swirl of Greek yogurt on top adds a creamy contrast that balances the chili’s heat. It also gives the dish a luxurious finish that feels indulgent without being heavy.
Creative Twists and Variations
This recipe is a playground. Here are some of my favorite ways to switch things up:
Spicy Chipotle Kick
Swap the cayenne pepper for a tablespoon of chipotle adobo sauce. The smoky, smoky heat will elevate the chili’s flavor profile and give it a deep, earthy undertone that pairs wonderfully with the squash.
Sweet and Smoky BBQ
Add half a cup of your favorite BBQ sauce and a splash of apple cider vinegar. This variation turns the chili into a tangy, sweet, and smoky bowl that’s perfect for a backyard cookout.
Vegan Protein Boost
Replace the beans with diced tempeh or tofu, sautéed until golden. The protein will absorb the spices, creating a hearty, plant‑based version that’s still satisfying and flavorful.
Cheesy Mexican Twist
Top the finished chili with crumbled cotija cheese, a handful of corn kernels, and a sprinkle of fresh oregano. The cheese adds a salty, creamy bite, while the corn provides a sweet crunch.
Cold Bean Chili
After simmering, let the chili cool completely, then refrigerate overnight. Serve cold with a dollop of Greek yogurt and a drizzle of olive oil. This chilled version is refreshing on a hot day and still full of flavor.
Breakfast Chili Bowl
Serve the chili over a bed of fluffy scrambled eggs and sprinkle with fresh chives. The combination of eggs and chili creates a savory breakfast that’s both comforting and protein‑rich.
Storing and Bringing It Back to Life
Fridge Storage
Store leftovers in an airtight container in the refrigerator for up to 4 days. The squash and beans will stay firm, and the chili’s flavors will deepen. When reheating, add a splash of water or broth to maintain moisture.
Freezer Friendly
Freeze the chili in portioned containers for up to 3 months. Thaw overnight in the refrigerator, then reheat on the stove or in the microwave. Stir well before serving to redistribute the spices and squash.
Best Reheating Method
Reheat on low heat, stirring frequently. Add a tiny splash of water or broth to steam back to perfection. The chili should be heated through without boiling, preserving the texture of the squash and beans.