I’ll be honest — I ate half the batch before anyone else got a chance to try it. It all started on a rainy Tuesday when my roommate dared me to turn a boring bowl of plain chicken nuggets into something that would actually make people sit up and say, “Whoa, what is that?” I tossed a few hot sauce packets into the mix, added a splash of butter, and before I knew it, the kitchen was filled with a scent so bold it could have knocked the socks off a statue. That moment of accidental brilliance sparked a firestorm of cravings that have haunted me ever since, and I swore I’d capture the magic in a recipe that would never again let you settle for bland.
Picture this: the first bite hits your tongue with the heat of a thousand buffalo wings, but the meatball’s interior stays moist, tender, and just a whisper of spice. The crust? A crisp, caramelized shell that snaps like a fresh spring twig underfoot, while the middle is as soft as a cloud that’s been kissed by sunshine. You can hear the sizzle as each ball hits the hot pan, a sound that tells you they’re about to turn into the most addictive finger food you’ve ever made. The aroma is a heady mix of garlic, butter, and that unmistakable tang of hot sauce that makes your nose do a little happy dance.
Most recipes get this completely wrong. They either drown the chicken in sauce, leaving it soggy, or they forget the sauce altogether, producing something that’s just plain chicken meat. What sets this version apart is the perfect balance of a light coating that clings like velvet, a secret binder that keeps everything together without turning the meat into a brick, and a finishing glaze that gives each bite an extra punch of flavor. I’m talking about a technique that uses a touch of flour and a quick sear to lock in juices before the sauce even touches the meat. The result? A bite that’s simultaneously crisp, juicy, and unapologetically spicy.
I’m about to walk you through every single step — by the end, you’ll wonder how you ever made it any other way. Okay, ready for the game-changer? Keep your eyes on the details, because the secret lies in the tiny moments that most cooks overlook. Trust me, I dare you to taste this and not go back for seconds. Let’s dive in.
What Makes This Version Stand Out
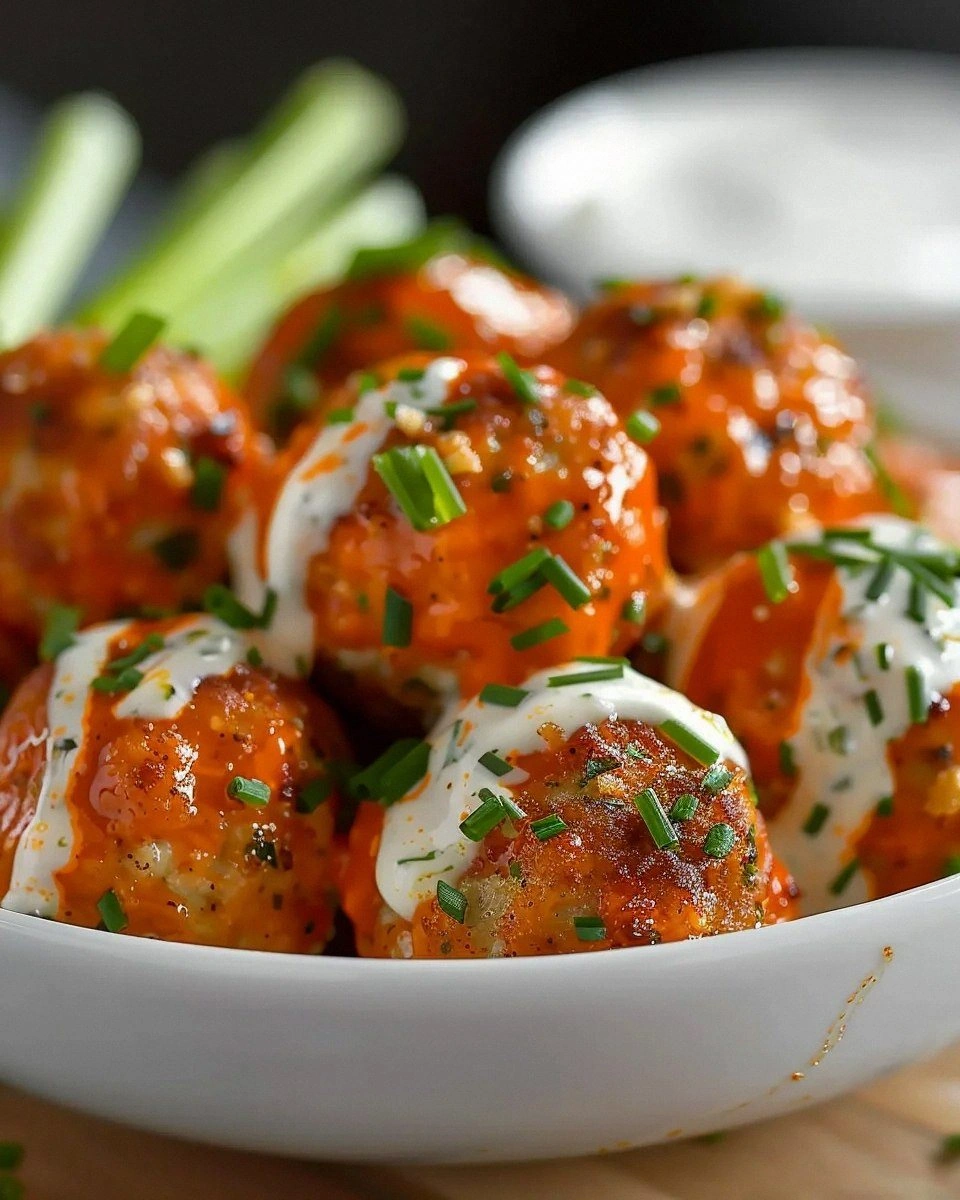
- Flavor Explosion: The combination of hot sauce, butter, and a dash of garlic powder creates a sauce that coats the meatballs like a silky blanket, delivering heat and richness in every bite.
- Texture Triumph: A quick flour dusting before searing gives the exterior a crispness that shatters like thin ice, while the interior stays tender and juicy.
- Simplicity: Only ten ingredients, five minutes of prep, and a single pan — perfect for busy weeknights or spontaneous gatherings.
- Unique Twist: Adding a spoonful of blue cheese crumble to the mix introduces a subtle tang that elevates the classic buffalo flavor.
- Crowd Reaction: These meatballs have a reputation for disappearing faster than free pizza at a college party; expect empty plates and happy sighs.
- Ingredient Quality: Using ground chicken breast ensures a lean base, while a splash of high‑quality hot sauce adds depth without artificial aftertaste.
- Cooking Method: The sear‑then‑bake technique locks in moisture and gives a uniform golden crust without the need for deep frying.
- Make‑Ahead Potential: You can form and freeze the raw meatballs for up to a month, then bake straight from the freezer for a quick snack.
Inside the Ingredient List
The Flavor Base
Hot sauce is the heart‑and‑soul of any buffalo‑style dish. I use a cayenne‑forward sauce with a vinegar tang that cuts through the richness of the butter. If you prefer a milder heat, swap it for a medium‑hot sauce, but remember that the flavor profile will shift slightly toward sweet. The butter not only mellows the heat but also adds a glossy finish that makes the glaze cling like a second skin. A pinch of garlic powder amplifies the savory depth, while a dash of onion powder adds a subtle sweetness that balances the acidity.
The Texture Crew
Ground chicken breast provides a lean canvas that absorbs flavors without becoming greasy. I add a beaten egg as a binder; it’s the secret that keeps the meatballs from crumbling during the sear. Breadcrumbs (or panko for extra crunch) give the mixture structure, ensuring each bite holds together. A splash of milk keeps the texture moist, while a light dusting of all‑purpose flour before frying creates that coveted golden crust. If you’re gluten‑free, swap the flour and breadcrumbs for almond flour and crushed rice crackers.
The Unexpected Star
Blue cheese crumbles might sound like a bold move, but they add a creamy tang that cuts through the heat like a cool breeze on a summer day. If you’re not a fan of blue cheese, feta or even a sprinkle of sharp cheddar works just as well. The cheese melts slightly during baking, creating pockets of gooey richness that surprise the palate. A handful of fresh parsley, chopped fine, adds a pop of color and a hint of freshness that lifts the entire dish.
The Final Flourish
A pinch of smoked paprika gives a subtle smokiness that makes you think you’ve been cooking over a wood fire. Salt and freshly cracked black pepper are the unsung heroes that bring all the flavors together. Finally, a drizzle of extra‑virgin olive oil just before serving adds a silky finish that makes the meatballs shine like polished gems. Remember, seasoning is cumulative; taste the mixture before forming the balls and adjust as needed.
Everything's prepped? Good. Let's get into the real action…
The Method — Step by Step
Start by gathering all your ingredients in a large bowl. Add the ground chicken, breadcrumbs, beaten egg, milk, and a generous pinch of salt and pepper. Using your hands, mix everything together until just combined; over‑mixing will make the meatballs tough. This is the moment of truth — you should feel a slightly sticky but manageable texture. Pro tip: If the mixture feels too wet, sprinkle a little extra flour and knead gently.
Kitchen Hack: Chill the mixture for 15 minutes before shaping; it firms up and makes rolling easier.Form the mixture into uniform golf‑ball sized spheres, about one inch in diameter. Place the formed meatballs on a parchment‑lined tray, then lightly dust each one with all‑purpose flour. The flour dusting is essential; it creates a barrier that will keep the sauce from soaking in too early. You’ll notice a faint “powdery” scent as you coat them — that’s the promise of a crispy crust.
Heat a large skillet over medium‑high heat and add a splash of olive oil. Once the oil shimmers, add the meatballs in a single layer, making sure not to crowd the pan. Listen for that satisfying sizzle — that’s the sound of flavor being locked in. Let them sear undisturbed for about 3 minutes, or until the bottoms turn a deep golden brown and start to pull away from the pan.
Flip the meatballs and sear the other side for another 2‑3 minutes. At this point, the interior should be opaque but still slightly pink in the center — it will finish cooking in the oven. Transfer the skillet to a pre‑heated oven at 375°F (190°C) and bake for 12‑15 minutes, or until the internal temperature hits 165°F (74°C). Watch Out: If you leave them in too long, they’ll dry out and lose that juicy core.
Watch Out: Opening the oven door too often drops the temperature and can prevent the crust from crisping properly.While the meatballs bake, whisk together the buffalo glaze: melt butter in a small saucepan, stir in hot sauce, a pinch of smoked paprika, and a splash of garlic powder. Let the mixture simmer for 2 minutes until it thickens slightly and the butter fully incorporates. The scent should be intoxicating, a buttery heat that makes your kitchen feel like a sports bar on game day.
When the meatballs are done, remove them from the oven and immediately toss them in the hot sauce glaze. Use a spatula to coat each ball evenly; the glaze should cling like a second skin, glossy and slightly sticky. Add the blue cheese crumbles and chopped parsley now, giving them a brief tumble so the cheese settles into the crevices.
Transfer the glazed meatballs to a serving platter. For an extra touch, drizzle a thin stream of extra‑virgin olive oil around the edges and sprinkle a final pinch of smoked paprika for color. The visual contrast of the bright red glaze against the specks of blue cheese is a feast for the eyes as well as the palate.
Serve immediately with a side of celery sticks, carrot ribbons, or a cool ranch dip. The contrast between the hot, spicy meatballs and the crisp, refreshing vegetables is pure perfection. Picture yourself pulling this out of the oven, the whole kitchen smelling incredible, and your guests lining up for a second helping. This next part? Pure magic.
Insider Tricks for Flawless Results
The Temperature Rule Nobody Follows
Never start with a cold pan; always preheat your skillet until the oil shimmers. This ensures an instant sear that locks in juices. I once tried to save time by adding the meatballs to a cold pan and ended up with soggy, pale skins that fell apart. Trust the heat, and you’ll get that coveted crust that snaps like fresh parchment.
Why Your Nose Knows Best
Your sense of smell is a better indicator than a timer when the glaze is ready. When the butter starts to foam and the hot sauce releases a fragrant, vinegary steam, you know it’s time to whisk. If you wait too long, the sauce can separate, leaving you with a greasy mess. Keep your nose close — it’s the ultimate kitchen gauge.
The 5‑Minute Rest That Changes Everything
After baking, let the meatballs rest for five minutes before tossing them in the glaze. This short pause allows the interior fibers to relax, preventing the meat from squeezing out when you coat them. I used to skip this step and ended up with a dry bite; now I never do. The result is a juicier, more tender center that makes each bite unforgettable.
Blue Cheese Balance
Add the blue cheese crumbles after glazing, not before. If you melt them into the sauce, you lose the delightful pockets of tangy creaminess. Toss them in at the very end so they stay slightly firm, providing a textural surprise in each bite.
The Secret of the Flour Dust
A light dusting of flour does more than just crisp; it also helps the glaze adhere uniformly, preventing those unsightly wet spots. Too much flour, however, can create a gummy coating, so keep it to a whisper. This tiny step is the difference between “good” and “hands‑down the best version you’ll ever make at home.”
Final Taste Check
Before serving, taste one meatball and adjust seasoning with a pinch more salt or a dash of extra hot sauce if you like it hotter. Remember, the glaze will mellow slightly as it cools, so a little extra heat now ensures a lasting kick. If you’re serving a crowd, a small side of extra hot sauce for dipping never hurts.
Creative Twists and Variations
This recipe is a playground. Here are some of my favorite ways to switch things up:
Maple‑Bacon Buffalo
Swap half the hot sauce for pure maple syrup and fold in crisp bacon bits. The sweet‑savory combo creates a flavor reminiscent of a brunch special, perfect for a weekend gathering.
Asian Fusion
Replace the hot sauce with sriracha and add a teaspoon of soy sauce to the glaze. Finish with a sprinkle of toasted sesame seeds and chopped green onions for an umami‑rich twist.
Herb‑Infused
Add finely chopped fresh rosemary and thyme to the meat mixture, and swap the butter glaze for a herb‑butter blend with a splash of lemon juice. The result is a fragrant, slightly citrusy bite that brightens the heat.
Cheesy Overload
Mix shredded mozzarella and sharp cheddar into the meat mixture, then top each baked meatball with a slice of cheese and broil for 2 minutes until bubbly. This creates a gooey, melty crown that pairs perfectly with the spicy glaze.
Gluten‑Free Glory
Replace the all‑purpose flour and breadcrumbs with almond flour and crushed rice crackers. The texture stays delightful, and you won’t miss the wheat at all.
Storing and Bringing It Back to Life
Fridge Storage
Place cooled meatballs in an airtight container, drizzle a thin layer of the leftover glaze over the top, and store for up to four days. The glaze acts as a moisture barrier, keeping each bite juicy. When ready to eat, reheat in a skillet over medium heat, adding a splash of water to revive the sauce’s shine.
Freezer Friendly
Arrange raw, unbaked meatballs on a parchment sheet and freeze solid. Transfer them to a zip‑top bag; they’ll keep for up to three months. Bake from frozen at 375°F, adding an extra five minutes to the cooking time, and finish with the glaze as usual.
Best Reheating Method
For the crispiest revival, use a hot oven (400°F) for 8‑10 minutes, or a pre‑heated air fryer for 5 minutes. If you’re in a hurry, a microwave works, but the crust will soften. To rescue that lost crunch, finish with a quick 2‑minute broil after microwaving.