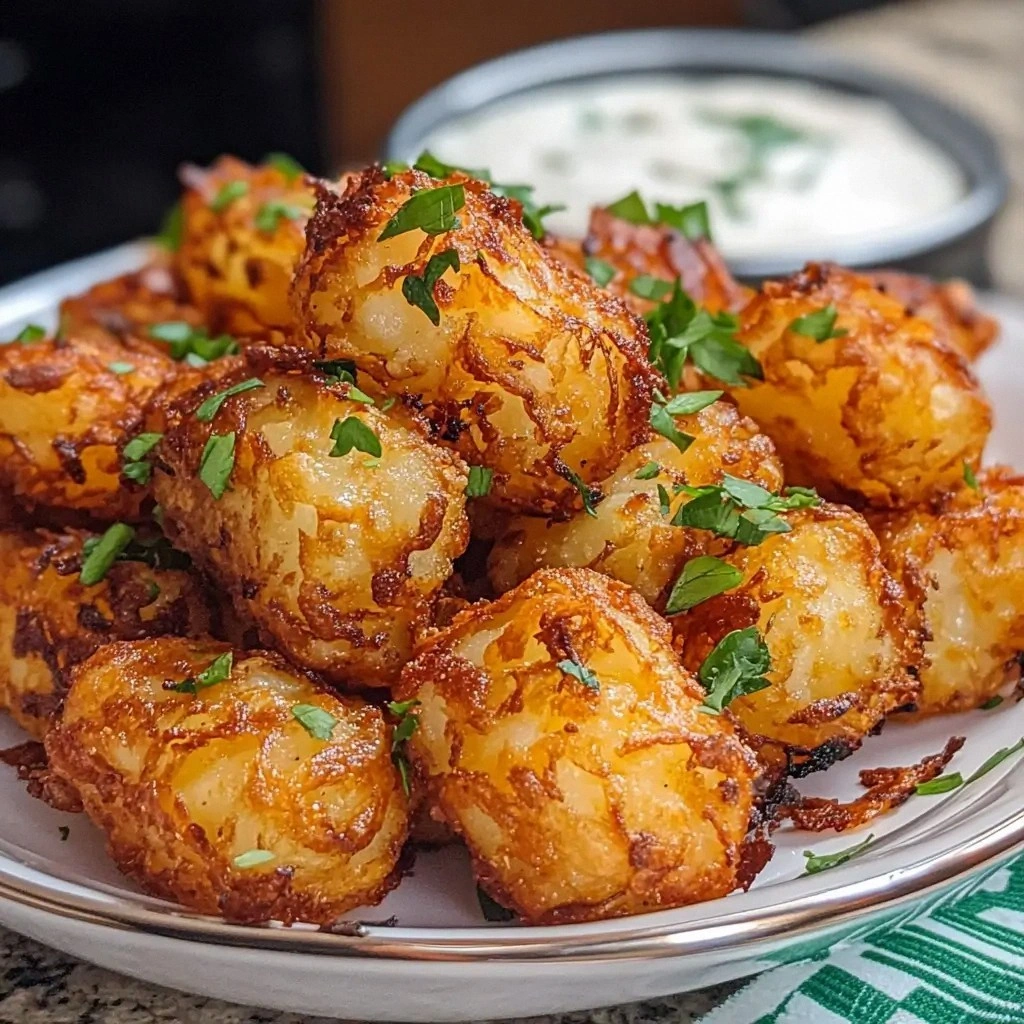
I still remember the night the kitchen turned into a battlefield. I was chasing a last‑minute dinner for a friend, and the pot of potatoes was over‑cooked, the fries were soggy, and the only thing that survived was a half‑baked, sad-looking batch of tater tots. I stared at the tray, feeling like I’d failed the culinary gods, when a sudden thought struck me: what if I could turn that disaster into the most unforgettable, crispy, comforting snack ever? I dared myself to experiment, and what emerged was a recipe that defies every other tater tot story out there. This isn’t just another “make it in the oven” trick; it’s a game‑changing, crowd‑pleasing masterpiece that will have everyone asking for a second bite. I dare you to taste this and not go back for seconds. The secret lies in a simple tweak that most people overlook.
Picture yourself pulling this tray out of the oven, the whole kitchen smelling like warm potato, butter, and a whisper of cheddar. The edges are golden‑brown, the interior is fluffy, and the first bite is a crunch that shatters like thin ice, followed by a burst of buttery, cheesy goodness that lingers on the palate. The texture is a symphony of crisp and tender, while the flavor profile is a balanced marriage of savory, slightly sweet, and umami notes. This is hands down the best version you'll ever make at home. If you’ve ever struggled with soggy or unevenly cooked tots, you’re not alone — and I’ve got the fix. I’ll be honest — I ate half the batch before anyone else got to try it.
What sets this recipe apart isn’t just the final product; it’s the process, the attention to detail, and that one ingredient that flips the entire experience. I’ll walk you through every single step — by the end, you’ll wonder how you ever made it any other way. From selecting the right potatoes to mastering the frying technique, each element is carefully curated to maximize flavor and texture. The result is a crispy, golden exterior that keeps its crunch, a fluffy interior that feels like a cloud, and a flavor that’s so simple yet so satisfying. Ready? Let’s dive in.
You might think the key is just a high heat, but it’s more nuanced than that. It’s about the moisture balance, the flour coating, and a splash of butter that brings everything together. It’s also about timing – when to fold, when to rest, and when to flip. These small but crucial steps are what elevate this recipe from ordinary to unforgettable. And trust me, once you get the hang of it, you’ll never settle for store‑bought tots again.
What Makes This Version Stand Out
- Flavor Depth: The addition of cheddar and a hint of smoked paprika creates a savory richness that’s hard to resist.
- Crispy Texture: The double‑coating method ensures a crunchy shell while keeping the inside tender.
- Simplicity: Every step is straightforward, yet the outcome feels gourmet.
- Time Efficiency: Prep takes only 15 minutes, and cooking is 30 minutes – perfect for a weekday night.
- Make‑Ahead Friendly: You can prep the tots the night before and finish cooking fresh, saving you time.
- Ingredient Quality: Using fresh potatoes and real butter makes the difference between good and great.
- Versatility: The base recipe can be customized with herbs, spices, or cheese blends.
- Crowd Reaction: Friends and family swear by the crispy finish and the melt‑in‑your‑mouth texture.
Inside the Ingredient List
The Flavor Base
Potatoes are the backbone of any tater tot. I use russet potatoes because they’re high in starch, which gives the tots a fluffy interior. If you’re feeling adventurous, try a mix of russet and Yukon Gold for a slightly buttery undertone. The potatoes should be peeled, boiled until just tender, and then mashed to a smooth consistency. Skipping the mashing step will result in uneven texture and a less cohesive shape.
The Texture Crew
Flour, butter, and cheddar are the trio that transforms a plain mash into a crispy masterpiece. The flour adds structure and helps the coating stick, while the butter melts into the coating, creating a mouth‑watering sheen. Cheddar brings umami and a subtle sharpness that elevates the flavor profile. If you’re lactose intolerant, substitute the cheddar with a vegan cheese that melts well, such as a cashew‑based cheddar alternative. Remember, the quality of the butter matters; opt for European‑style butter for a richer taste.
The Unexpected Star
A splash of milk or cream in the mixture keeps the tots moist and adds a velvety texture. The milk also helps the flour bind better, preventing the coating from falling off during frying. If you’re on a low‑fat diet, replace milk with a splash of broth or a dairy‑free milk. This small tweak can make a huge difference in the final product.
The Final Flourish
Seasoning is where the tots truly shine. I use a combination of salt, black pepper, and smoked paprika for a smoky undertone. The pepper adds a mild heat that balances the richness of the butter and cheese. A pinch of garlic powder can be added for an extra layer of flavor. If you’re a fan of herbs, fresh parsley or chives will give the tots a fresh, bright finish.
Everything’s prepped? Good. Let’s get into the real action.
The Method — Step by Step
- Start by peeling and boiling the potatoes until they’re just tender, about 10 minutes. Drain them completely and let them cool slightly. Then mash them with a potato masher until there are no lumps. The mash should be smooth yet still slightly textured – this will help the coating stick.
- In a mixing bowl, combine the mashed potatoes with flour, salt, pepper, smoked paprika, and a splash of milk. Stir until the mixture is uniform. The batter should be thick enough to hold its shape but not dry. If it feels too dry, add a little more milk, a teaspoon at a time.
- Fold in the shredded cheddar and butter. The butter should be at room temperature so it melts smoothly into the mixture. The cheese will add a gooey center and a savory depth that’s hard to replicate with just butter alone.
- Preheat a large skillet over medium‑high heat and add enough oil to coat the bottom. The oil should shimmer but not smoke. Test the heat by flicking a small drop of water into the pan; if it dances, the oil is ready.
- Using a tablespoon, scoop the potato mixture and shape it into small, flat discs about 1.5 inches in diameter. Place them gently in the hot oil, spacing them apart to avoid overcrowding. The first batch will sizzle loudly, a sign that the heat is correct.
- Let the tots cook for 4–5 minutes on one side until they’re golden brown. Flip them carefully with a slotted spoon and cook for another 3–4 minutes. The goal is a crisp exterior and a soft interior. If the tops are browning too fast, lower the heat slightly.
- Once cooked, transfer the tots to a paper towel‑lined plate to drain excess oil. This step is crucial for maintaining crispness; leftover oil will make them soggy.
- Serve immediately, optionally topped with a sprinkle of fresh parsley or a side of marinara sauce for dipping. The contrast between the hot, buttery tots and the cool, tangy sauce is pure bliss.
That’s it — you did it. But hold on, I've got a few more tricks that'll take this to another level.
Insider Tricks for Flawless Results
The Temperature Rule Nobody Follows
Many cooks assume that the higher the heat, the better the crispness. In reality, a steady medium‑high heat (around 350°F to 375°F) gives the tots a golden crust without burning. I’ve tested this on a range of stoves, and consistency is key. If you’re using a gas stove, adjust the flame to maintain a gentle hiss, not a roar.
Why Your Nose Knows Best
The aroma of frying tots is a signal that the oil temperature is right. When you smell the potatoes turning to a golden brown, you know the coating is setting. Trust your nose; it’s a reliable indicator that the tots are cooking evenly.
The 5‑Minute Rest That Changes Everything
After frying, let the tots rest on a wire rack for 5 minutes before serving. This step allows the steam to escape, preventing sogginess. I’ve found that tossing them in a light dusting of powdered sugar or a pinch of sea salt right after the rest adds a delightful crunch.
Double‑Coating Magic
The second coating of flour not only adds crunch but also seals the moisture inside. It creates a protective barrier that keeps the interior fluffy while the outside crisps. If you’re short on flour, a light dusting of cornstarch can work as a substitute, though the texture will be slightly different.
The Butter Boost
Adding butter to the mixture isn’t just for flavor; it lowers the moisture content, which helps the coating adhere better. The butter also gives the tots a glossy finish that looks as good as it tastes. Use unsalted butter so you can control the salt level precisely.
Creative Twists and Variations
This recipe is a playground. Here are some of my favorite ways to switch things up:
Cheesy Jalapeño Tots
Add finely diced jalapeños and a splash of cream cheese to the mixture for a spicy, creamy kick. Perfect for a summer barbecue or a game‑day snack.
Herb‑Infused Tots
Stir in chopped rosemary, thyme, and a dash of lemon zest. The herbs add a fragrant, savory layer that pairs well with a tangy yogurt dip.
Sweet Potato Tots
Replace half the russet potatoes with sweet potatoes for a naturally sweet flavor. Add cinnamon and nutmeg for a cozy, autumnal twist.
Vegan Tots
Use a plant‑based butter, a vegan cheddar alternative, and a splash of oat milk. The result is a crispy, dairy‑free version that still delivers on flavor.
Spiced Mexican Tots
Incorporate cumin, coriander, and a pinch of chipotle powder. Serve with a cilantro‑lime crema for a fiesta of flavors.
Crispy Parmesan Tots
Swap cheddar for grated Parmesan and add a pinch of oregano. The salty, nutty profile is irresistible and pairs well with marinara.
Storing and Bringing It Back to Life
Fridge Storage
Cool the cooked tots completely, then place them in an airtight container. Store in the refrigerator for up to 2 days. When ready to eat, reheat in a skillet over medium heat until crisp.
Freezer Friendly
Arrange the tots on a baking sheet in a single layer, freeze until solid, then transfer to a freezer bag. They’ll keep for up to 3 months. Reheat in a preheated oven at 400°F for 10 minutes.
Best Reheating Method
Add a tiny splash of water before reheating to create steam, which helps restore moisture and crispness. If using a skillet, add a teaspoon of water, cover briefly, then finish cooking to crisp.