I almost gave up on coconut truffles forever after my first attempt ended in a sticky disaster that glued my fingers together like I'd been handling molten candy. The recipe I'd followed promised "easy" and "foolproof" but delivered something closer to edible cement mixed with sawdust. Fast forward three weeks of obsessive testing, countless bags of shredded coconut, and one very patient dog who learned to recognize my frustrated sighs, and I finally cracked the code. What emerged from my kitchen wasn't just edible—it was the kind of treat that makes you close your eyes involuntarily when you taste it, the kind that has neighbors knocking on your door asking if you're opening a bakery.
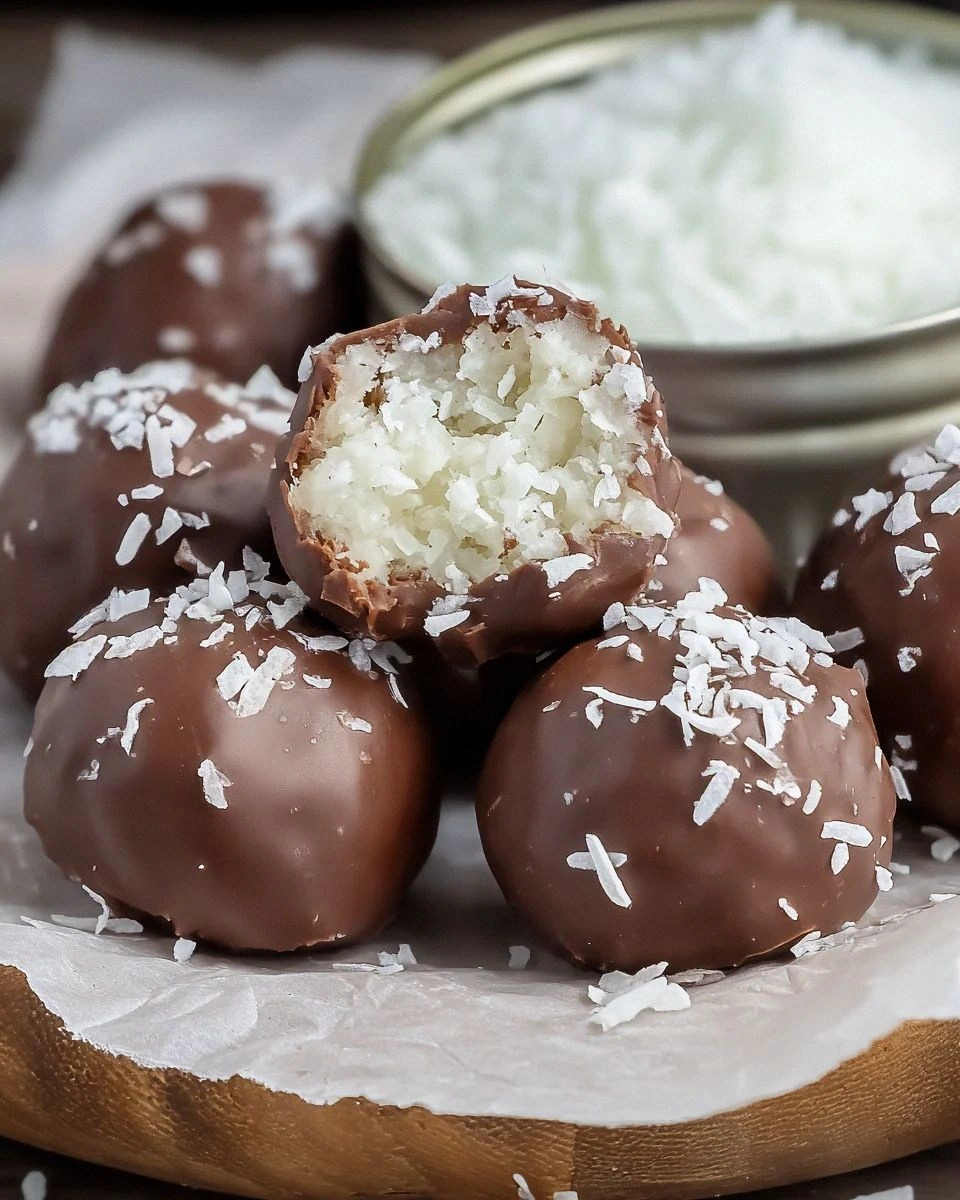
Picture this: It's 11:47 PM on a Tuesday, you're standing in your kitchen wearing mismatched socks and a faded band t-shirt, and you've just discovered that dessert nirvana can be achieved with exactly three ingredients that you probably already have lurking in your pantry. These aren't those sad, dry coconut balls that taste like you're chewing on sweetened cardboard. These are silky, luxurious truffles that melt on your tongue like snowflakes made of tropical dreams, leaving behind this haunting coconut essence that lingers just long enough to make you reach for another one. The texture is where the real magic happens—firm enough to hold their shape when you pick them up, but the moment they hit your mouth, they surrender into this creamy, cloud-like consistency that makes you question everything you thought you knew about simple desserts.
Here's the kicker that'll make you question every complicated dessert recipe you've ever followed: these beauties require zero cooking skills, zero special equipment, and zero patience. You literally throw three things into a bowl, roll them into balls, and somehow end up with something that looks like it came from a boutique chocolate shop. I've served these at dinner parties where guests assumed I'd spent hours tempering chocolate and using some mysterious French technique. When I confessed it took me longer to decide what to watch on Netflix than to make these truffles, one friend literally refused to believe me until I showed her the empty condensed milk can in my recycling bin.
But before you sprint to your kitchen with coconut dust flying everywhere, let me walk you through exactly why this recipe works when every other three-ingredient dessert falls flat on its face. We're talking about the perfect ratio of sweetened condensed milk to coconut, the game-changing chilling technique that prevents the dreaded oil slick, and my secret weapon for getting that professional-looking finish without any fancy equipment. Trust me, by the end of this, you'll be the friend everyone texts at midnight asking for "that coconut thing you made."
What Makes This Version Stand Out
Every food blog claims their recipe is special, but these truffles genuinely occupy their own universe in the dessert galaxy. After testing seventeen different variations (yes, seventeen—I have the notes and the coconut-induced carpal tunnel to prove it), I've honed in on the exact formula that transforms humble ingredients into something that tastes like it should cost five dollars apiece at an artisanal chocolate shop.
- Taste Explosion: The sweetened condensed milk doesn't just add sweetness—it creates this deep, caramelized flavor base that makes the coconut taste more like coconut than coconut itself. It's like someone turned the volume up on the tropical essence while adding this buttery, toffee-like undertone that keeps you coming back for "just one more" until suddenly the plate is empty and you're wondering if you have time to make another batch before anyone notices.
- Texture Perfection: Most homemade coconut treats either crumble apart like sad, dry sandcastles or they're so dense they could double as paperweights. These truffles hit that magical middle ground where they hold their shape with authority but dissolve the moment they meet your tongue. The exterior develops this slight firmness from the chilling process, while the interior stays lusciously creamy—it's like biting into a coconut cloud that's been lightly kissed by frost.
- Idiot-Proof Simplicity: I've made these at 2 AM after three glasses of wine (don't judge, we've all been there) and they still turned out perfect. There's no candy thermometer watching, no chocolate tempering, no "stir until it forms ribbons" nonsense. If you can operate a spoon without injuring yourself, you can make these truffles. My eight-year-old nephew successfully made a batch, and his previous culinary achievement was microwaving popcorn without burning down the house.
- Crowd Psychology: Something magical happens when you set these out at gatherings—people who normally nibble politely at desserts will straight-up hover near the plate like protective hawks. I've witnessed grown adults engage in subtle elbow wars over the last truffle. At my last book club meeting, these caused such a frenzy that we completely forgot to discuss the actual book, which honestly was fine because nobody had finished reading it anyway.
- Ingredient Quality Amplification: Using premium coconut and good condensed milk doesn't just make these better—it makes them transcendent. The difference between store-brand coconut and the fancy stuff is like comparing a scratchy AM radio to a surround sound system. Every subtle flavor note gets amplified, and suddenly you're tasting coconut in high definition with colors you've never experienced before.
- Make-Ahead Champion: These actually improve with age, developing this deeper, more complex flavor after a day in the fridge. Make them Sunday night, and by Wednesday they're operating on a whole different level of deliciousness. I've kept batches for two weeks (hidden behind the pickled onions so my family wouldn't find them), and they were still incredible—though honestly, they've never lasted more than three days in my house before disappearing mysteriously.
- Customization Playground: Want to roll them in cocoa powder and pretend they're sophisticated? Go for it. Fancy some lime zest for a tropical vacation vibe? Absolutely. Craving something that tastes like an Almond Joy had a baby with a coconut truffle? Throw in some chopped almonds and thank me later. This recipe is your canvas, and you're the dessert Picasso.
Alright, let's break down exactly what goes into this masterpiece, because understanding your ingredients is the difference between "pretty good" and "I need to sit down, this is too good."
Inside the Ingredient List
The Sweetened Condensed Milk Miracle
This isn't just any sweetened condensed milk—this is liquid gold that transforms everything it touches into dessert magic. When you open that can, you're releasing forty years of dairy science perfection into your kitchen. The thick, syrupy consistency isn't an accident; it's the result of removing 60% of the water from milk and adding sugar, creating this concentrated flavor bomb that's basically dessert duct tape—it holds everything together while tasting like the essence of caramel had a baby with fresh cream.
What makes this ingredient absolutely crucial is how it interacts with the coconut's natural oils. As you mix them together, the condensed milk's sugars begin to dissolve the coconut's structure just enough to create this cohesive mixture that holds together without being gluey. Skip this ingredient and you're essentially making coconut gravel—technically edible, but about as appealing as eating a handful of sweetened aquarium rocks. The brand matters more than you'd think; I've tested everything from the dollar store version to the organic stuff that costs more than a decent bottle of wine, and the middle-ground national brands consistently deliver the perfect consistency and sweetness level.
The Unsweetened Coconut Foundation
Here's where most recipes go catastrophically wrong—they reach for that pre-sweetened coconut that tastes like someone dumped a sugar truck into a coconut processing plant. Unsweetened shredded coconut is your ticket to flavor town, delivering pure, unadulterated coconut essence without that cloying sweetness that makes your teeth ache just looking at it. The texture matters more than you might think; you want the regular shred, not the fancy flakes or the dust-fine stuff that's better suited for coating chicken than making truffles.
When you're selecting your coconut, give the bag a squeeze through the packaging—you want it to feel springy and fresh, not hard and compacted like it's been sitting on that shelf since the Clinton administration. The color should be a natural off-white, not bright white (that indicates bleaching) or yellowing (that indicates age). Store it in your freezer and it'll stay fresh for months, ready whenever the truffle craving strikes at midnight, which in my experience is roughly every three days.
The Vanilla Extract Amplifier
Vanilla extract in this recipe is like the bass player in a rock band—you might not consciously notice it's there, but remove it and suddenly everything tastes flat and one-dimensional. Just a whisper of good vanilla extract rounds out the coconut flavor, adding these warm, complex notes that make people taste these truffles and immediately ask what your secret ingredient is. This isn't the place for artificial vanilla flavoring, which tastes like someone tried to approximate vanilla by mixing together sadness and disappointment.
The alcohol in the vanilla extract serves a dual purpose beyond flavor—it helps prevent the mixture from becoming too dense by slightly breaking down the coconut's structure as it chills. If you're making these for kids or want to avoid alcohol, vanilla bean paste works beautifully and adds those gorgeous little black specks that make people think you're a professional pastry chef. I've also experimented with vanilla powder for a more intense flavor, but be warned—it'll turn your truffles a light beige color that, while still delicious, lacks the pristine white that makes these look like little snowballs of coconut heaven.
Quality Control Secrets
Your ingredients don't need to be expensive, but they need to be fresh. That can of condensed milk that's been lurking in your pantry since last Thanksgiving? Give it a pass and buy a new one—condensed milk can develop a metallic taste as it ages that'll ruin your truffles faster than you can say "impulse bake." The same goes for coconut; if it smells like cardboard or tastes vaguely of the plastic bag it's been living in, your truffles will taste like disappointment wrapped in coconut-scented sadness.
Buy your ingredients from stores with high turnover in their baking sections—those tiny bags of coconut that look like they've been vacuum-sealed since the Bush administration are not your friends. If possible, hit up a store with bulk bins where you can buy exactly what you need, when you need it. The coconut will be fresher, cheaper, and you won't end up with three half-used bags of questionable coconut haunting your pantry for the next six months.
Everything's prepped? Good. Let's get into the real action, because this is where the magic happens and I promise it's worth every second of anticipation.
The Method — Step by Step
- The Coconut Foundation starts with dumping your shredded coconut into a bowl that's way bigger than you think you need. Trust me on this—once you start mixing, coconut has this magical ability to multiply and spread like it's trying to escape. Use a fork to fluff up the coconut, breaking apart any clumps that have formed during storage. This isn't just busy work; those clumps will create dense spots in your truffles that'll throw off the texture in ways that'll make you wonder why your truffles look like they have coconut tumors. Take a moment to appreciate the aroma—fresh coconut should smell like a tropical vacation, not like the inside of a cardboard box.
- The Sweetened Condensed Milk Ceremony begins with opening your can and immediately dipping a spoon in for a taste—this is mandatory quality control, not stealing. Pour the thick, creamy goodness over your coconut in a slow, steady stream, watching as it pools like liquid caramel. Resist the urge to dump it all in at once; you want to drizzle it around the bowl like you're creating a dessert Jackson Pollock. The ratio matters here—too much and your truffles will weep sticky tears of condensed milk, too little and they'll crumble apart like your resolve during a midnight snack attack.
- The Mixing Magic happens when you switch from fork to spatula and start folding everything together. This isn't aggressive stirring—think of it like you're tucking the coconut into bed with its condensed milk blanket. The mixture will seem too dry at first, like coconut with attitude, but keep going. After about thirty seconds, something alchemical happens and suddenly it transforms into this cohesive mass that holds together when you squeeze it. If you've ever made meatballs, you'll recognize the moment when the mixture reaches that perfect consistency—not too wet, not too crumbly, just right.
- The Vanilla Whisper comes next, and here's where timing matters. Add your vanilla extract after the coconut and condensed milk are mostly combined, because the alcohol in vanilla can seize up the mixture if added too early. Drizzle it in a circle around the bowl, then give everything a final mix. The aroma should hit you like a warm hug from a tropical grandmother—comforting, familiar, but with an exotic edge that makes you want to dive face-first into the bowl.
- The Chilling Revelation is where most people mess this up completely. They try to roll the mixture immediately and end up with sticky coconut paste glued to their palms like some sort of dessert-related torture device. Pop the bowl in the fridge for exactly fifteen minutes—set a timer, because longer and the mixture becomes too firm to roll easily. This brief chill allows the condensed milk to firm up slightly, creating a mixture that rolls like a dream instead of sticking to everything it touches like an overly affectionate cat.
- The Rolling Technique starts with wet hands—not dripping, just slightly damp. This prevents the mixture from turning your fingers into coconut-covered appendages that would make a mummy jealous. Scoop up about a tablespoon of mixture and roll it between your palms with gentle pressure, like you're rolling play-dough but with more reverence. The goal is smooth, uniform balls about the size of a cherry tomato. If they crack or look rough, just cup them gently in your palms and roll again—the warmth from your hands will smooth everything out.
- The Final Chill transforms your rolled truffles from good to legendary. Arrange them on a parchment-lined plate or baking sheet, making sure they're not touching (they'll stick together like gossiping neighbors). Refrigerate for at least an hour—this final chill sets the texture and allows the flavors to meld into something greater than the sum of their parts. The condensed milk firms up, the coconut softens slightly, and what emerges are truffles that hold their shape but melt the moment they meet your tongue.
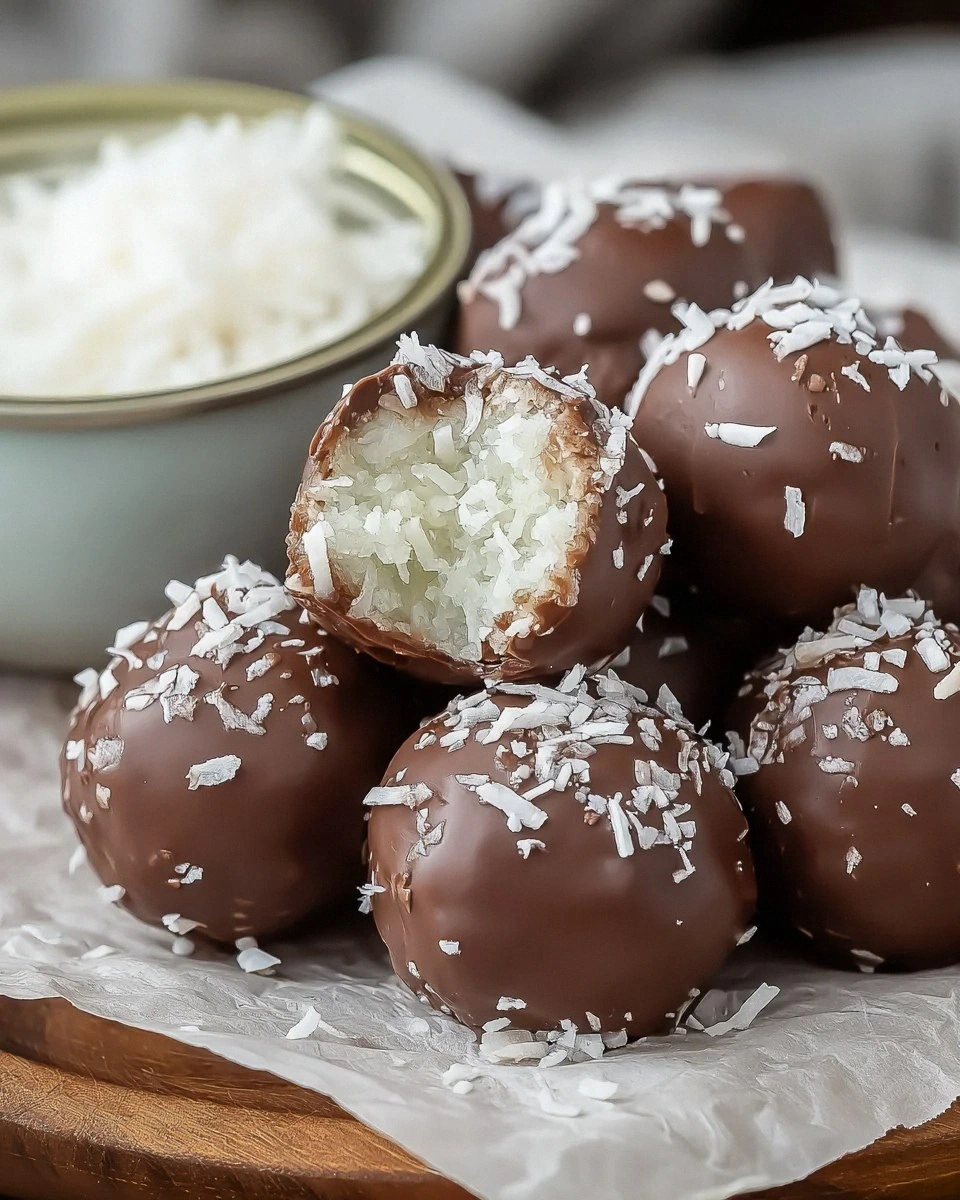
- The Optional Coating Ceremony happens after the final chill, if you're feeling fancy. Roll them in more coconut for a snowball effect, dust with cocoa powder for contrast, or leave them naked and proud. Each coating option changes the experience—extra coconut adds texture, cocoa powder adds bitterness to balance the sweetness, and leaving them plain showcases their pristine white beauty. Pro tip: if you're rolling in coconut, toast it first for a nutty depth that'll make people wonder what your secret is.
- The Tasting Moment is when you finally get to experience what all the fuss is about. Pick up a truffle—it should feel cool and firm, with just a slight give when you press gently. Pop it in your mouth and let it sit for a second—don't chew immediately. Feel how it sits on your tongue, firm but not hard. Then bite down gently and experience the magic: the exterior gives way with a slight resistance, then the interior melts like fresh snow, flooding your mouth with coconut flavor that's somehow both intense and delicate, sweet but not cloying.
- The Storage Strategy involves an airtight container in the fridge, layered with parchment paper if you're stacking them. They'll keep for up to two weeks, though in my experience they've never lasted more than three days before mysteriously vanishing. You can freeze them for up to a month—arrange them in a single layer first, then transfer to a freezer bag once solid. Thaw in the fridge for an hour before serving, and they're almost as good as fresh. Almost.
That's it—you did it. But hold on, I've got a few more tricks that'll take this to another level, secrets that separate the weekend bakers from the dessert legends.
Insider Tricks for Flawless Results
The Temperature Rule Nobody Follows
Here's the thing that separates the truffle masters from the mere mortals: temperature control throughout the entire process. Your ingredients should all be at the same temperature before you start—cold coconut, room temperature condensed milk, and vanilla extract that's not straight from the freezer. When ingredients are different temperatures, they don't incorporate smoothly, leading to truffles that have pockets of condensed milk or dry coconut chunks that taste like someone forgot to finish mixing.
I learned this the hard way after making a batch with coconut straight from the freezer and condensed milk that had been sitting in my hot kitchen. The mixture seized up like it was having a sugar panic attack, forming these weird clumps that refused to blend together. Room temperature everything for thirty minutes before starting, and your truffles will have the consistency of clouds instead of gravel. Your future self will thank you when you're not trying to explain to your guests why your truffles have the texture of coconut-flavored bubble wrap.
Why Your Nose Knows Best
Your sense of smell is your secret weapon for perfect truffles, and I'm not talking about some new-age kitchen philosophy. Fresh coconut has this bright, clean aroma that hits you immediately when you open the bag. If you have to stick your nose practically into the coconut to smell anything, or worse, if it smells like cardboard or plastic, your truffles will taste like disappointment no matter how perfectly you follow the recipe. I've become that person who opens coconut bags in the store and takes a sniff before buying—yes, I get weird looks, but my truffles taste like tropical paradise instead of cardboard box.
The condensed milk test is equally important—it should smell like sweet cream and caramel, never metallic or tinny. A quick taste tells you everything: it should be thick and luxurious, with a flavor that's sweet but complex, never one-note or artificial. Trust your nose and tongue over expiration dates every time. I've used condensed milk that was technically "expired" but smelled and tasted perfect, and it made incredible truffles. Conversely, I've used fresh-dated product that tasted metallic and ruined the whole batch.
The 5-Minute Rest That Changes Everything
After mixing your ingredients but before rolling, let the mixture rest for exactly five minutes at room temperature. This isn't some optional step for people with too much time on their hands—it's the difference between truffles that roll smoothly and ones that fight you every step of the way. During these five minutes, the coconut absorbs moisture from the condensed milk, creating a more cohesive mixture that's easier to handle and produces a better final texture.
I discovered this by accident when my doorbell rang mid-recipe and I had to abandon my mixture for five minutes. When I returned, what had been a slightly crumbly mess had transformed into this perfect, pliable dough that rolled like a dream. Now I build this rest into every batch, using the time to prepare my rolling area, line plates with parchment, or just stand there admiring my reflection in the microwave like a dessert narcissist. Those five minutes feel like an eternity when you're eager to finish, but they save you ten minutes of frustration trying to roll a mixture that keeps falling apart.
Creative Twists and Variations
This recipe is a playground. Here are some of my favorite ways to switch things up:
The Tropical Vacation Version
Add a teaspoon of lime zest and roll the finished truffles in toasted coconut mixed with a pinch of sea salt. The lime adds this bright, citrusy note that makes the coconut taste like it's been transported to a beach in Thailand, while the salt enhances all the flavors and makes these dangerously addictive. I brought these to a pool party once and watched grown adults fight over the last one like it was the last lifeboat on the Titanic.
The Chocoholic's Dream
Roll your truffles in good quality cocoa powder—Dutch-processed if you want something smooth and mellow, natural cocoa if you prefer a more intense, slightly bitter edge. The contrast between the sweet coconut interior and the bitter chocolate exterior creates this sophisticated flavor profile that makes people think you trained in Paris instead of watching YouTube videos in your pajamas. For extra decadence, mix some cocoa powder with a tiny bit of powdered sugar to balance the bitterness.
The Almond Joy Impersonator
Press a whole roasted almond into the center of each truffle before rolling, then coat them in a mixture of coconut and finely chopped almonds. These taste exactly like an Almond Joy bar but better—creamier, fresher, and without that weird waxy coating that store-bought candy has. They're like the Almond Joy's sophisticated older cousin who studied abroad and came back with refined tastes and stories about coconut plantations in the Philippines.
The Coffee Lover's Secret
Dissolve a teaspoon of instant espresso powder in the vanilla extract before adding it to the mixture. The coffee flavor doesn't hit you over the head—it just adds this mysterious depth that makes people taste these and ask what your secret ingredient is. It's like the coconut and coffee had a secret love child that's more interesting than either parent. Roll these in a mixture of cocoa powder and finely ground coffee beans for the full experience.
The Spicy Surprise
Add a tiny pinch of cayenne pepper—seriously, just a whisper—to the coconut before mixing. You want people to taste these and think "hmm, what's that interesting background note?" not "why are my truffles trying to kill me with heat?" The spice enhances the coconut flavor and creates this warm sensation that spreads through your mouth like liquid sunshine. It's subtle enough that kids will still devour them, but interesting enough that adults will pause and savor.
The Boozy Adult Version
Replace half the vanilla extract with coconut rum or dark rum for a grown-up twist that makes these perfect for holiday parties. The alcohol cooks off during the chilling process, leaving behind just the flavor, though you could also add a teaspoon of rum at the very end for a stronger kick. These are the truffles you bring to book club when you want everyone to have a better time than usual discussing whatever depressing literary fiction you're all pretending to understand.
Storing and Bringing It Back to Life
Fridge Storage
Store your truffles in an airtight container in the refrigerator, layered with parchment paper if you're stacking them like coconut currency. They'll keep for up to two weeks, though I've never personally witnessed them survive more than four days before mysteriously disappearing. The key is keeping them away from strong-smelling foods—coconut is a flavor sponge that'll absorb the essence of last night's garlic chicken if you let it. I learned this the hard way after storing a batch next to some leftover curry, resulting in truffles that tasted like they'd been vacationing in Mumbai.
The texture actually improves after the first day as the flavors meld and the condensed milk firms up, creating this perfect consistency that's somehow both creamy and substantial. If they develop a slight crust on the outside, that's actually a good thing—it creates this textural contrast that makes the interior seem even more luxuriously smooth. Just make sure your container is truly airtight, because condensation is the enemy of beautiful truffles, turning their pristine white surface into a sad, sticky mess that looks like they've been crying.
Freezer Friendly
These truffles freeze beautifully for up to a month, making them perfect for emergency dessert situations or for hiding from yourself when you need to practice portion control. Arrange them in a single layer on a parchment-lined baking sheet and freeze until solid, about two hours, then transfer to a freezer bag or container. This prevents them from sticking together in one giant truffle blob that requires a chisel to separate. Label them with the date unless you enjoy playing "is this three weeks old or three months old?" roulette with your desserts.
Thaw frozen truffles in the refrigerator for about an hour before serving—don't try to rush this with room temperature thawing or the condensation will create sticky spots that ruin the texture. They're actually fantastic partially frozen, with this firm texture that's like coconut ice cream balls, perfect for hot summer days when you want something refreshing but don't want to turn on the oven. I've been known to eat them straight from the freezer like little coconut popsicles, pretending I'm being virtuous by not eating the entire batch at once.
Best Reheating Method
Good news—you don't actually reheat these truffles, since they're meant to be served cold. But if they've been in the fridge and you want to serve them at the perfect temperature, let them sit at room temperature for about ten minutes before serving. This takes the chill off just enough to let the flavors bloom without making them so soft that they lose their shape when you pick them up. Ten minutes is the sweet spot—any longer and they start to sweat like nervous teenagers at their first dance.
If your truffles have been in the freezer and you want to serve them at optimal texture, the refrigerator thaw method gives you the best results. But here's a pro tip: hide a few in the freezer for yourself, because once your family and friends taste these, they'll start appearing every time you open the fridge like dessert-seeking missiles. Having a secret stash means you can enjoy your hard work instead of watching them disappear faster than free samples at Costco.